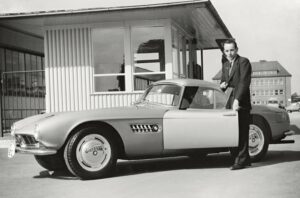
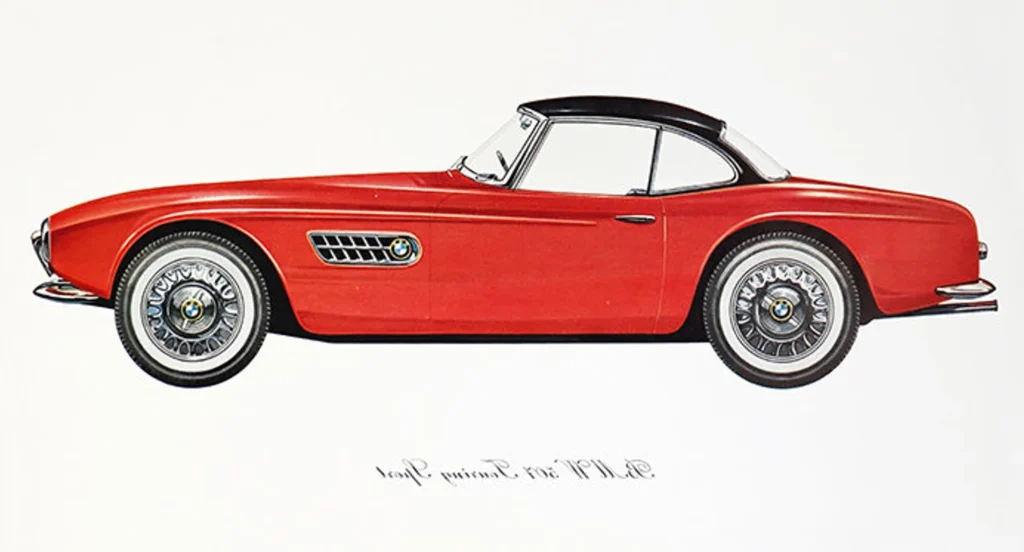
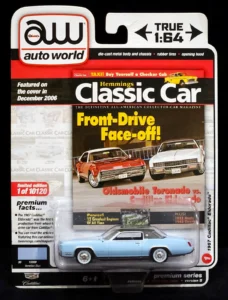
第1回:GFCC社製、1/64 BMW 507 ハードトップ, 【1958当時、販促カタログのイラストを完全再現⁈】
#本プロジェクトのゴール:
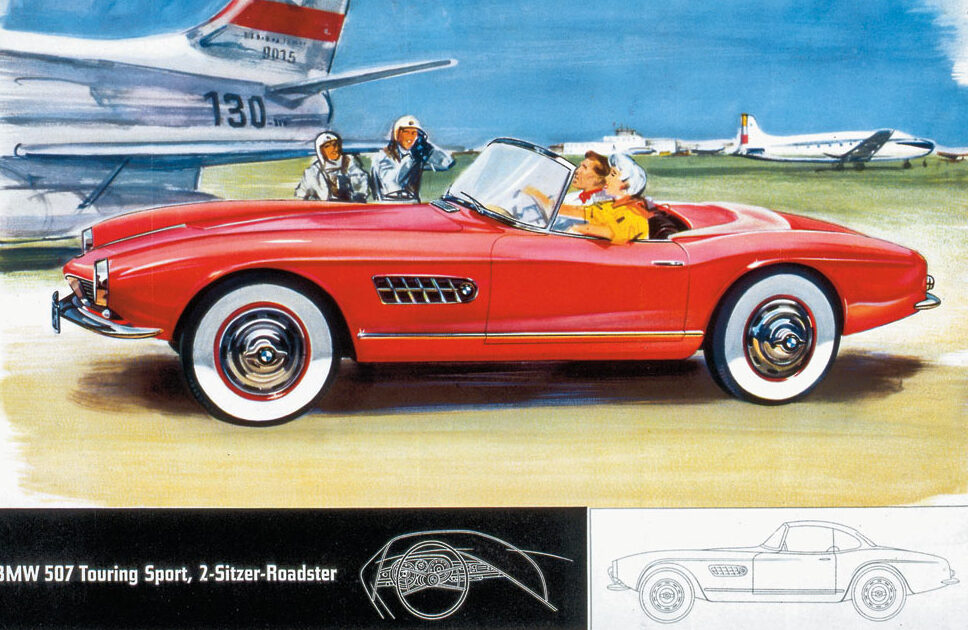
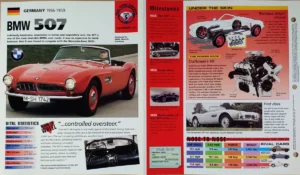
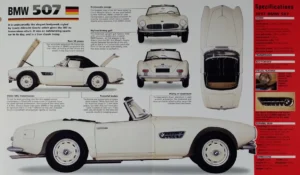
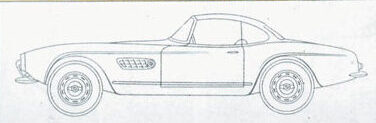
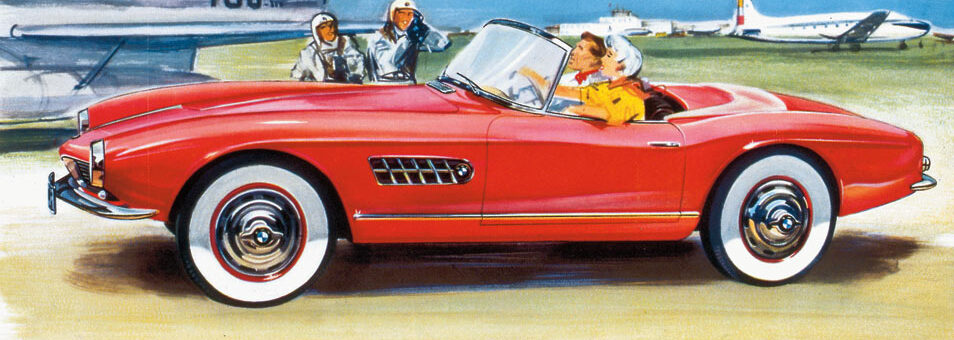
販促カタログの表紙のイラスト+サイドビューです:
#ミニカーの改造記事、始めます!
直前の記事、
【好きな自動車写真館ーーー2025年12月現在のベスト10ショット】にて、
見事3位に入賞しました、
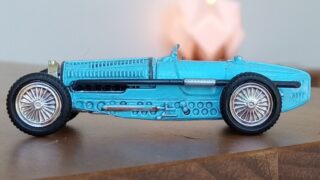
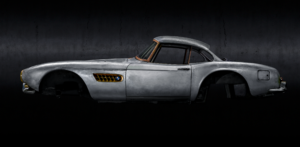
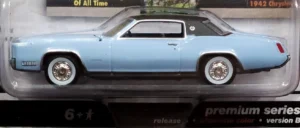
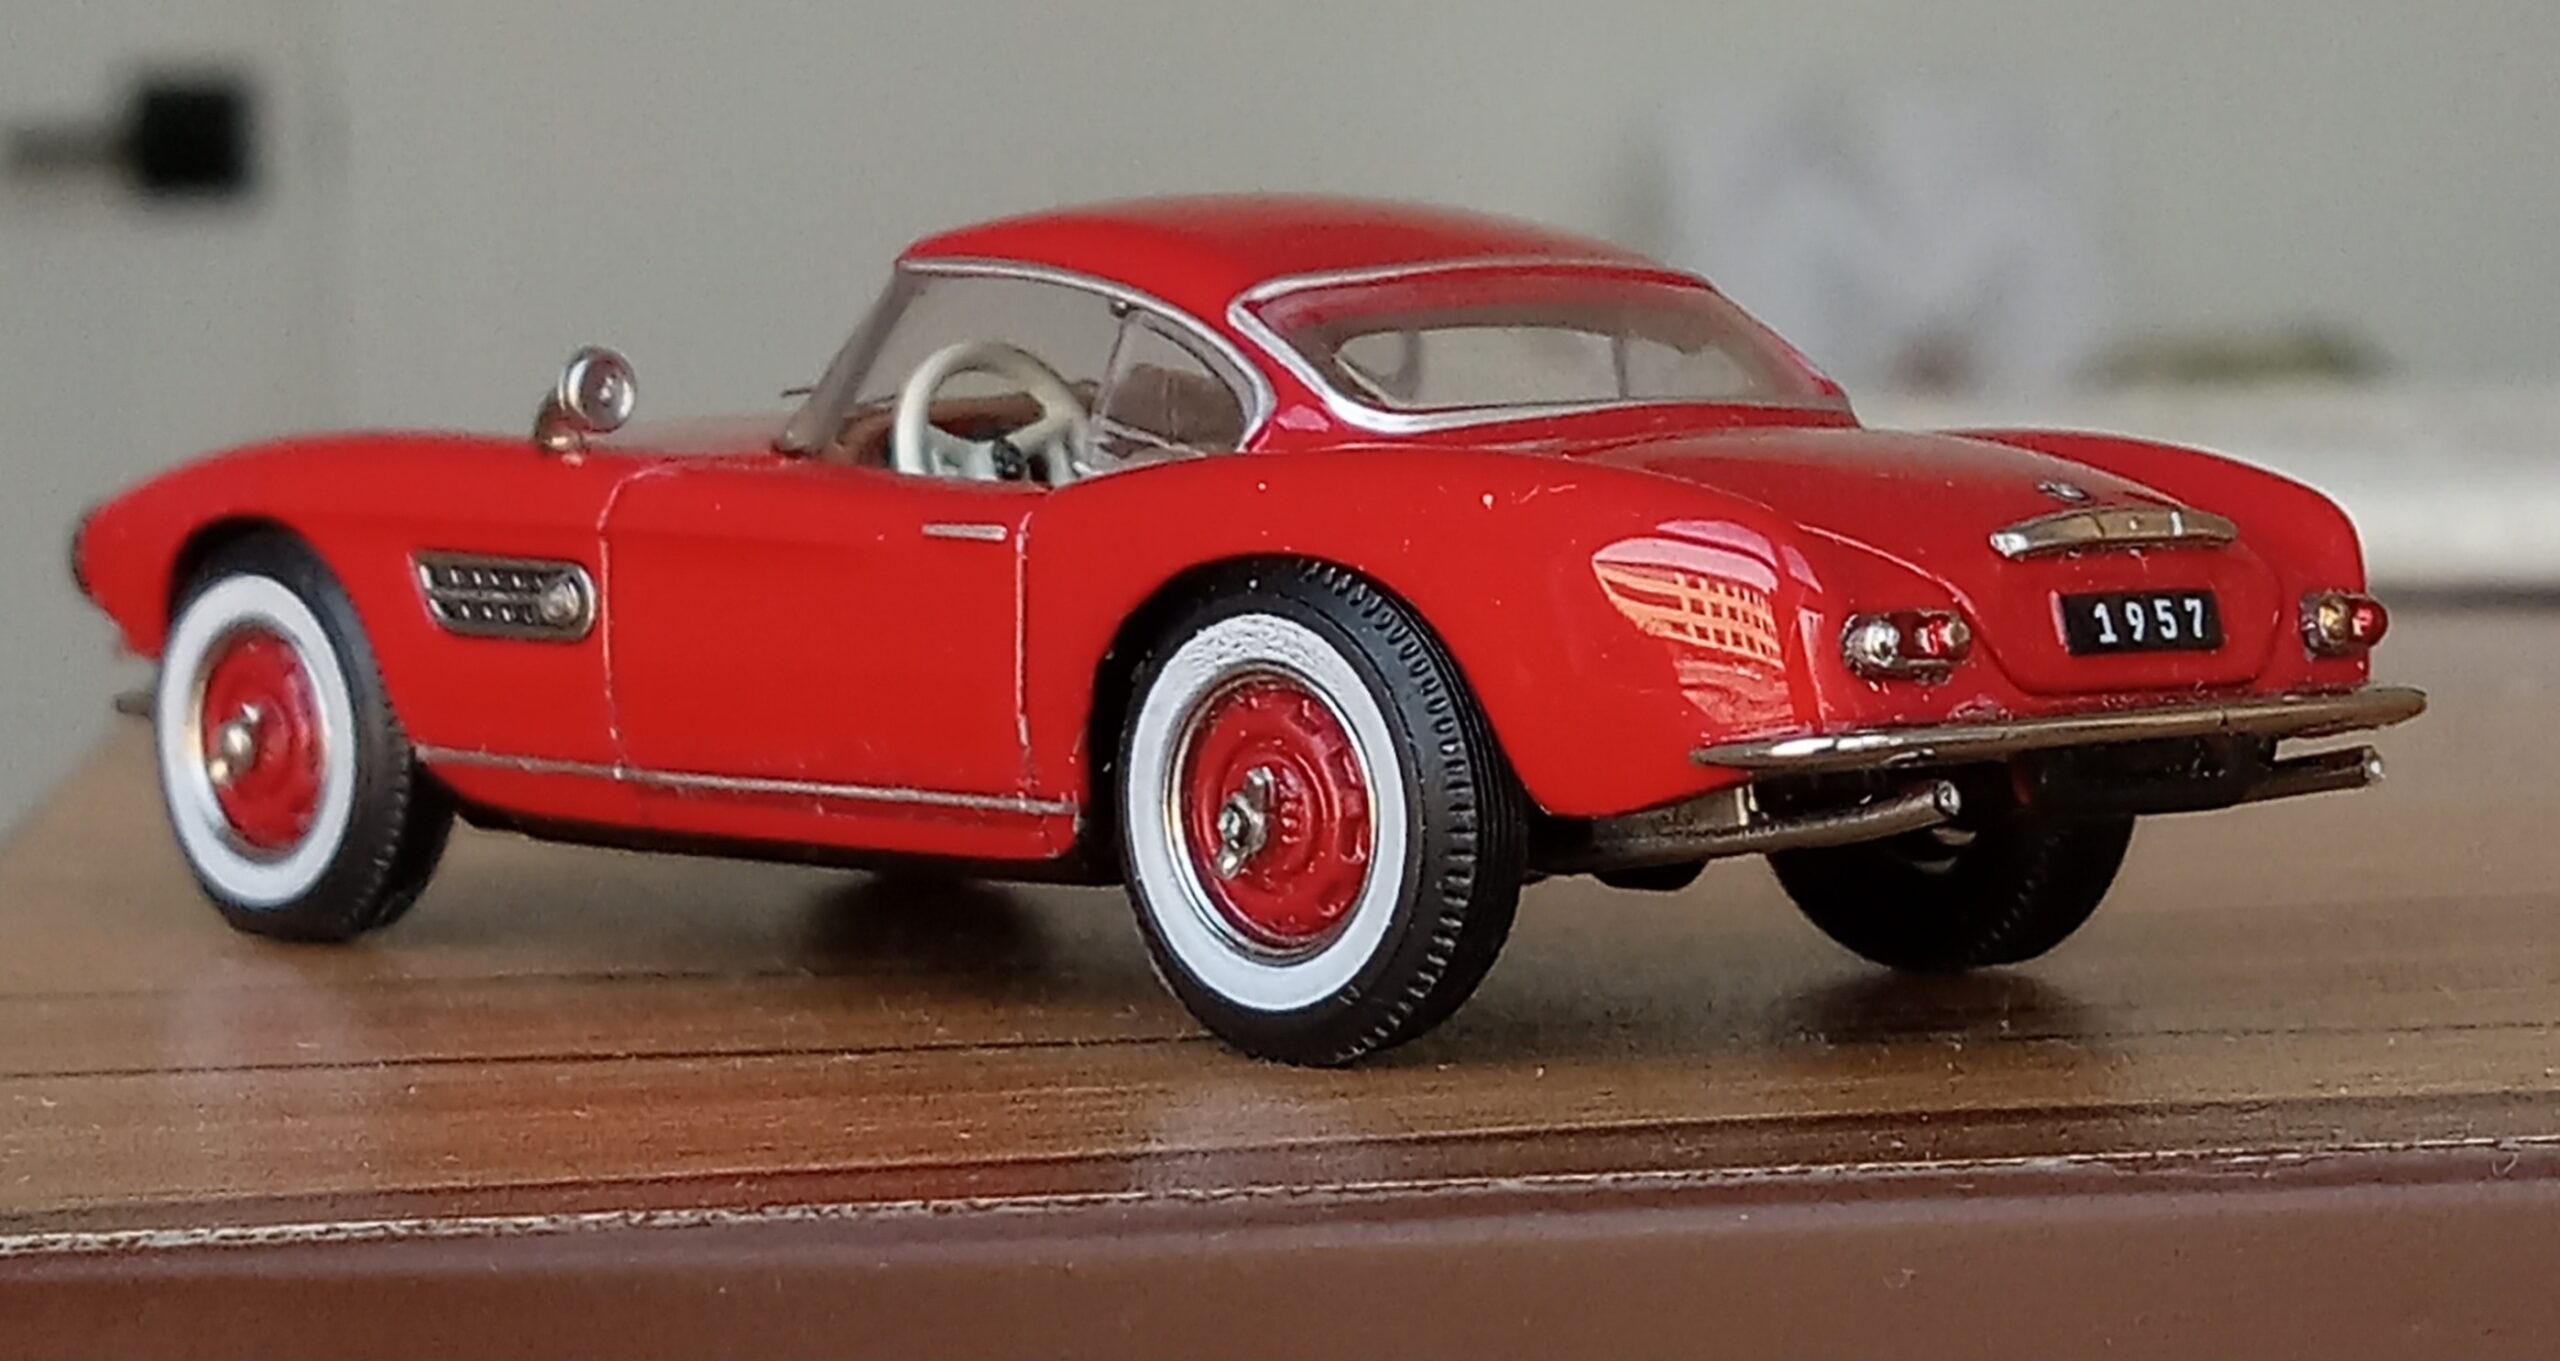
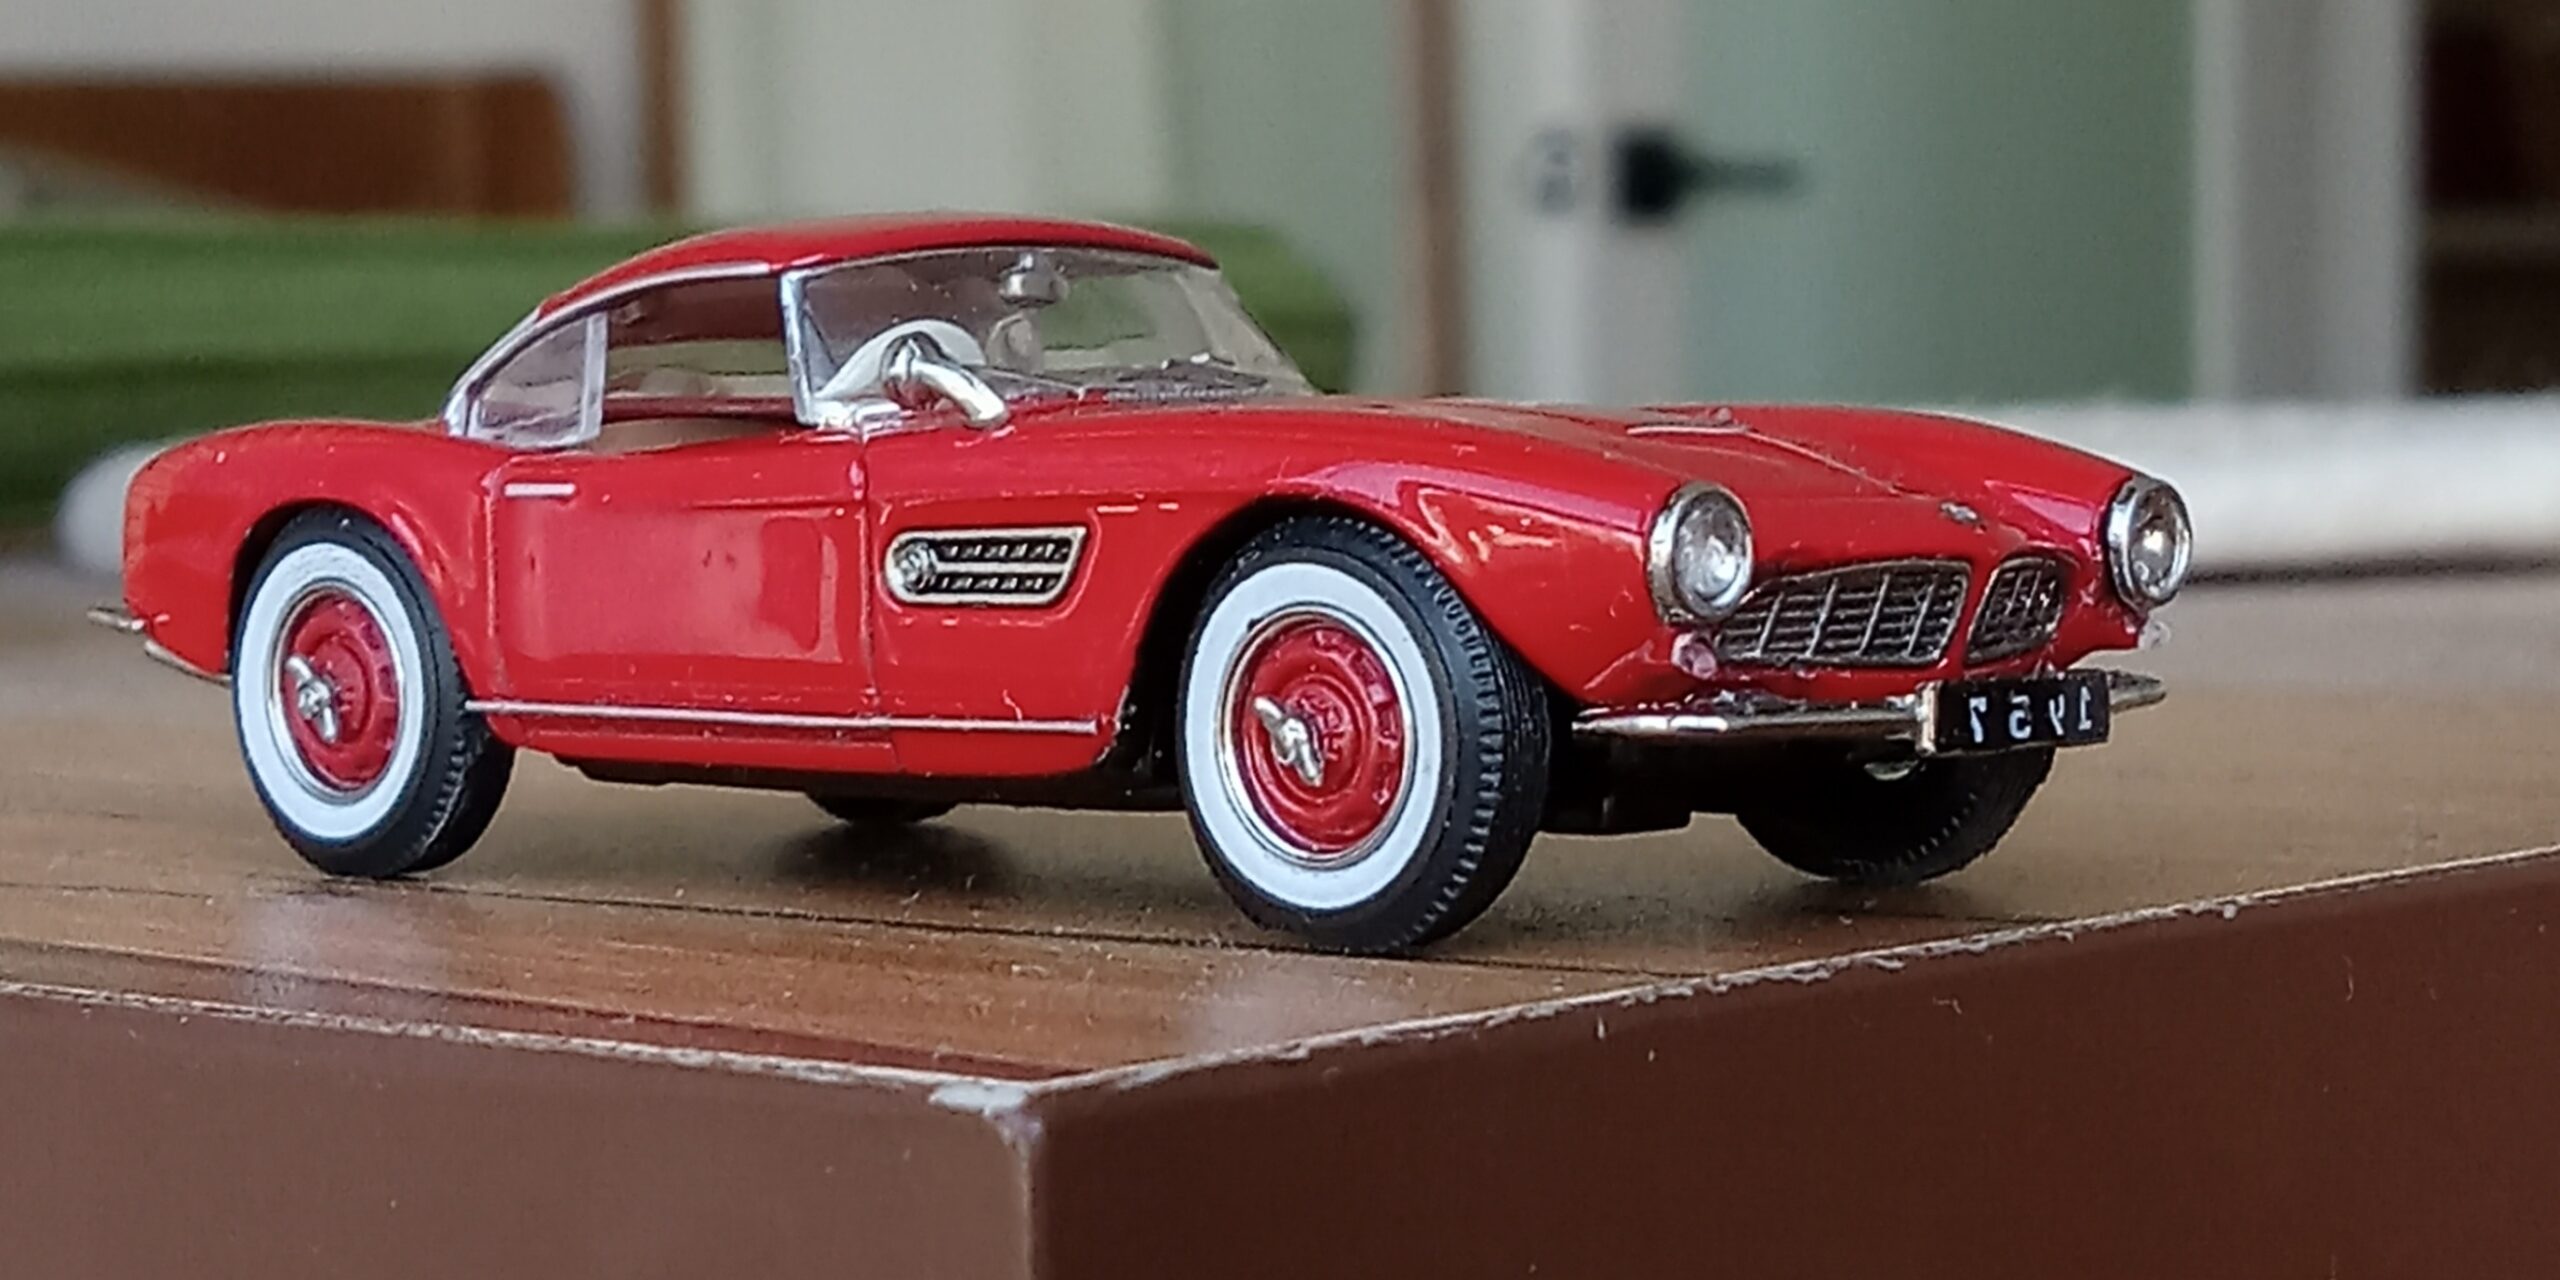
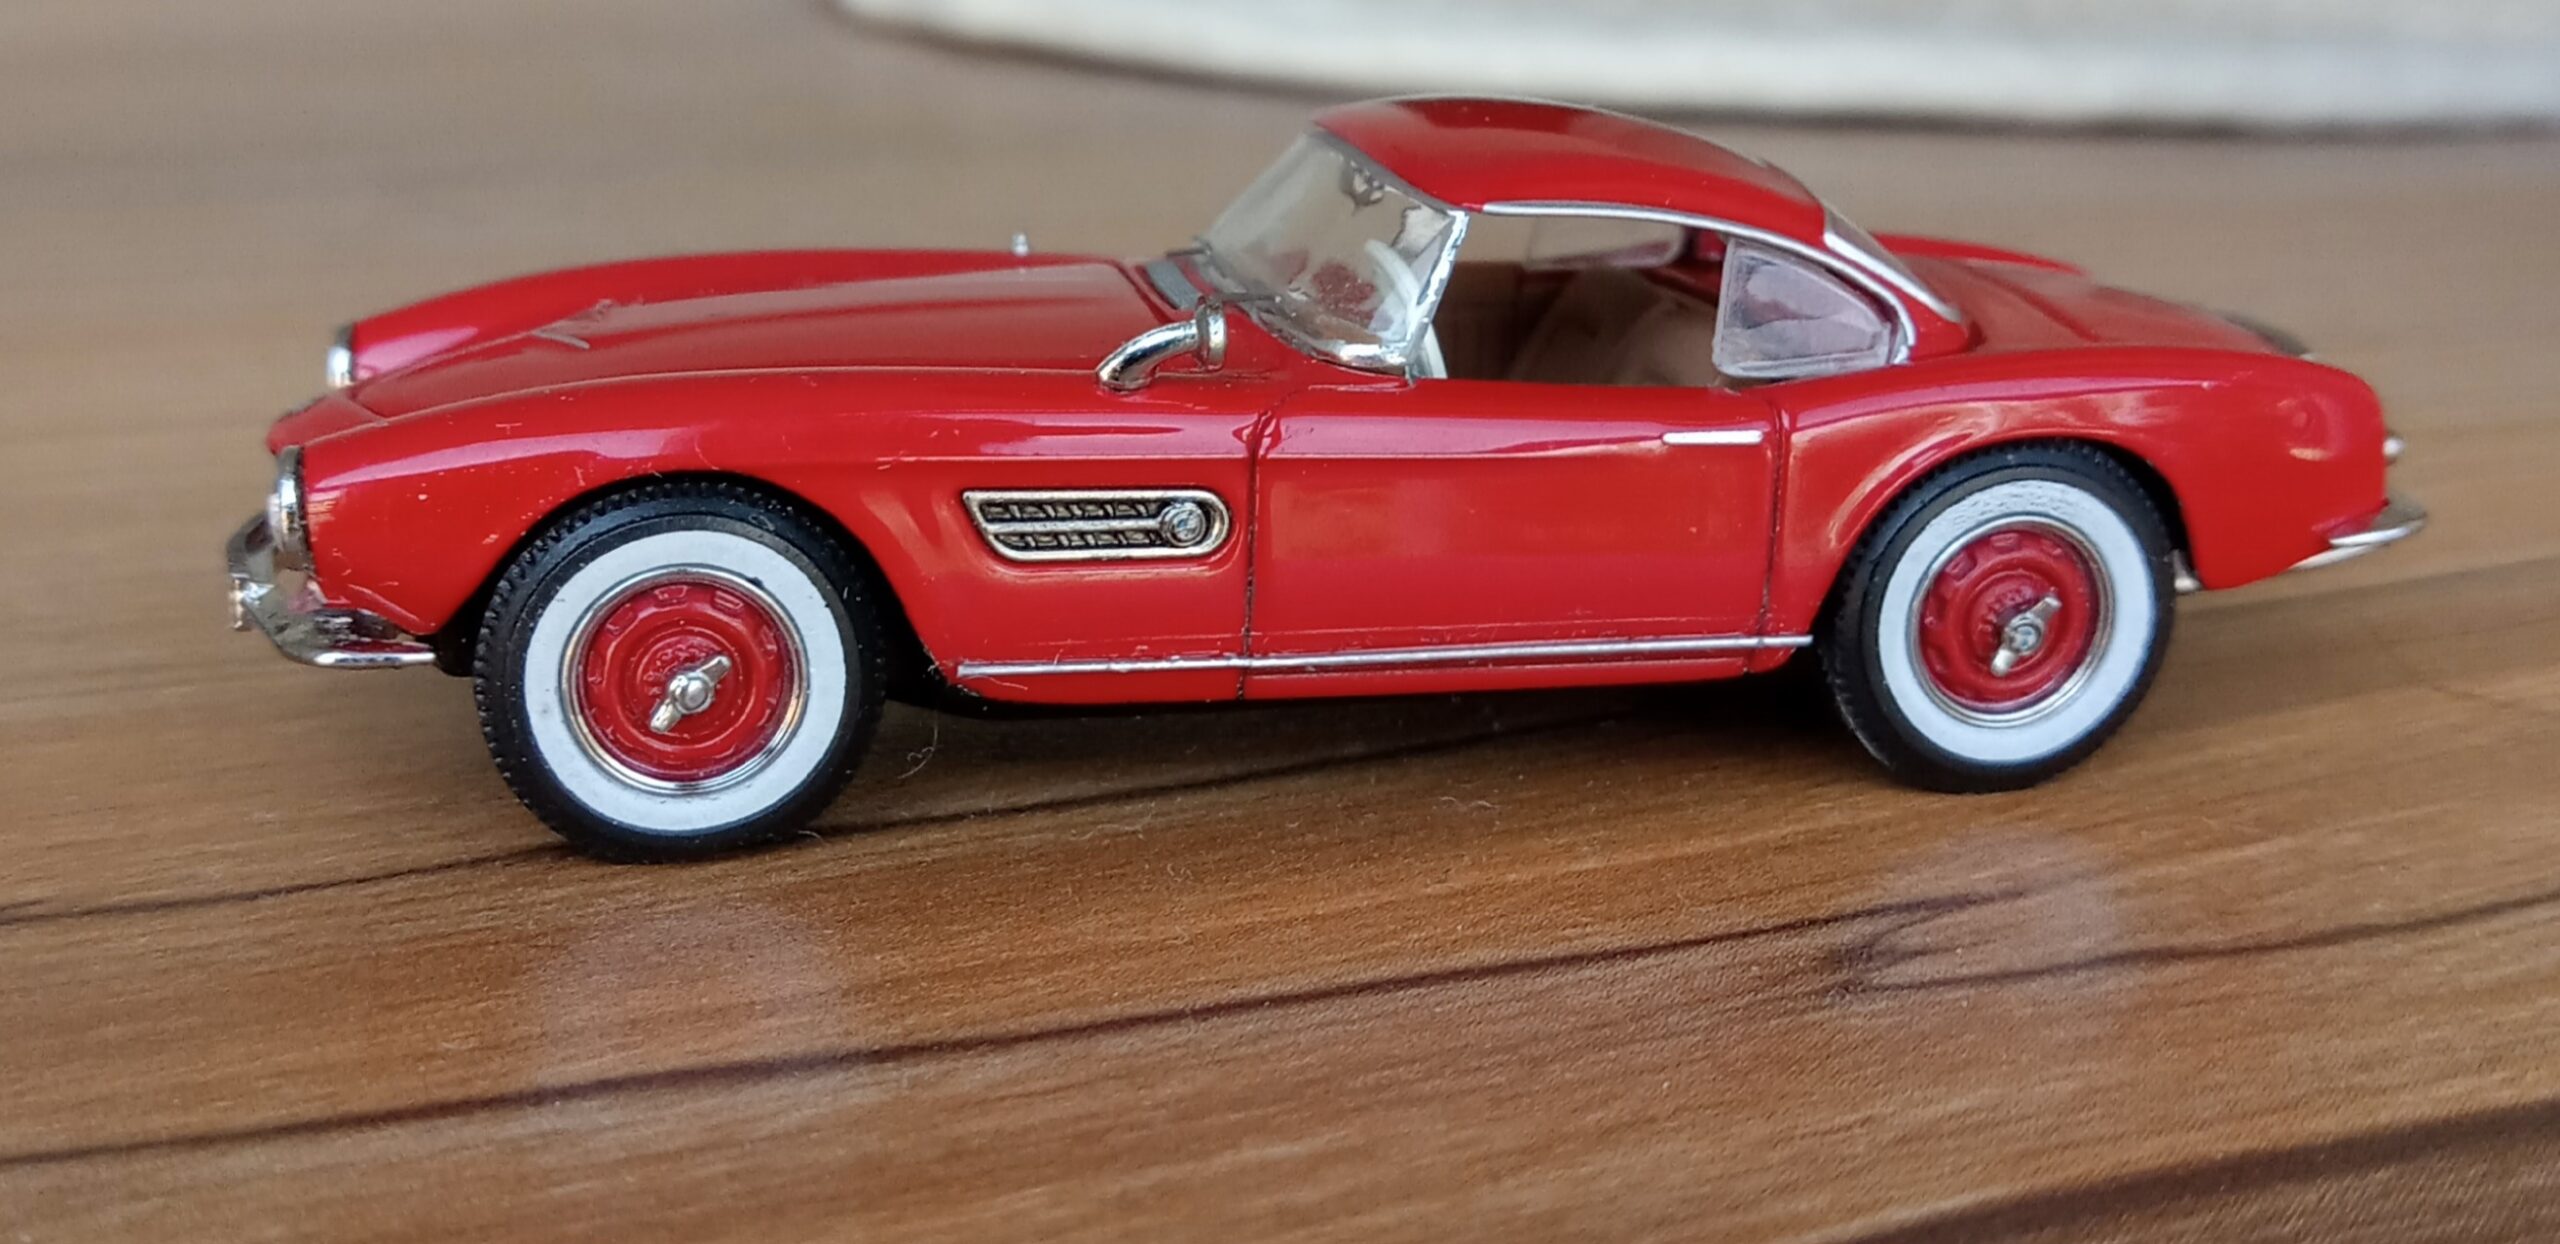
GFCC社製、1/64 BMW 507 ハード・トップ版【アンティーク・レッド】
ですが、
その記事の中で写真を撮影中に、
25年前から私の心にちらつく1957年当時の販促カタログ掲載のイラストが脳裏に浮かんで離れません、、、、
素晴らしいこの、GFCC製の1/64の507を
販促イラストに近づけたいという思いがムクムクと持ち上がり、
色々改造し始めたところ、
次々要改良点が見つかり、
収拾がつかなくなってしまいました。
その為、
急遽、前から温めていました、
ミニカーの改造記事 Vol.001を始めることになりました。嬉
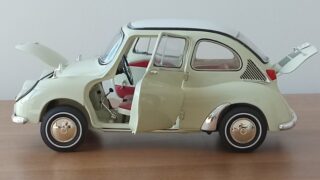
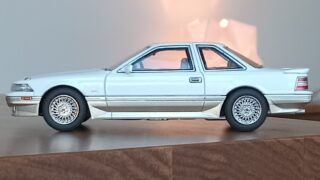
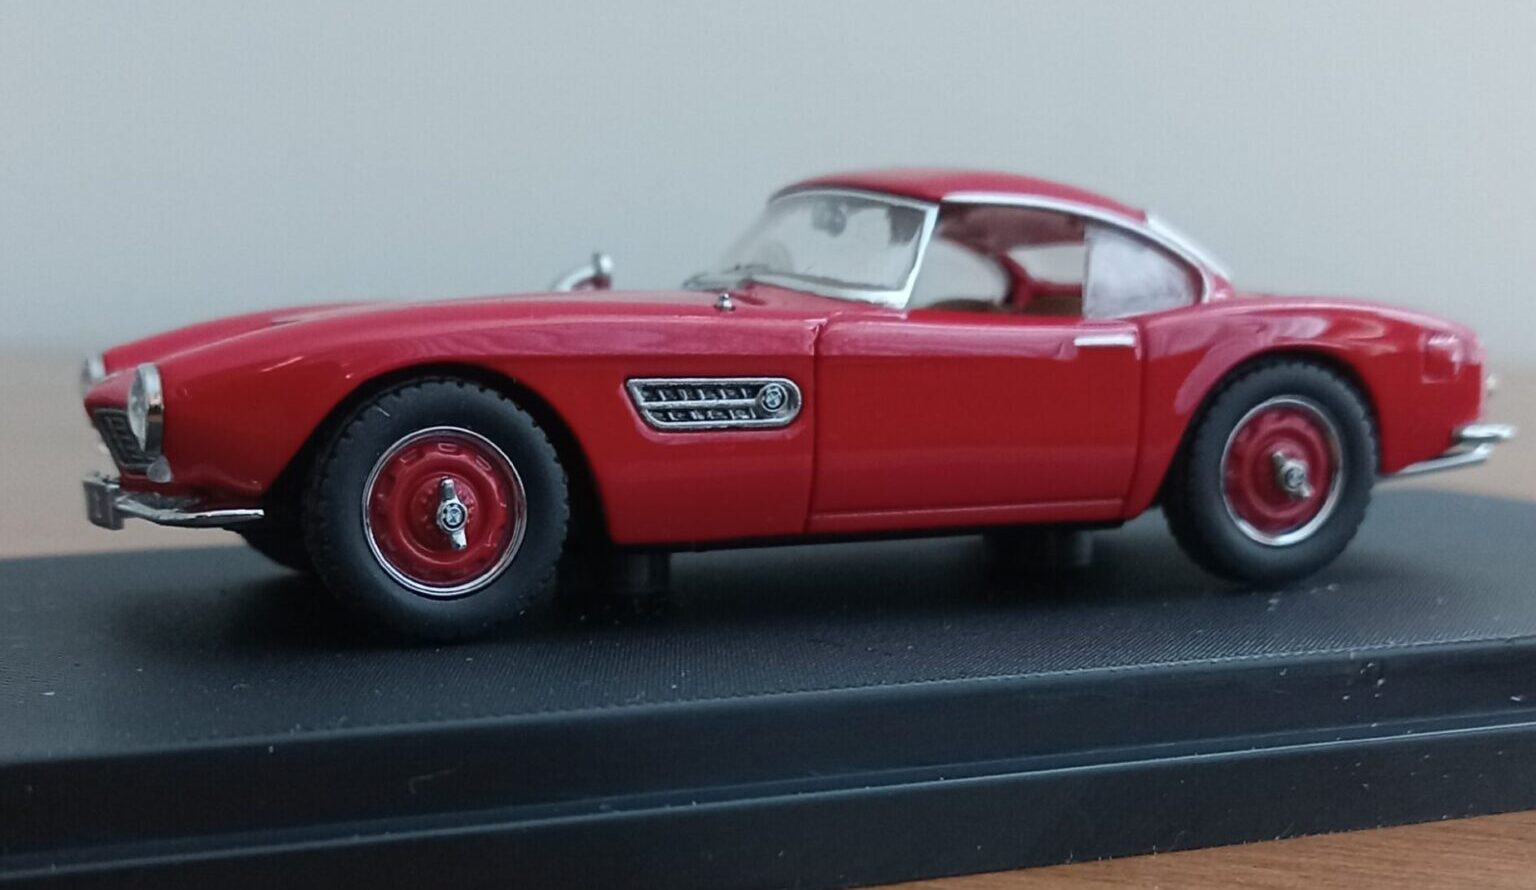
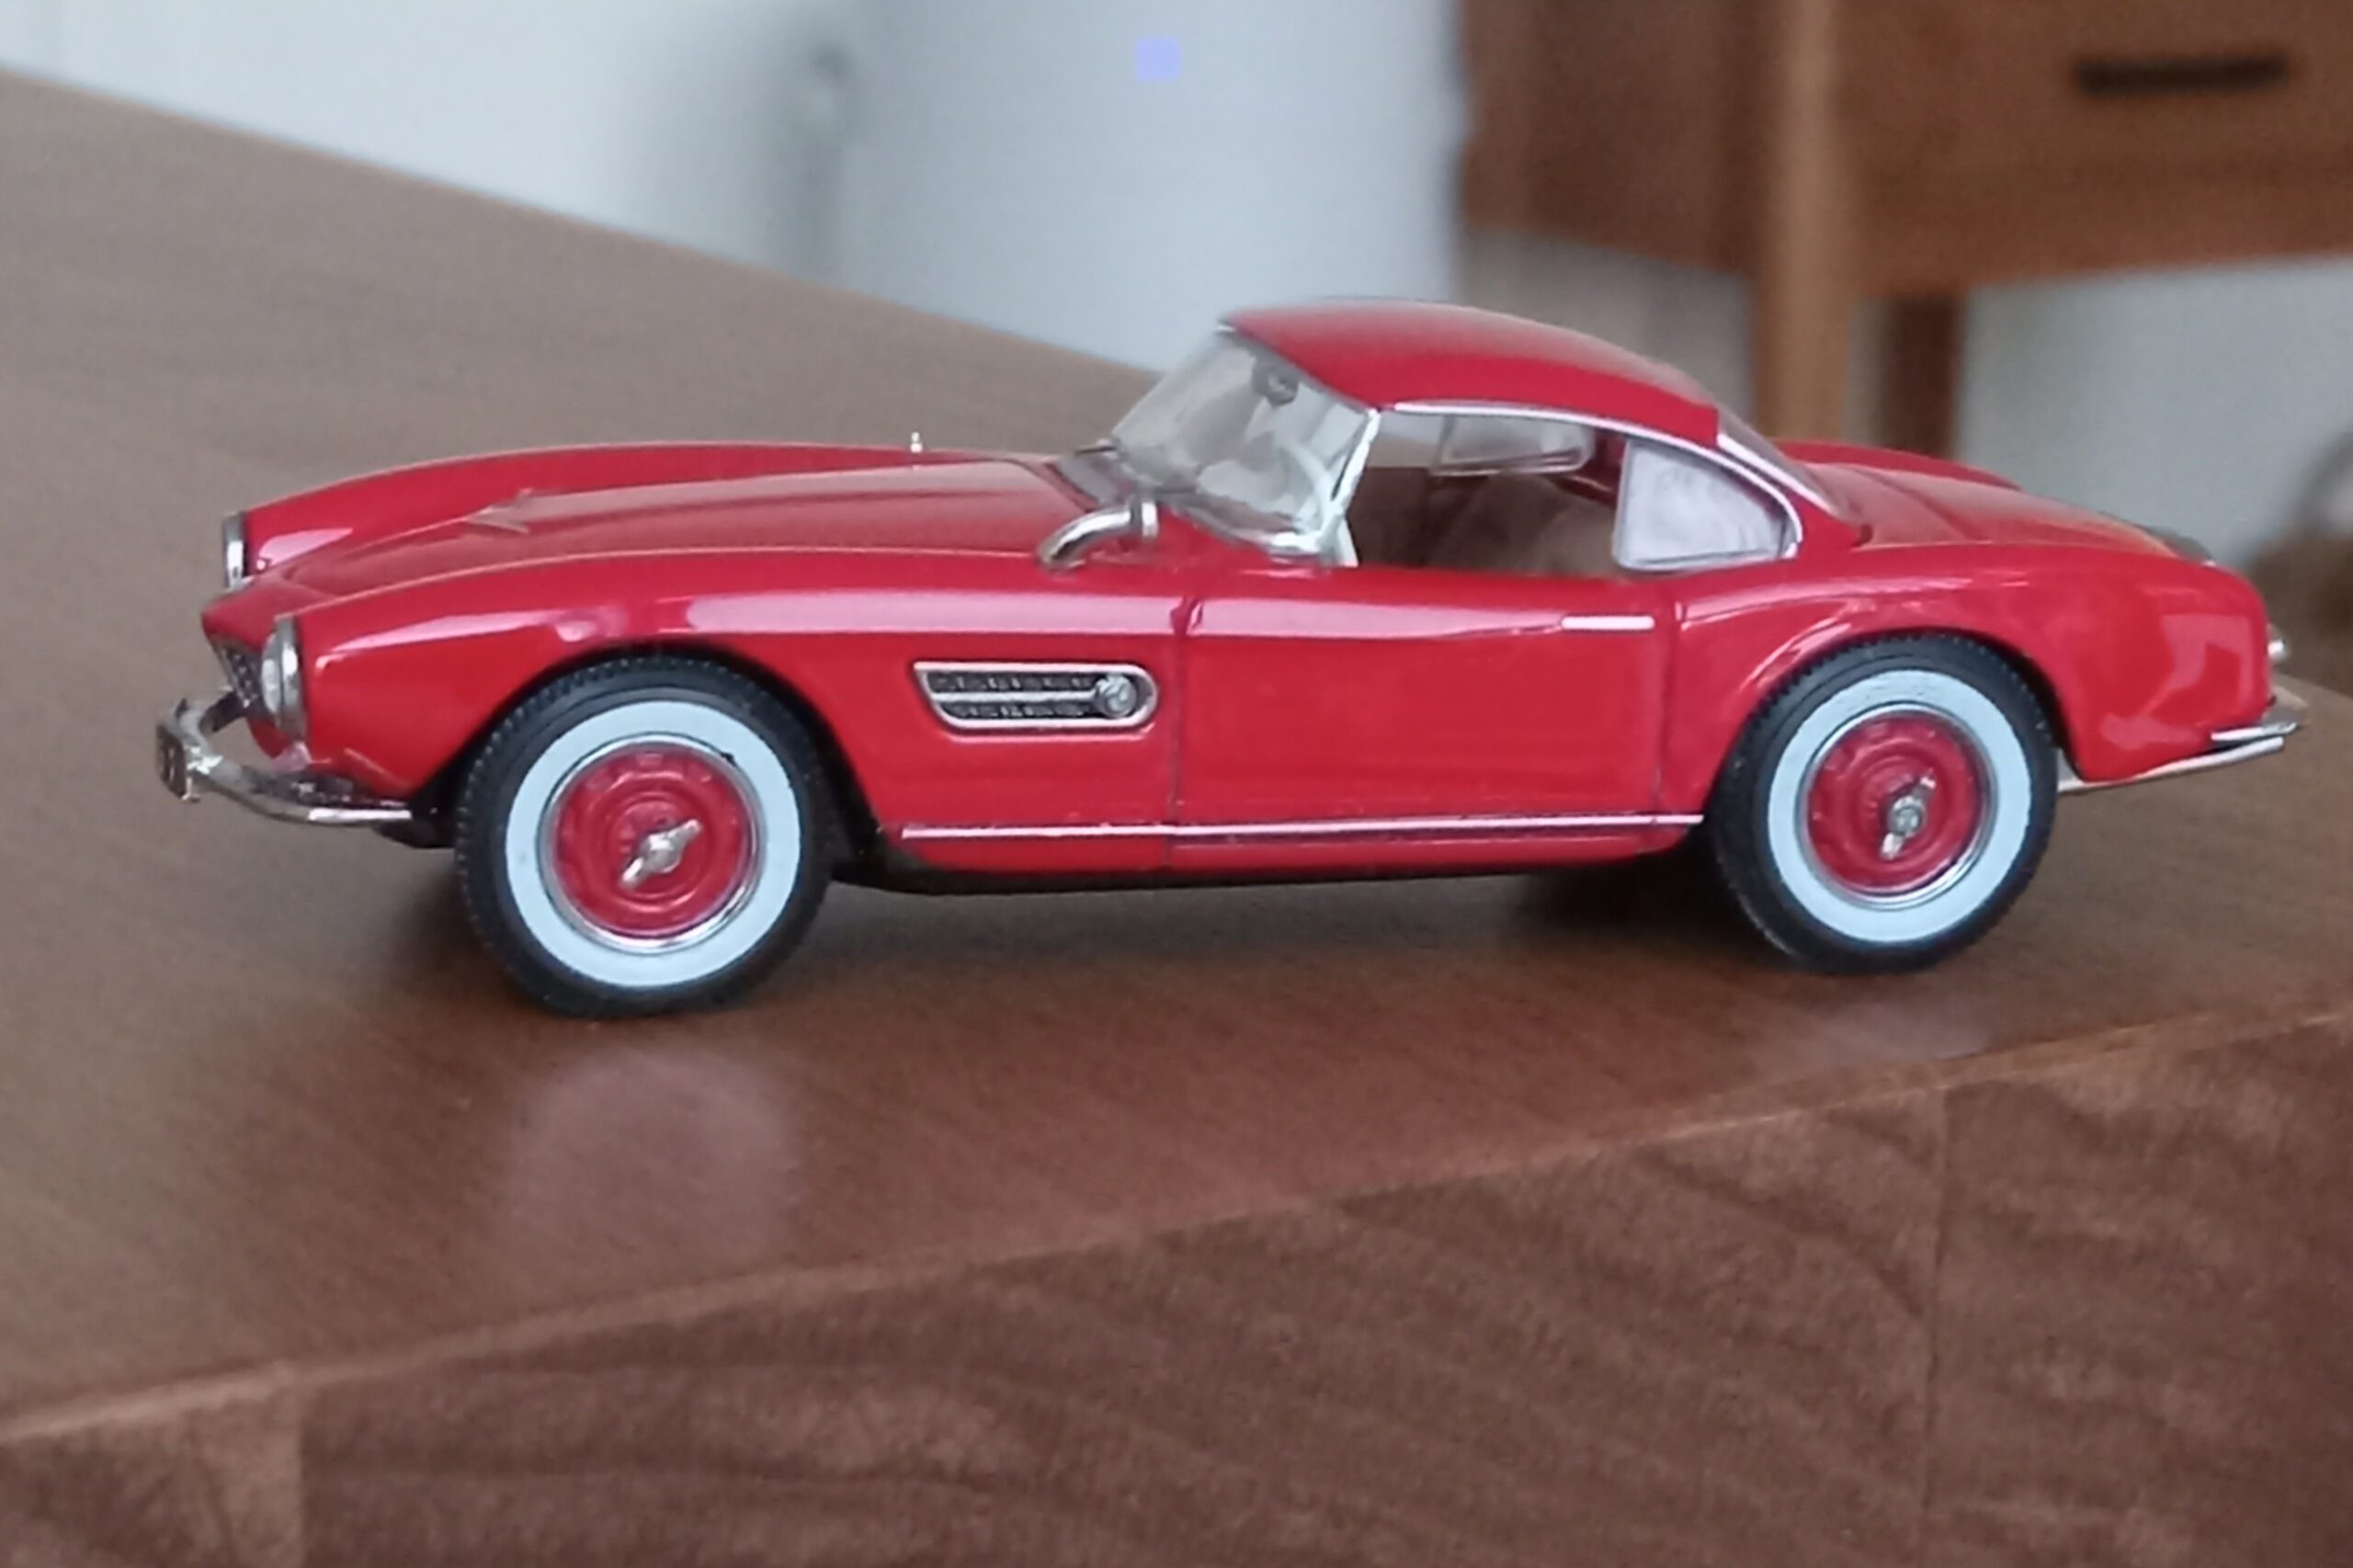
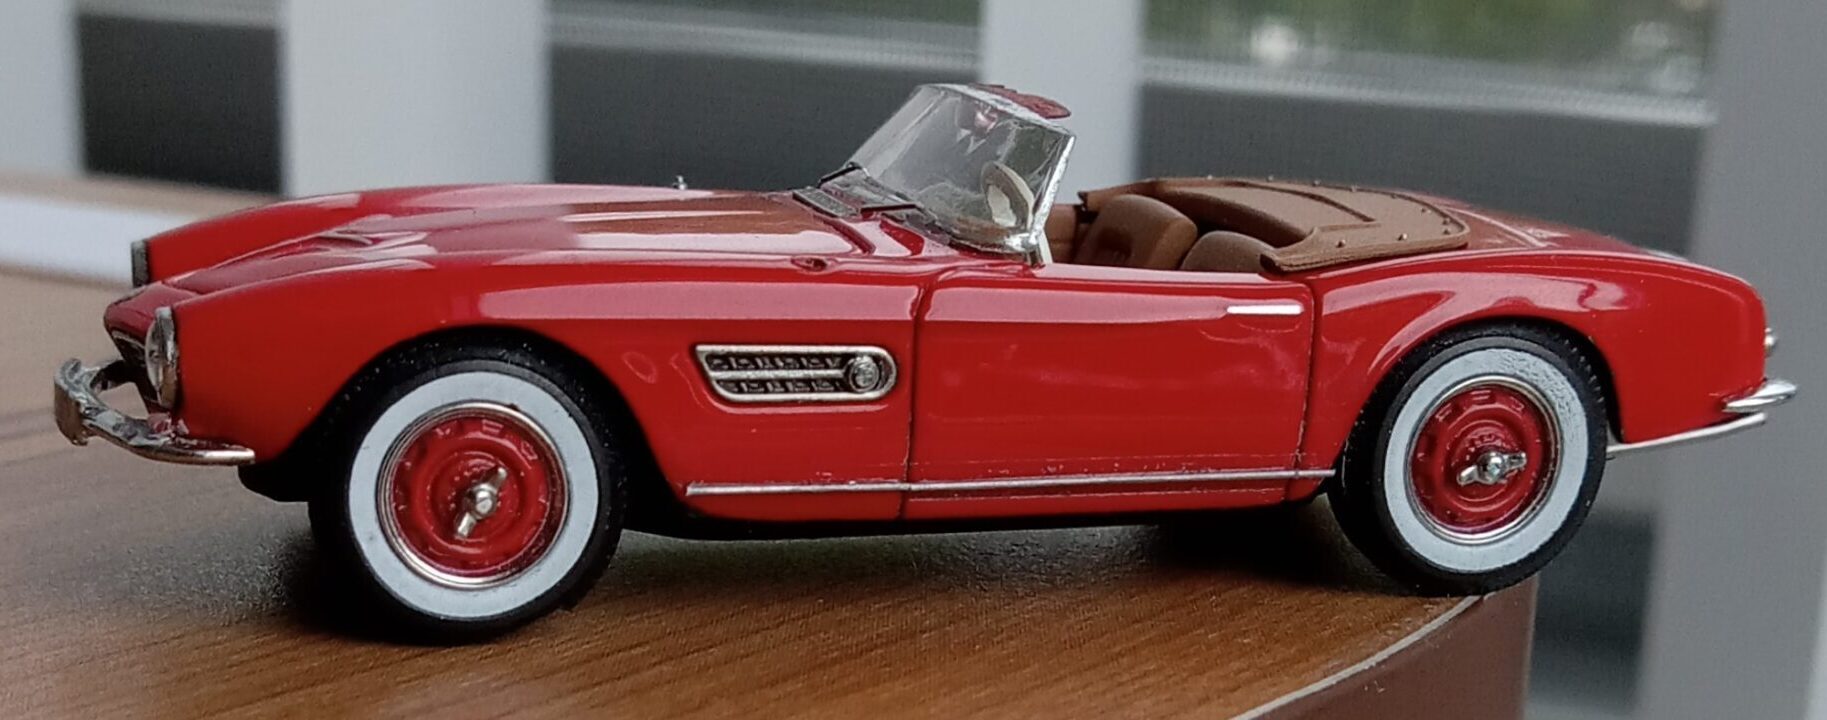
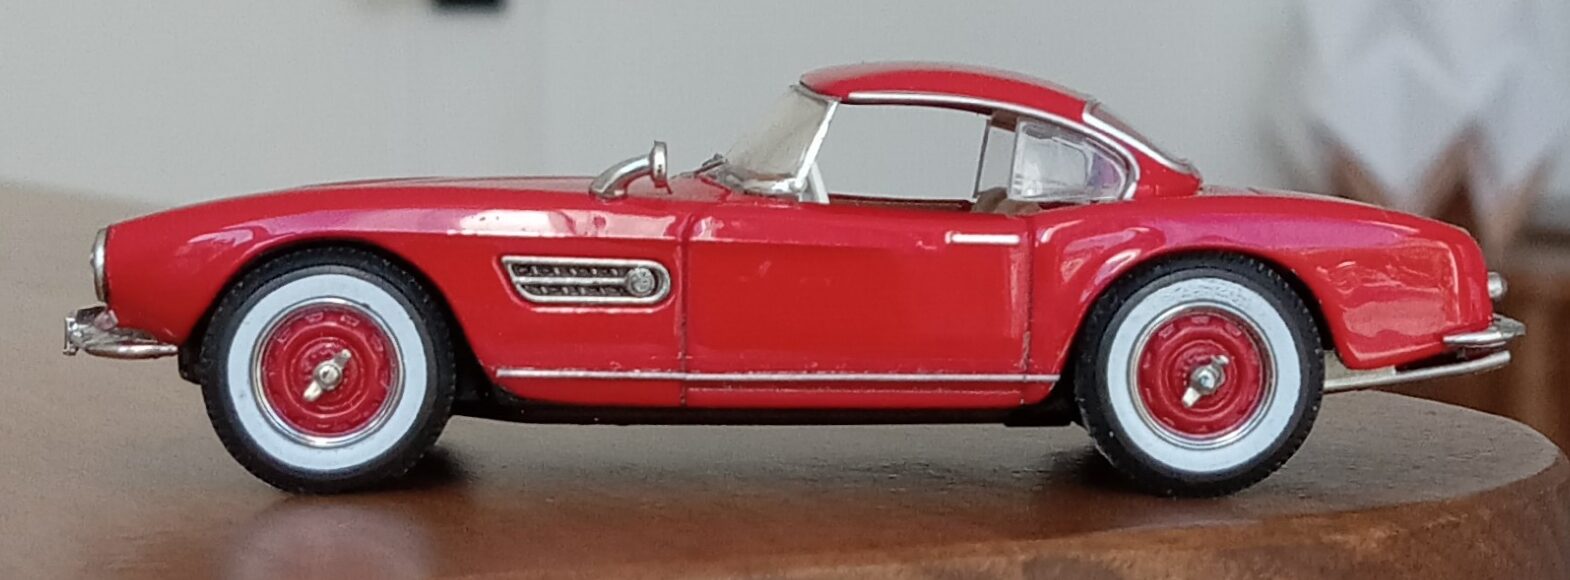
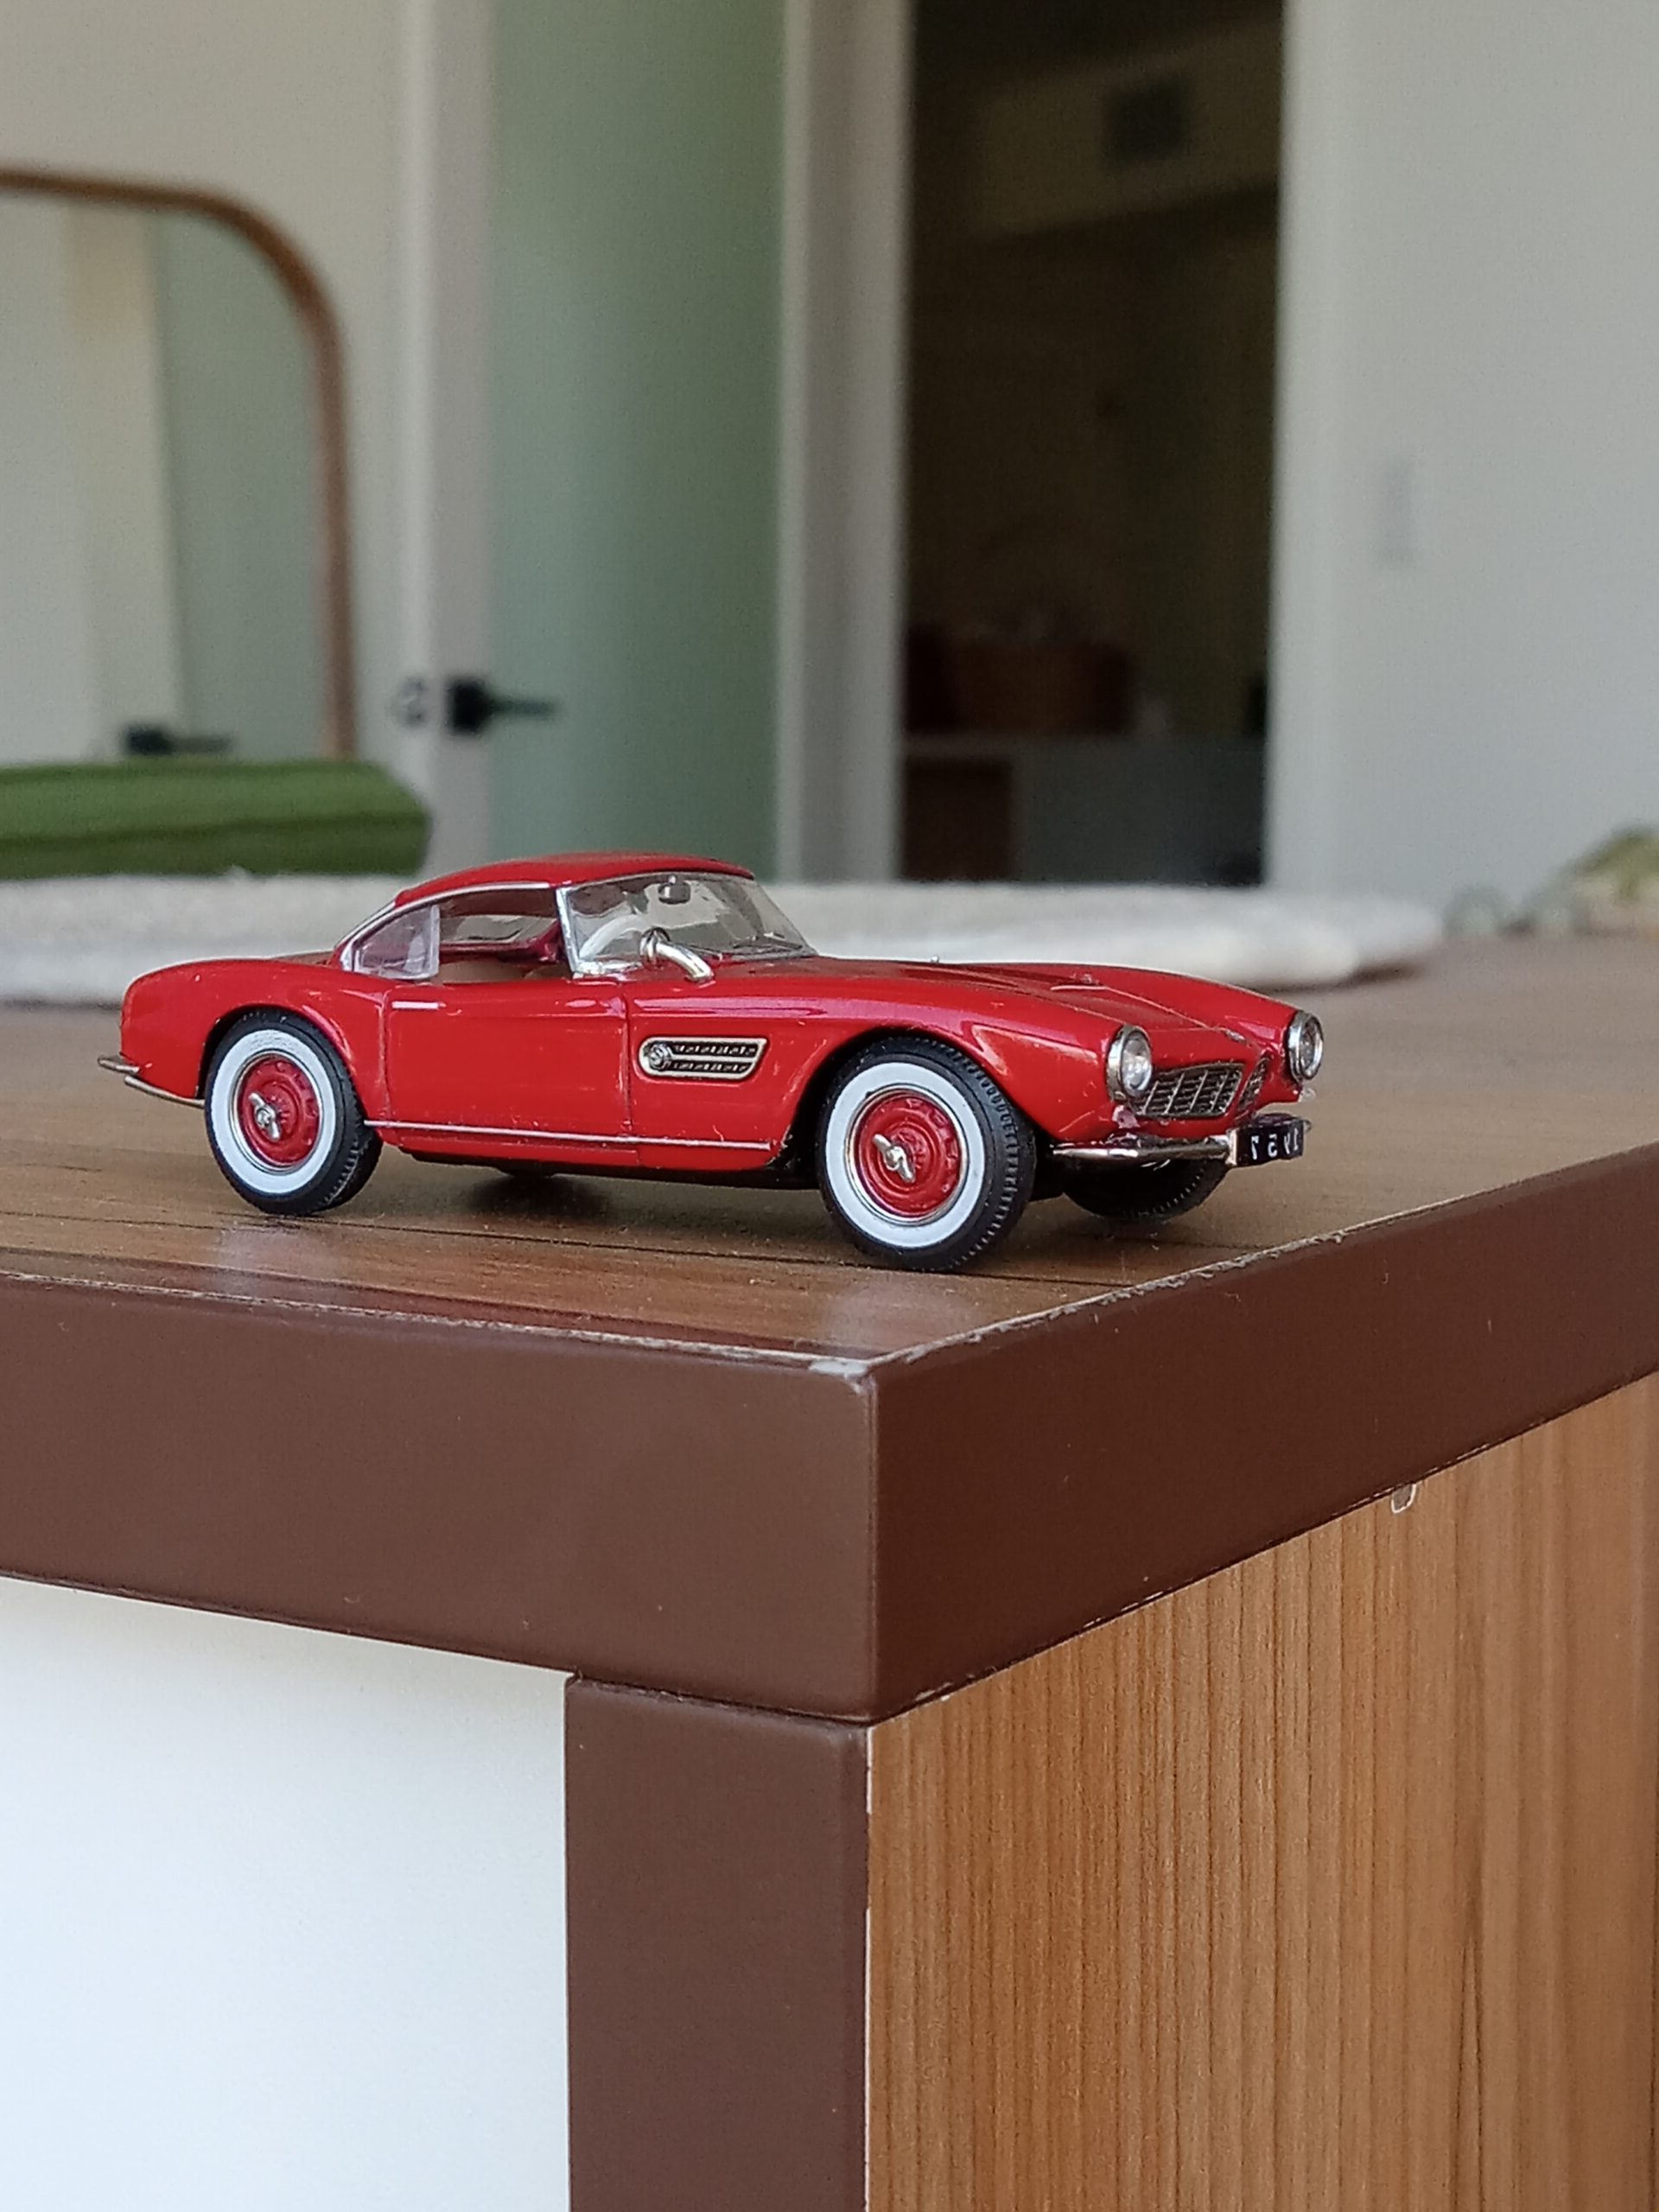
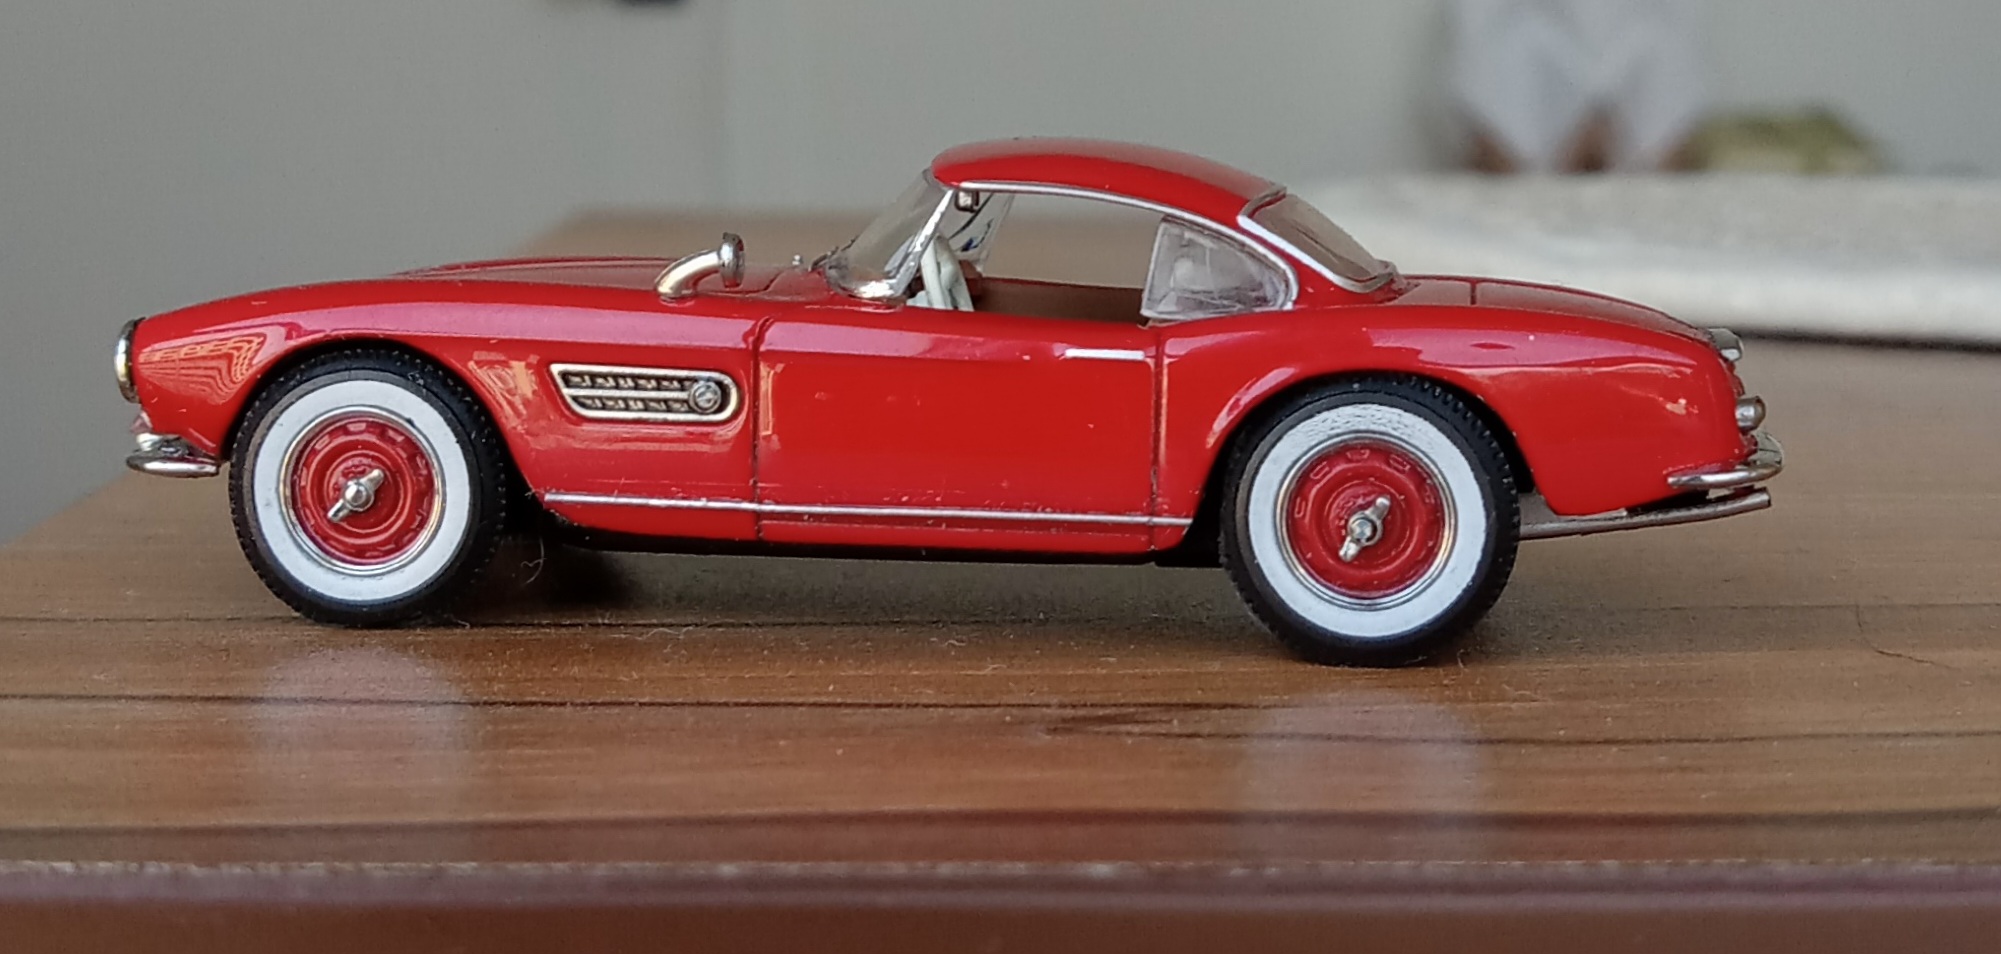
*傑作ミニカー:GFCC社製, 1/64 BMW 507 ハードトップ【アンティーク・レッド】とは?
#GCFF製 507の改造前の評価:
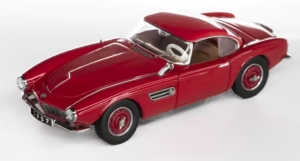
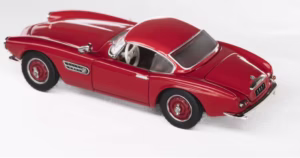
2024年の暮れ中国の新興ミニカー会社GFCC社から発売された, 1/64ダイキャスト製のミニカー:BMW507 ですが、
ALIexpress上で上記の写真を見た時は、
とても1/64(ホット・ホイールサイズ)とは信じがたく、
フェンダーミラーのボテッとした出来に気付くまでは、
絶対に1/18か少なくとも、
1/43のミニカーだと決めつけていました。驚
現在まで、30年近くに渡り、世界中で販売されたほぼすべての『BMW507のミニカー』(30種類以上)を収集してきた身としましては、このGFCC社さんの『507』は断トツの出来で、特に以下の点が優れています。(あくまで個人的な意見ですが、、)
【美点】
*何よりまず、極めて味わい深いボディー造形:実物をCAD-CAM情報を使用してなぞっただけでなく、絵心・彫刻心のある原型師の手で、修正が加えられている点。
(これまで私的ベストな、AMR原型の1/43ダウンハウゼン/MINI43版を超えてます。)
ーーーーー>全後フェンダー上のリップ部分のデフォルメはAMRに一日の長があります。
*タイヤホイールの彫刻の正確さ、大きさ、ボディーとの位置関係が完璧なこと。
(このあたり、ミニチャンプスの1/43版の弱点でしたが、GFCCは特にリアタイヤの位置が素晴らしいです。)
*厚す過ぎず薄すぎない赤塗装の塗膜の美しさ。
(こちらも1/64とは思えない、塗装後もドアカットラインがシャープに残って実際に開きそうです。)
*ボンネット、トランクの開閉可能に伴うスケール感の喪失が皆無なこと。
(ボンネットは、磁石でパッチリくっつきます)
*ハードトップの出来:大きさ、形、塗分け共に完璧なこと。
(ハードトップのミニカーは珍しく、レベルのキットとメルクリンの1/43位しか思い浮かびません。)
ーーーーーー>これをおかずにして、御飯大盛3倍はいけます。(笑)
*ヘッドライト、テールライト、内装類などのディテール表現の秀逸さ。
*エッチング+カラー加工されたBMWのエンブレム(合計9個)
ーーーーーーーー>老眼の私には、ほとんど見えませんが、、、、、、泣
【残念な部分】
(ほとんどありませんが、、、、)
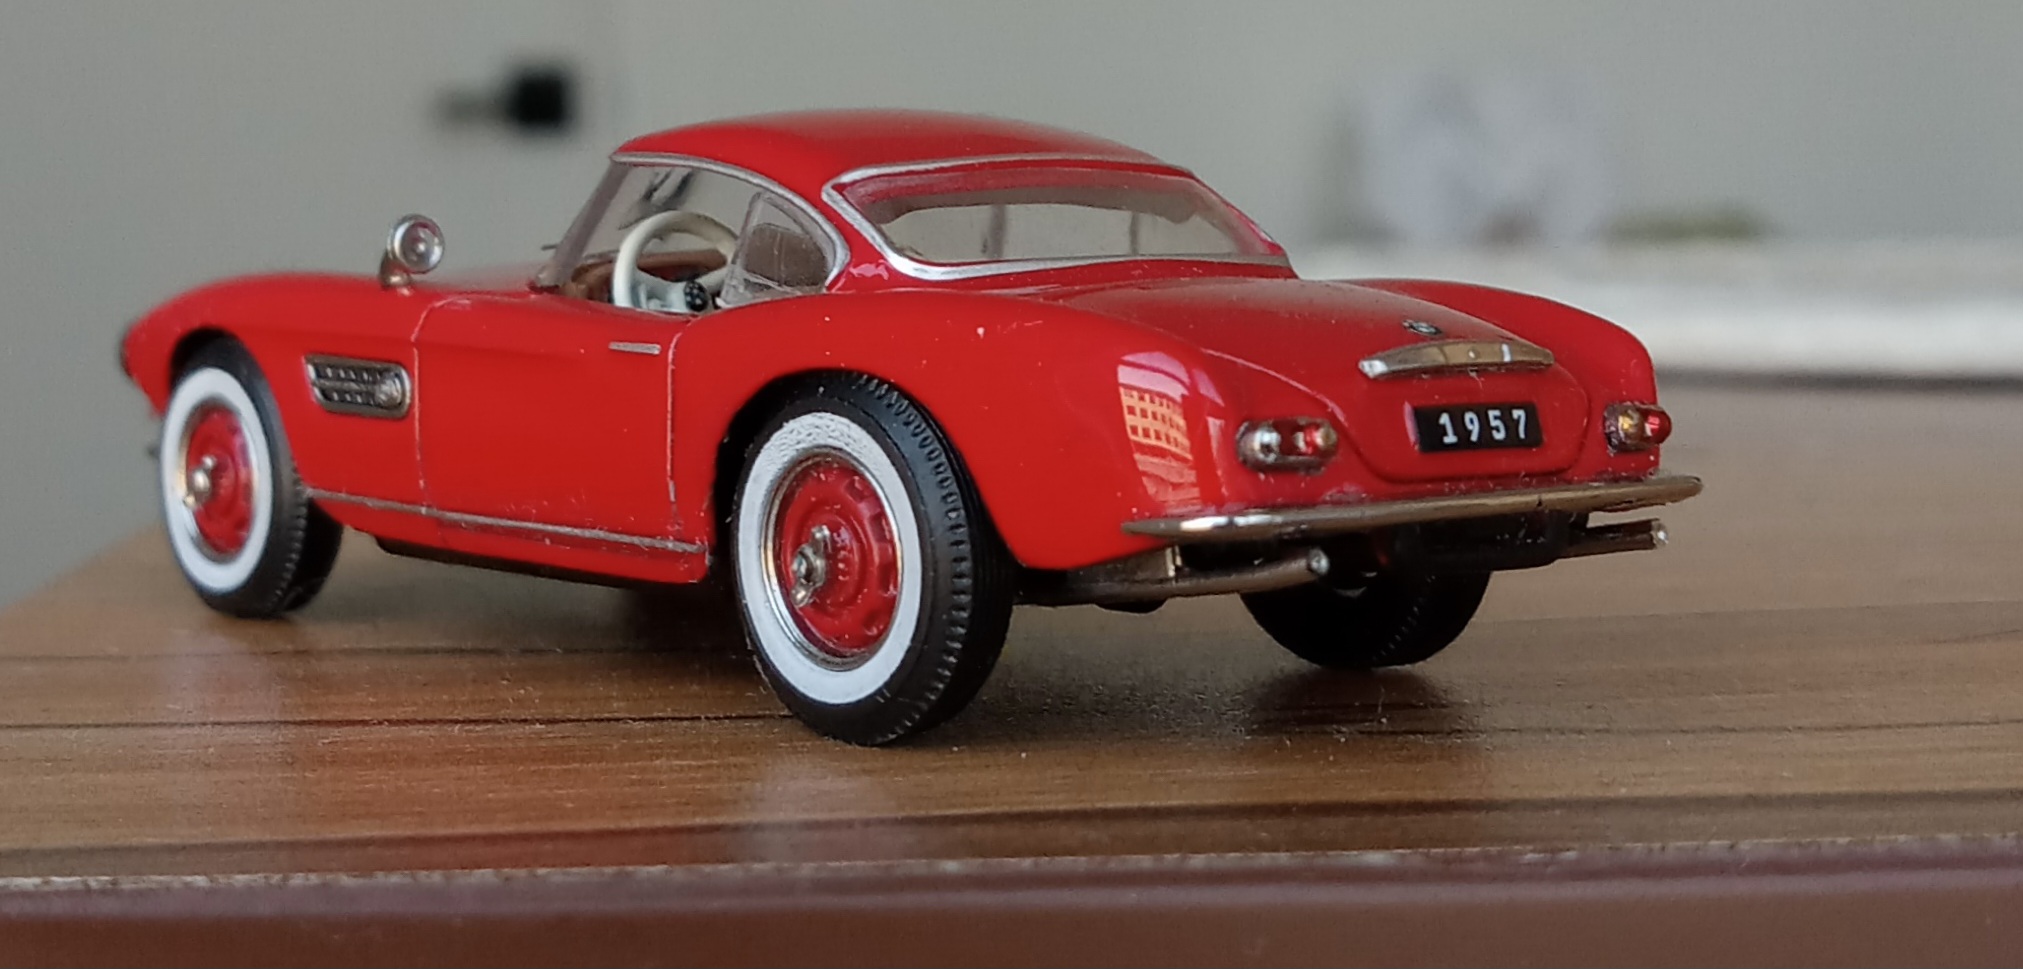
*なぜだかバックミラーだけが、ぼてぼての彫刻でここだけ従来の1/64みたいなところ。
*フロントグリルと、サイドのエアベントの彫刻が若干シャープさに欠けるところ。
*ヘッドライトのメッキリングが少し厚すぎて、横から見た時、ボンネット先端部の出っ張りがはっきり見えないところ。
*前後のバンパー位置が少し「下付き」なこと。
残念な部分に関しましては、
この後行います「改造プロジェクト」への流れで、無理矢理捻出しました。
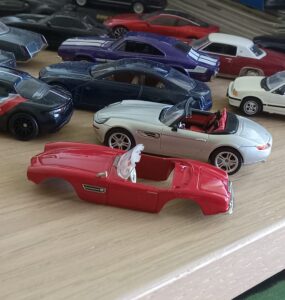
本当に素晴らしい立体で、最初に出たものに関しましては、10台中5台買いました。
#新興ミニカー会社: GFCCとは?
その後このGFCCというミニカー会社について興味がわき、
調べてみたところ、
始めに、1/43のアメ車のダイキャスト・ミニカーを発売後、
1/64に転向、矢継ぎ早に超精密なミニカー群をラインナップしていきます。
得意分野は、ヴィンテージモノのヨーロッパの名車群で、
これまで、
*ロールスロイス(50-60年台?)
*ジャガー・E-タイプ
*フェラーリ・カリフォルニア
*メルセデス・ベンツ300SL ロードスター
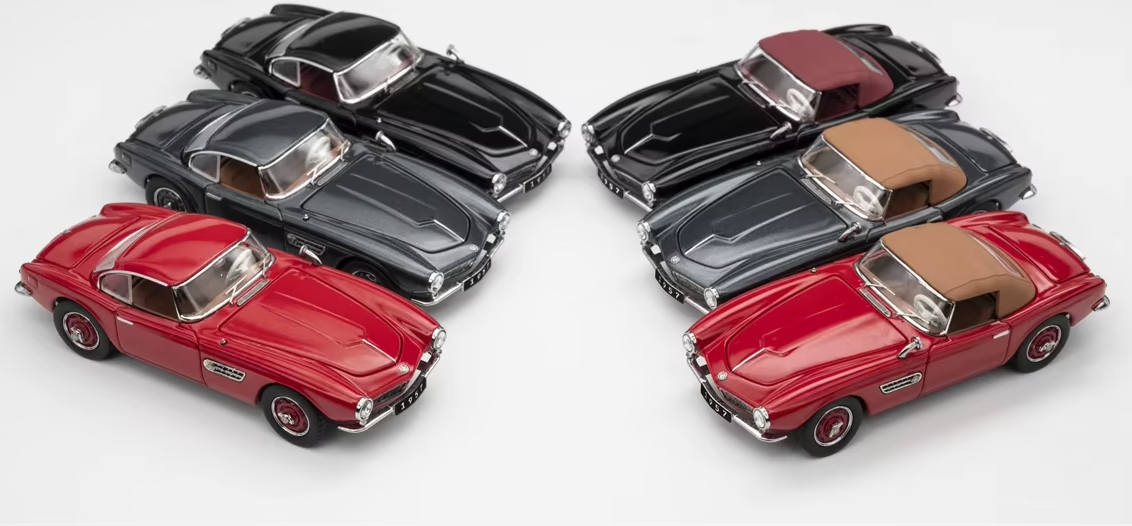
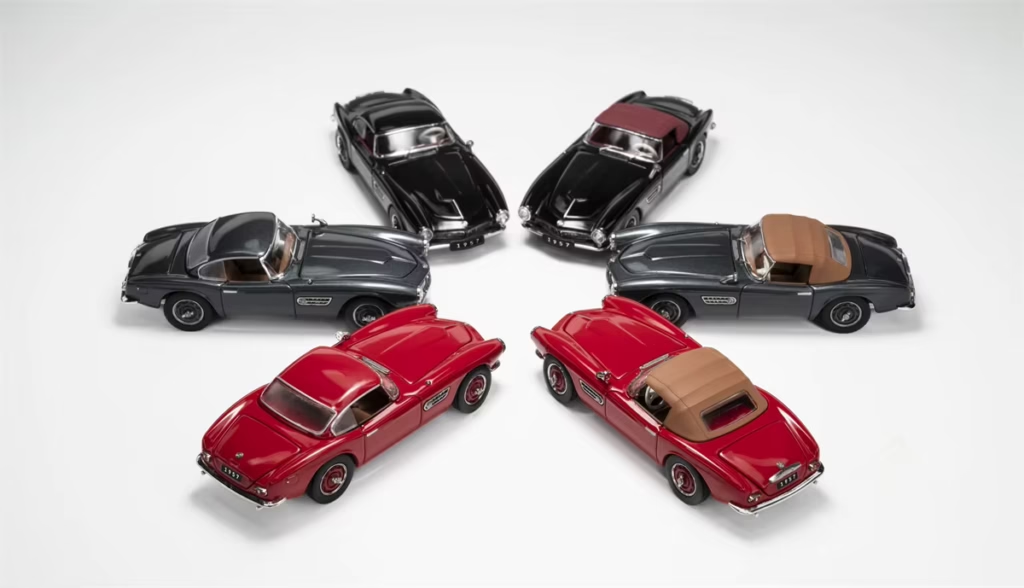
などを「無版権」にてそれぞれ10色以上の外装色とソフトトップ/ハードトップを別々に製造してきました。
【BMW507シリーズ】は2024年12月頃
*上記6種類が発売開始され、
*すぐ後、エルビスプレスリーの白いバージョンが限定扱いで特別な箱入りで追加され、
*その後エルビスのレストア前のぼろぼろの赤塗装バージョンや、
*銀色塗装・ホワイトレタータイヤ付きの大きな箱入りの限定盤、
*更には、商魂たくましく、2025年12月現在、メタリック塗装を含めた、
*オリジナル色まで新発売されております。
最新作は、
*私の大好きな、フェラーリ250TRテスタロッサ ポンツーンフェンダーバージョンです。
今後もこのクラッシックカー好きのメカーから目が離せません!
(何とかオースチンヒーレー4気筒版を出してほしい今日この頃です、、、、)
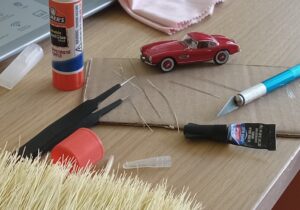
*改造プロジェクト開始!!
#まずは設定資料です
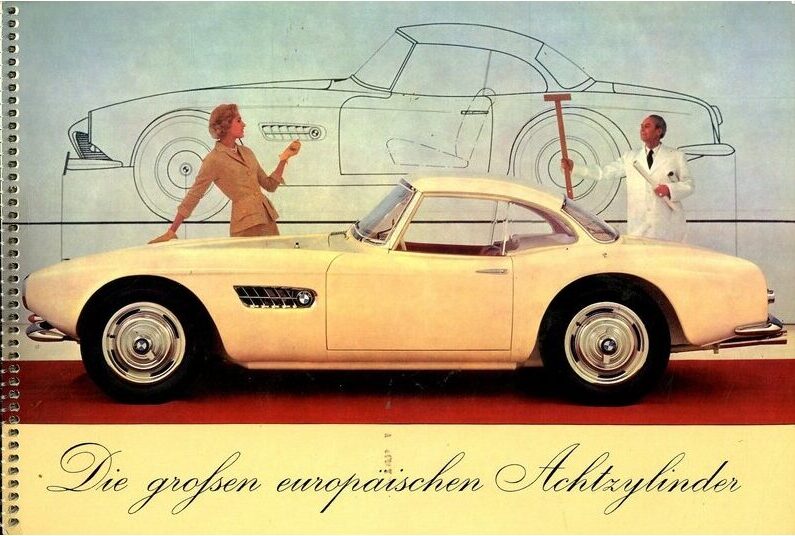
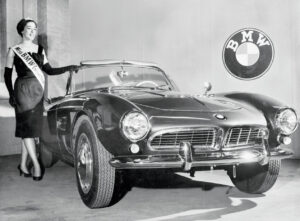

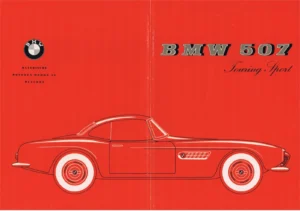
色々な広告や宣伝材料、デザイン中の写真などを閲覧する中、下記の宣伝カタログの表紙を飾る、
*美しいイラストと
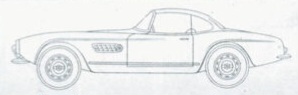
*その右下に鎮座する、実車を多少カルカチャイズした感じの
超絶サイドビューの図版から
目が離せなくなりました。
#いよいよ改造プロジェクト開始!!
これまで半年間の間、
たくさんの1/64のミニカーの写真を撮影する中で出来た持論は:
『1/64の小さなサイズの場合、実物より少しかっこよすぎな位でないと、写真を問た時のインパクトが薄い」
といったものです。
その持論を実際のミニカーに応用する意味で、
ブログ記事の中で使ったミニカーの中には、
私流に少し改造したものも存在します。
その中でも自分のこだわりが特に強い、
「BMW507」に関しましては、最近になり更に大幅に手を加えましたので、
ここに、ご披露させていただきます。
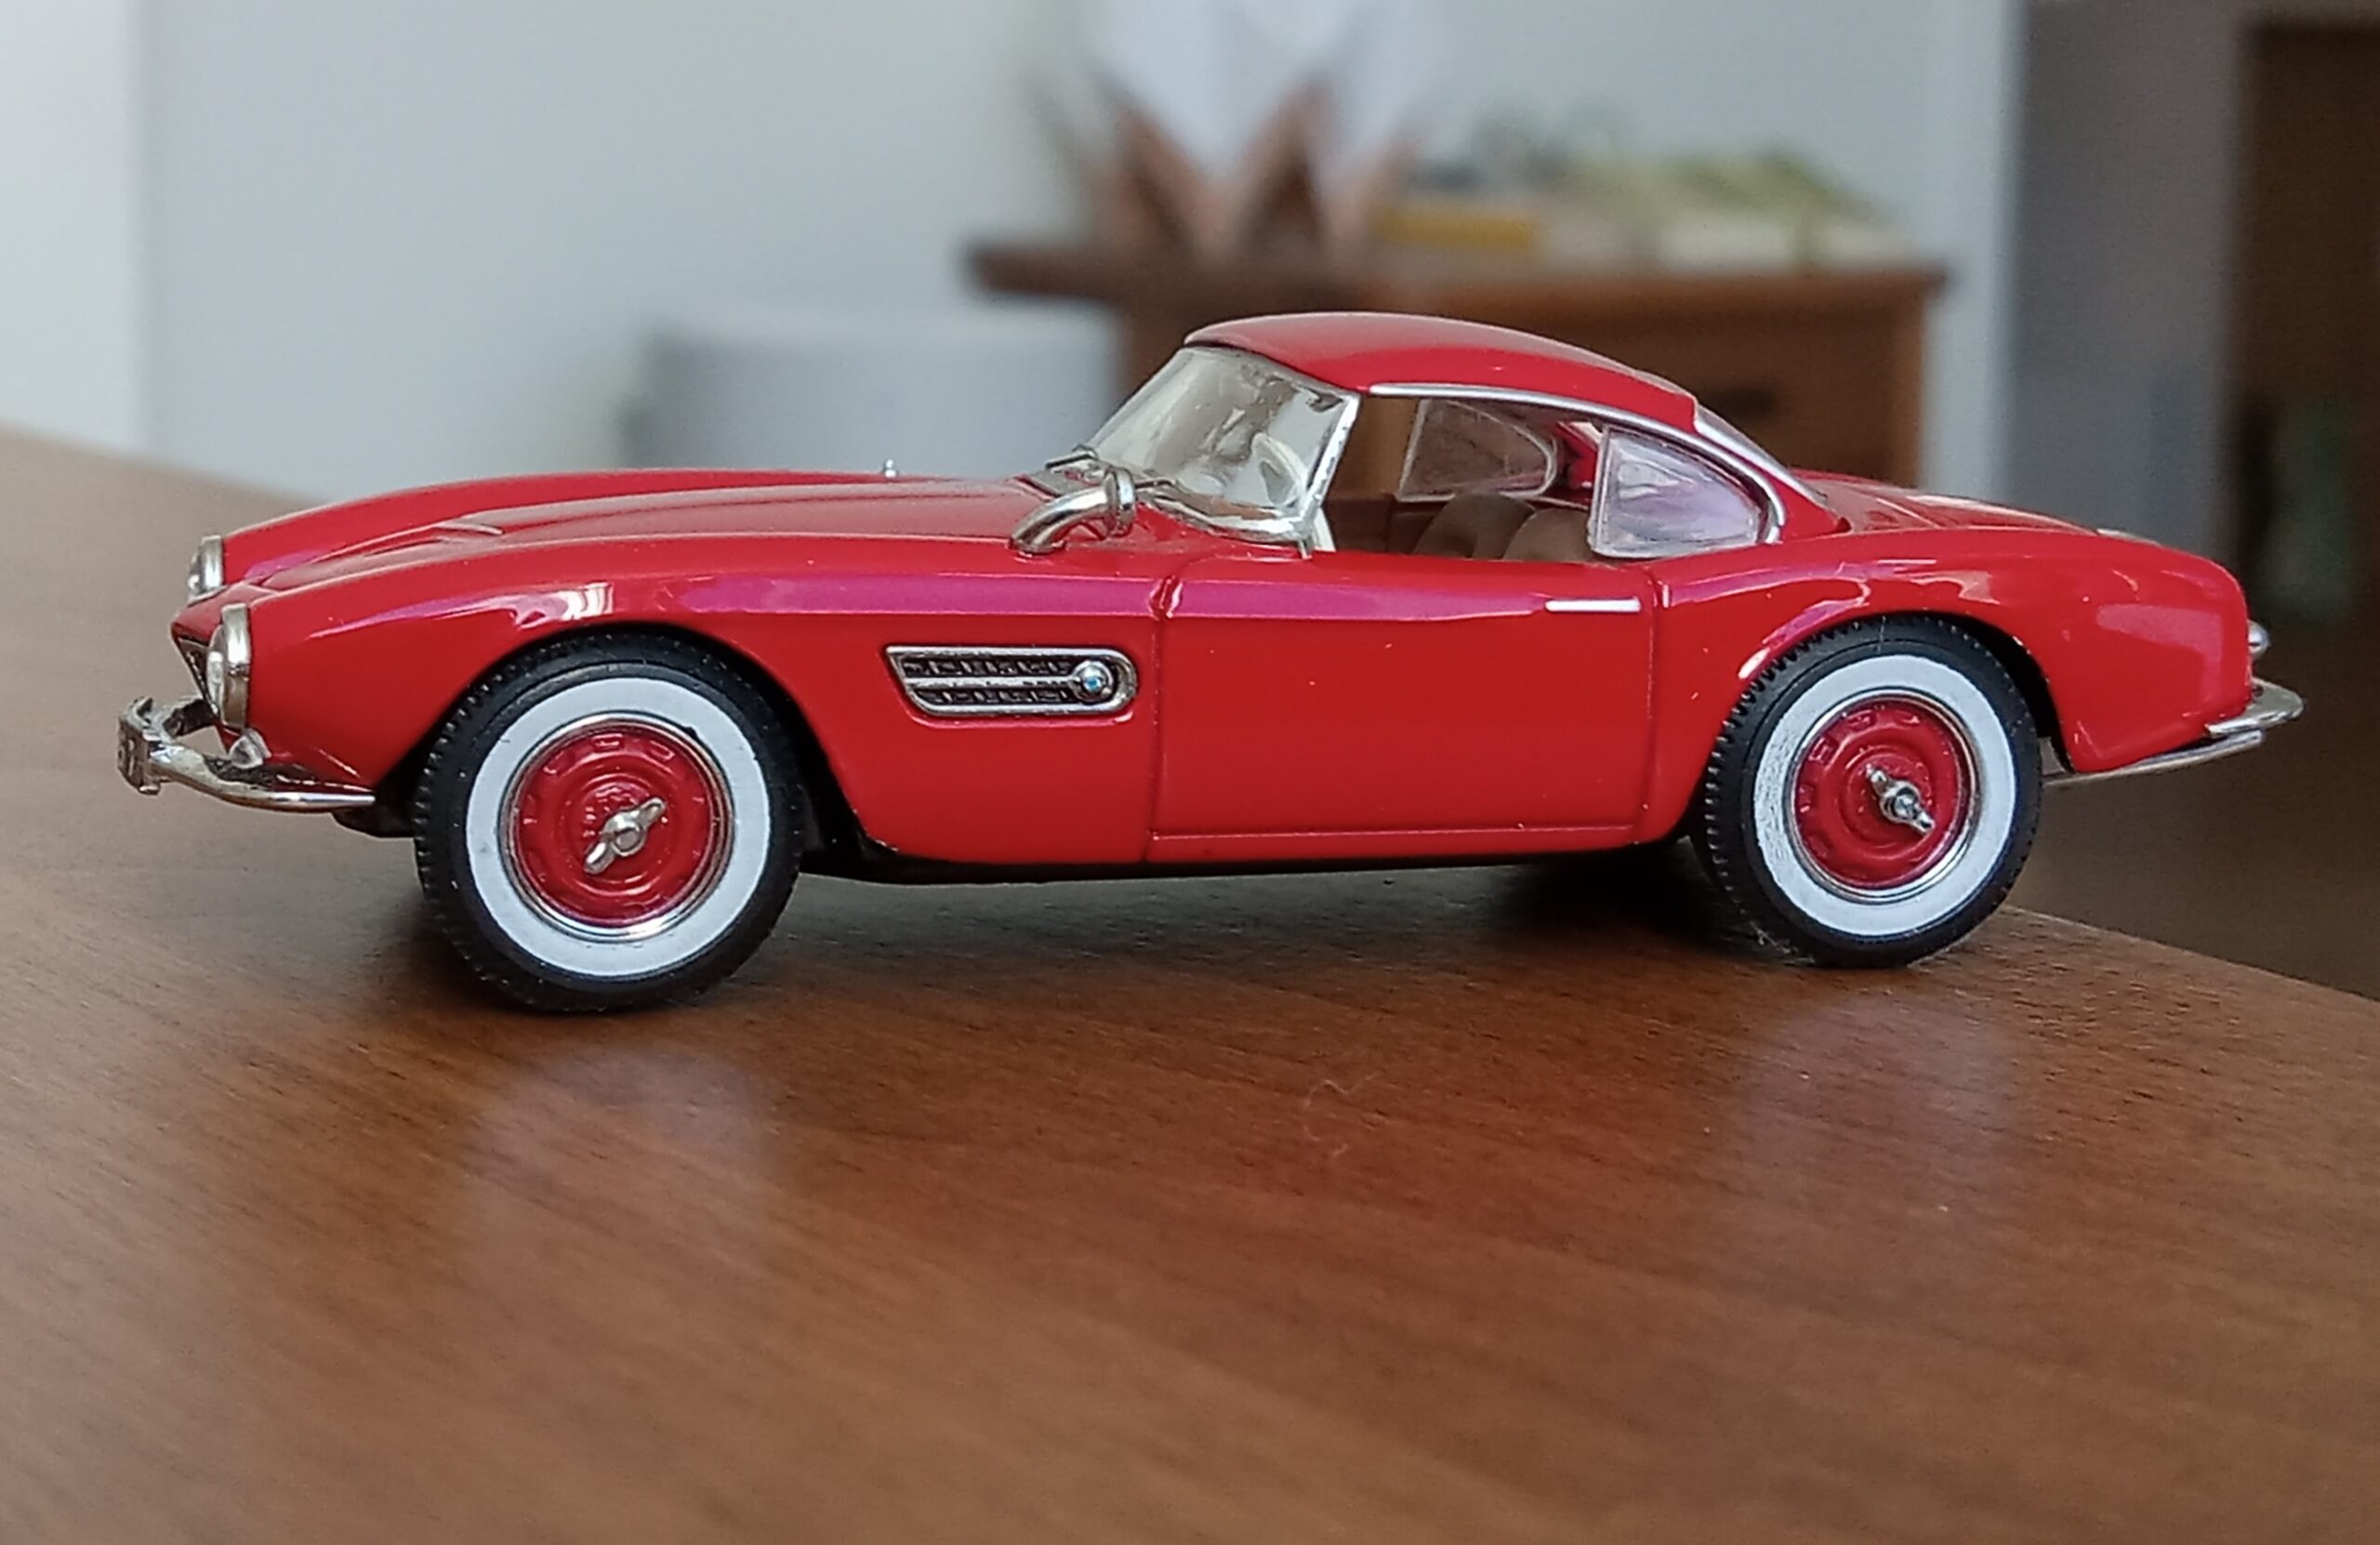
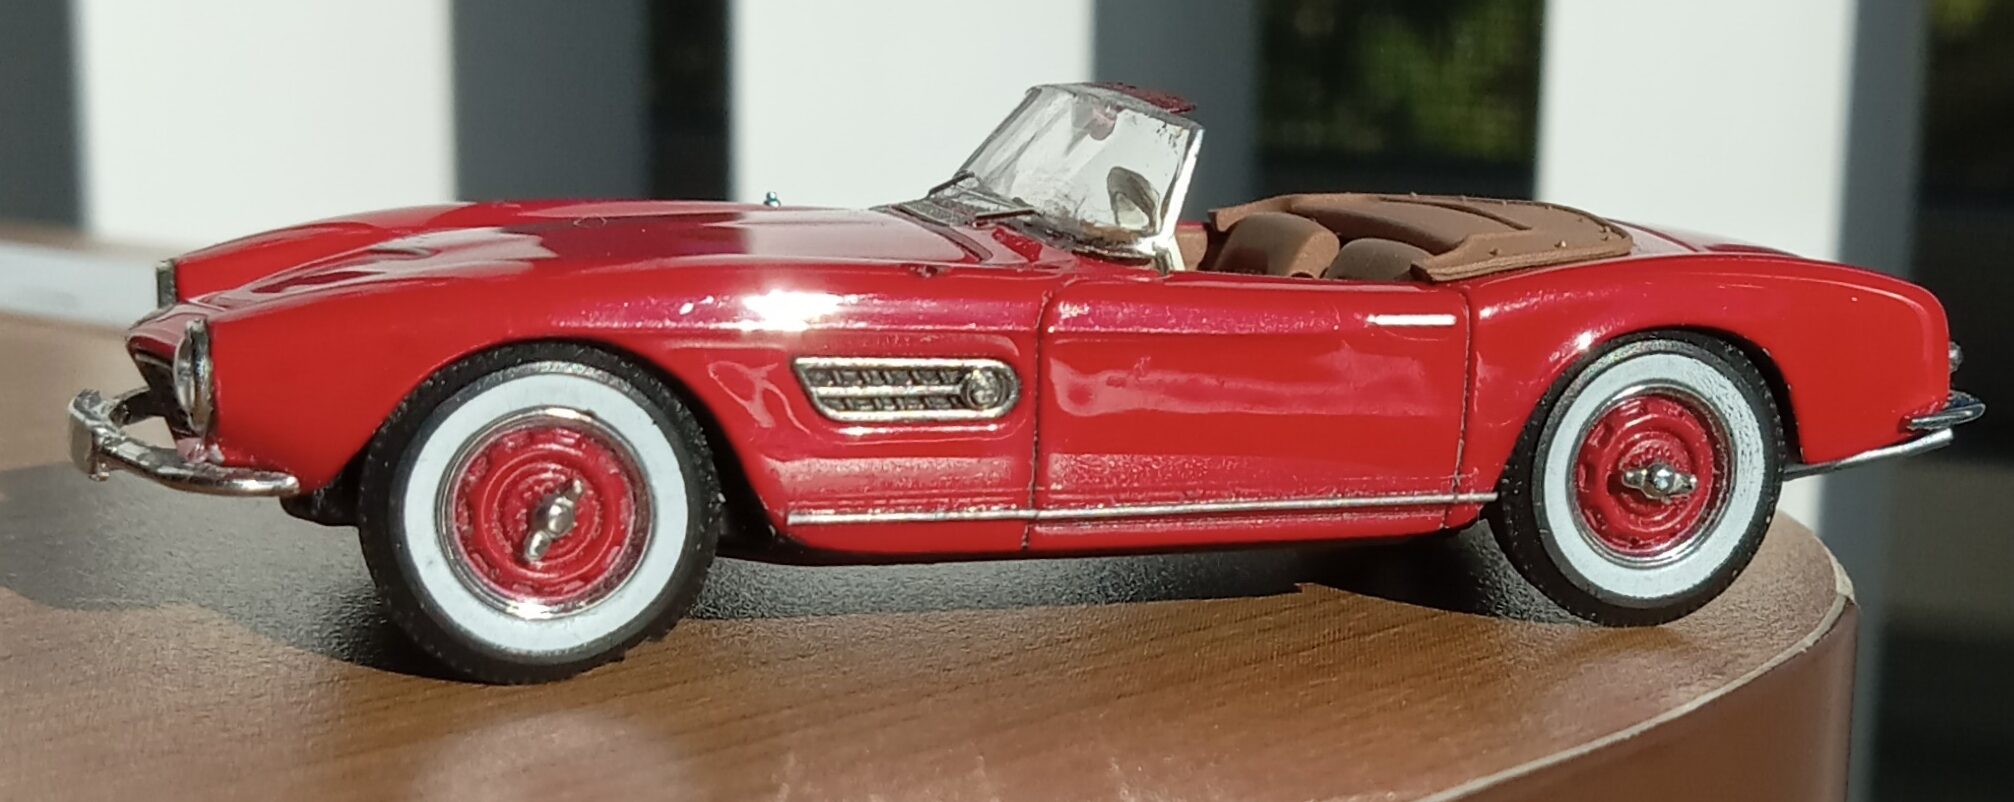
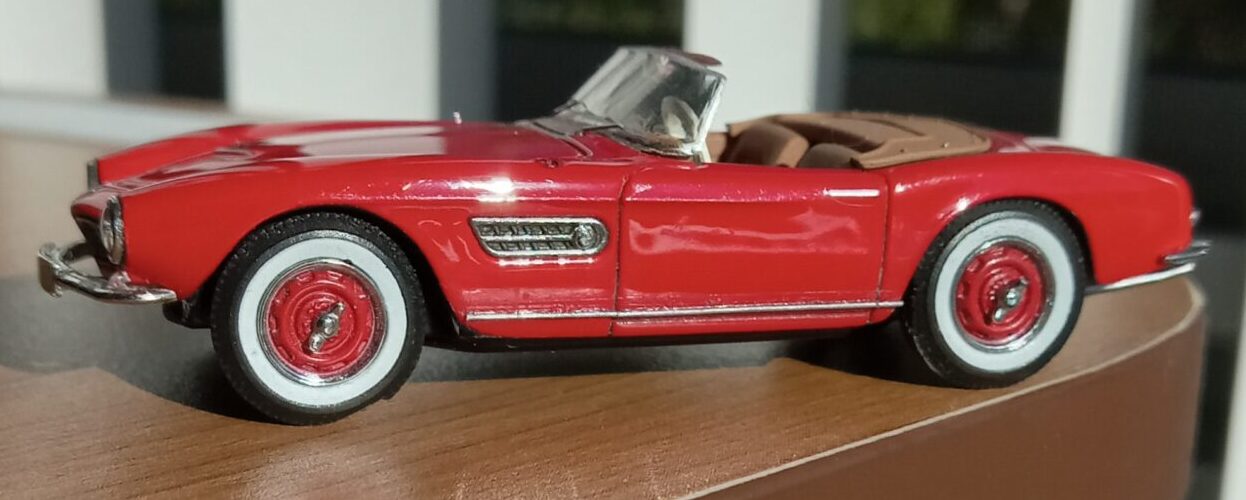
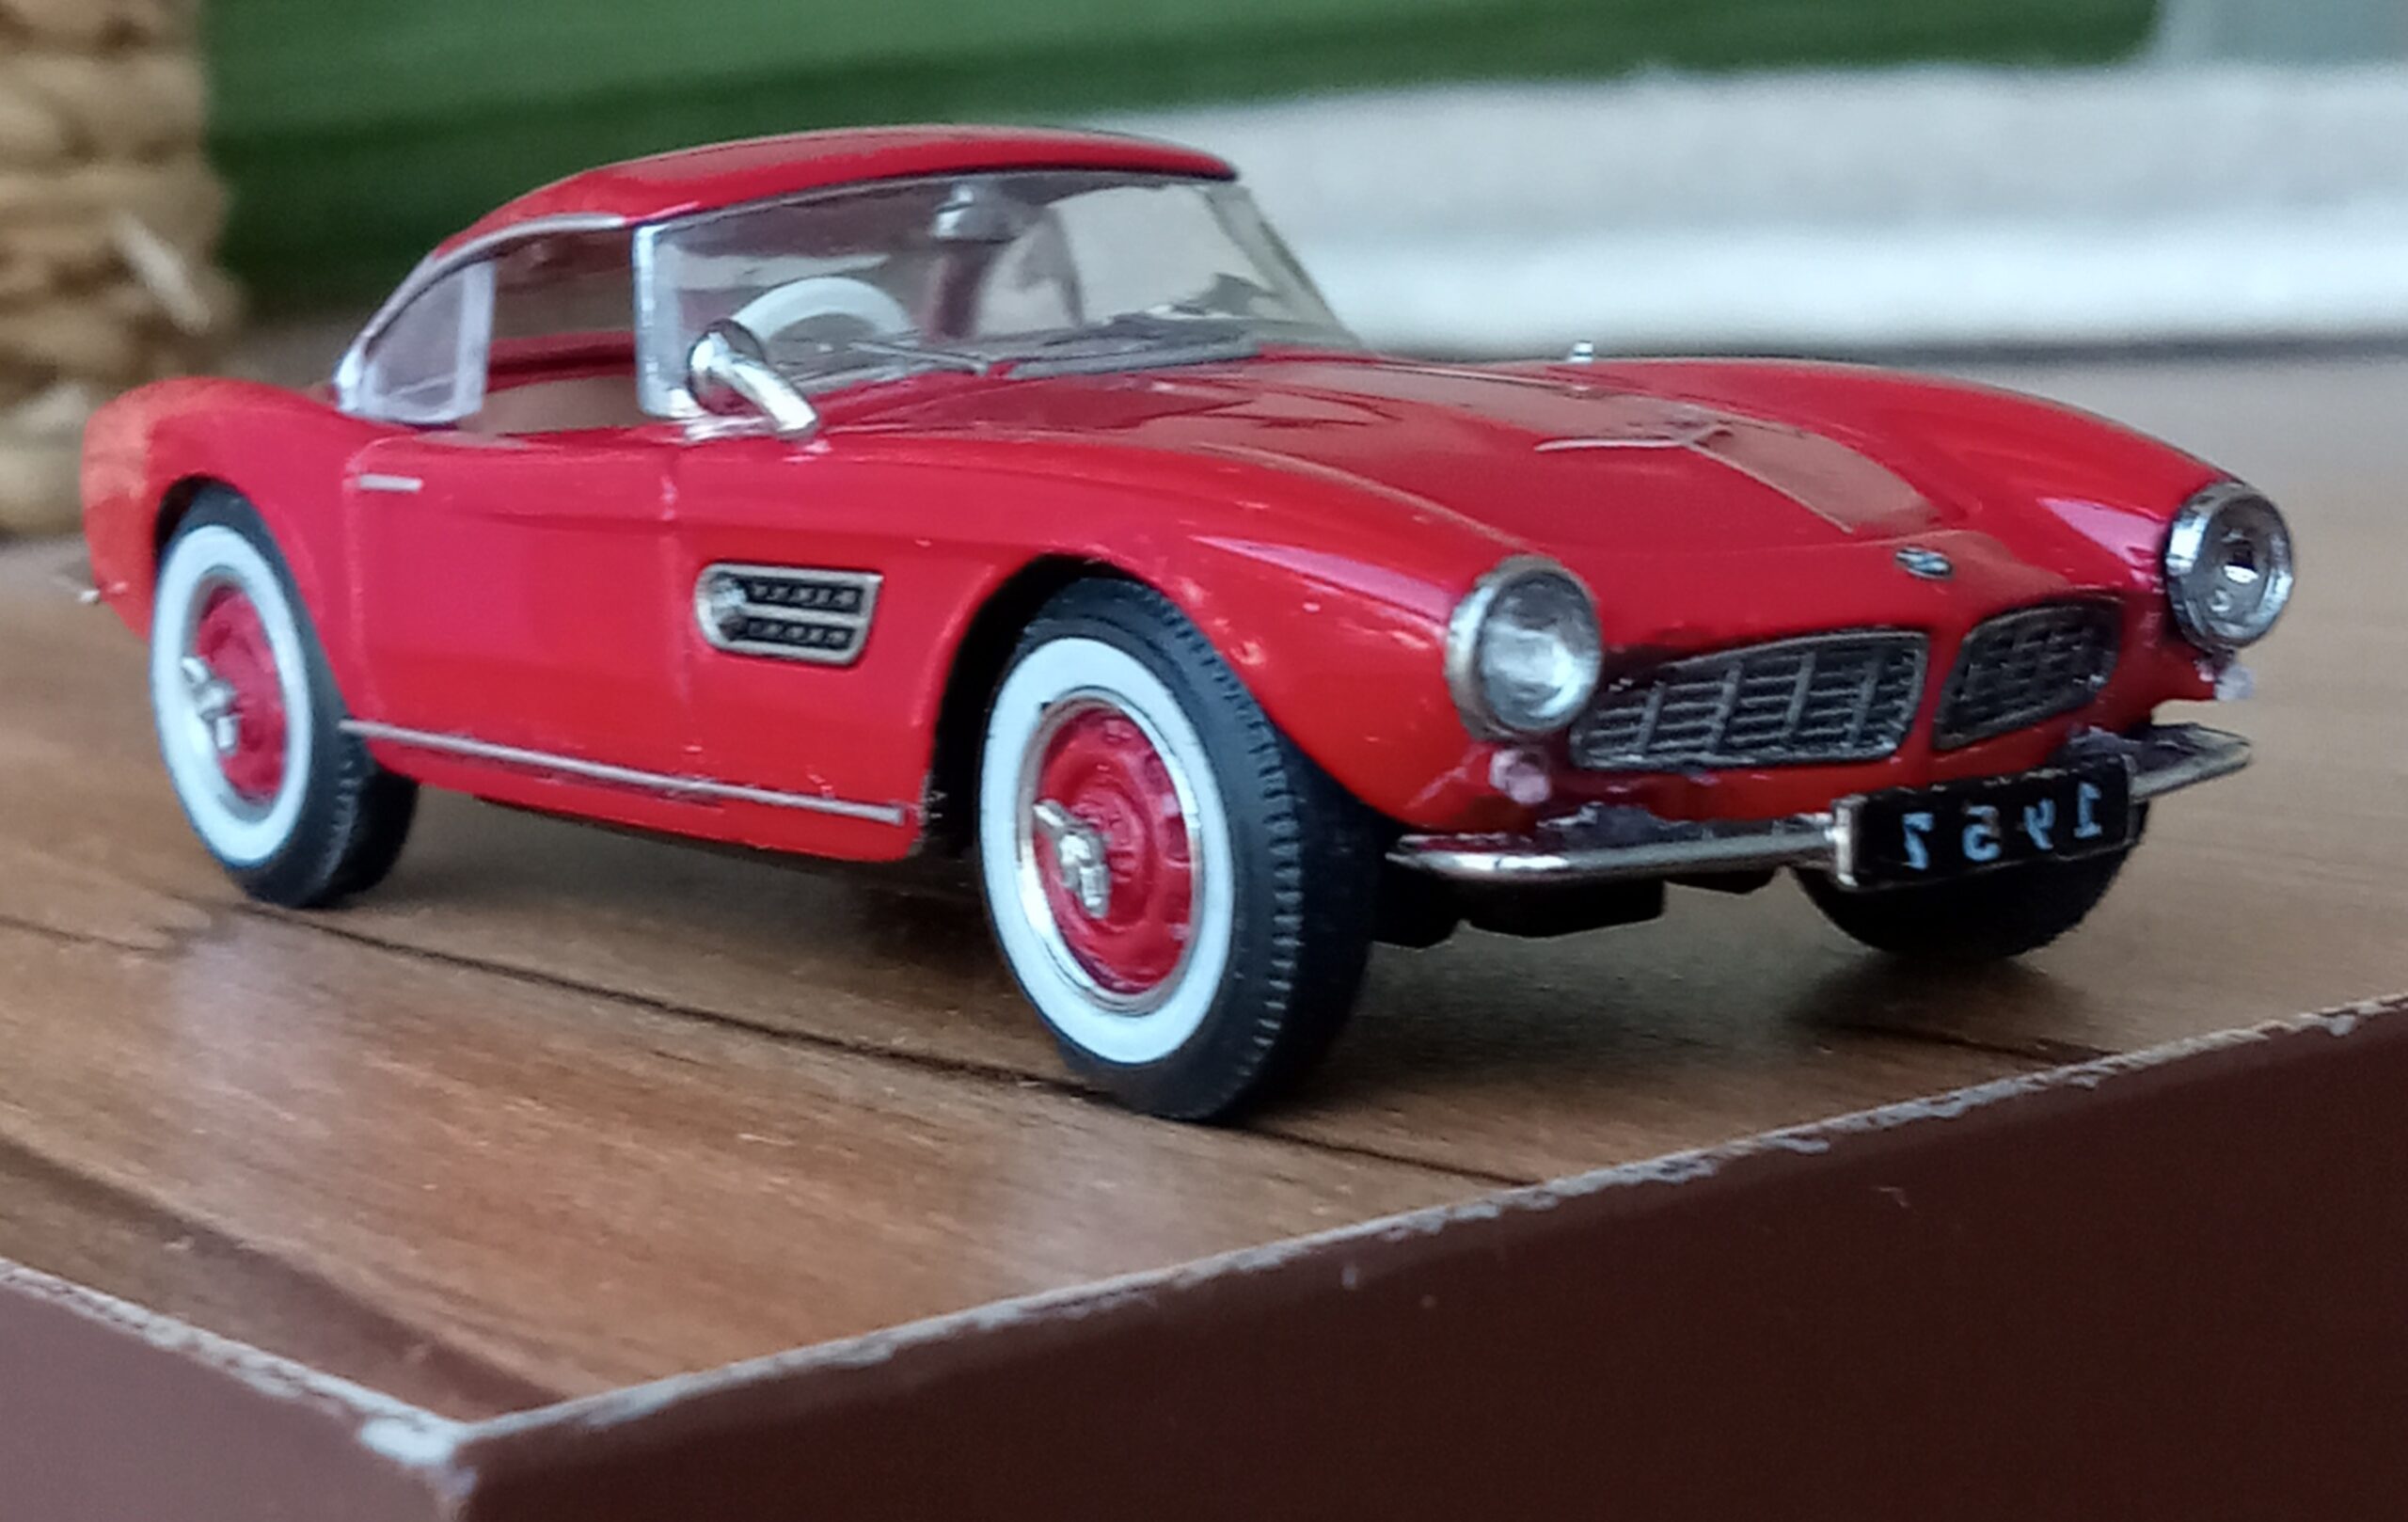
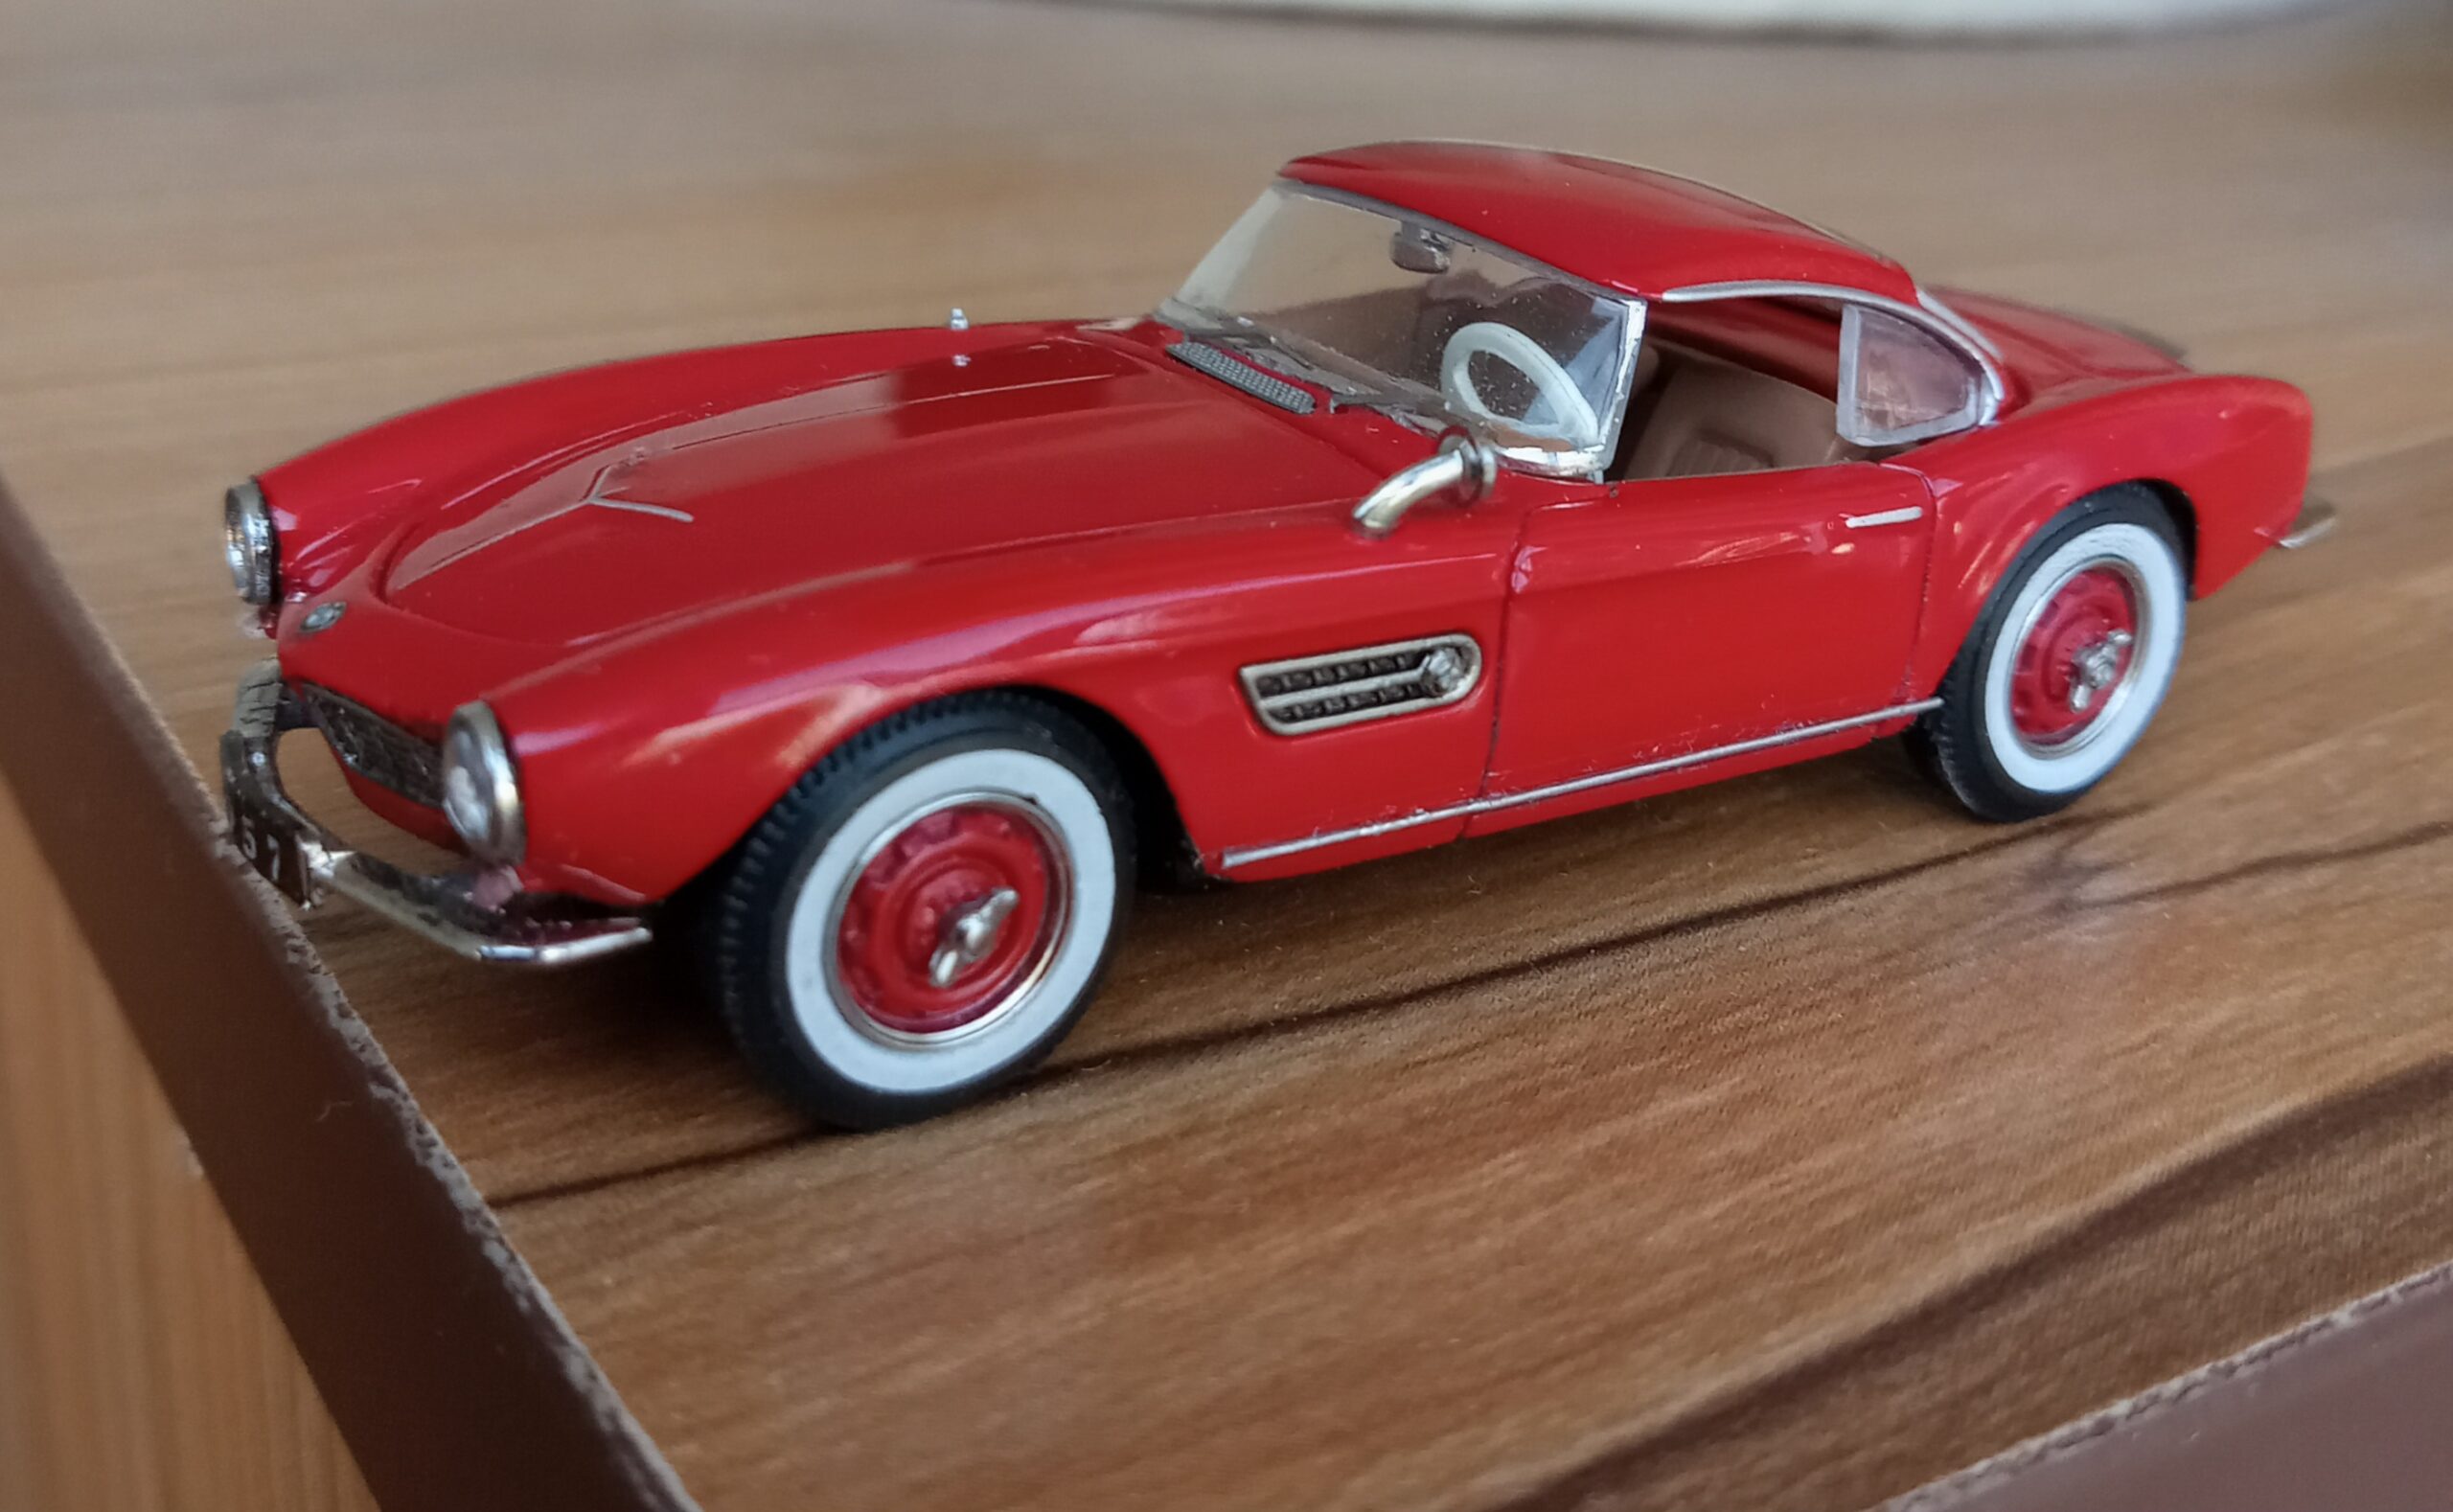
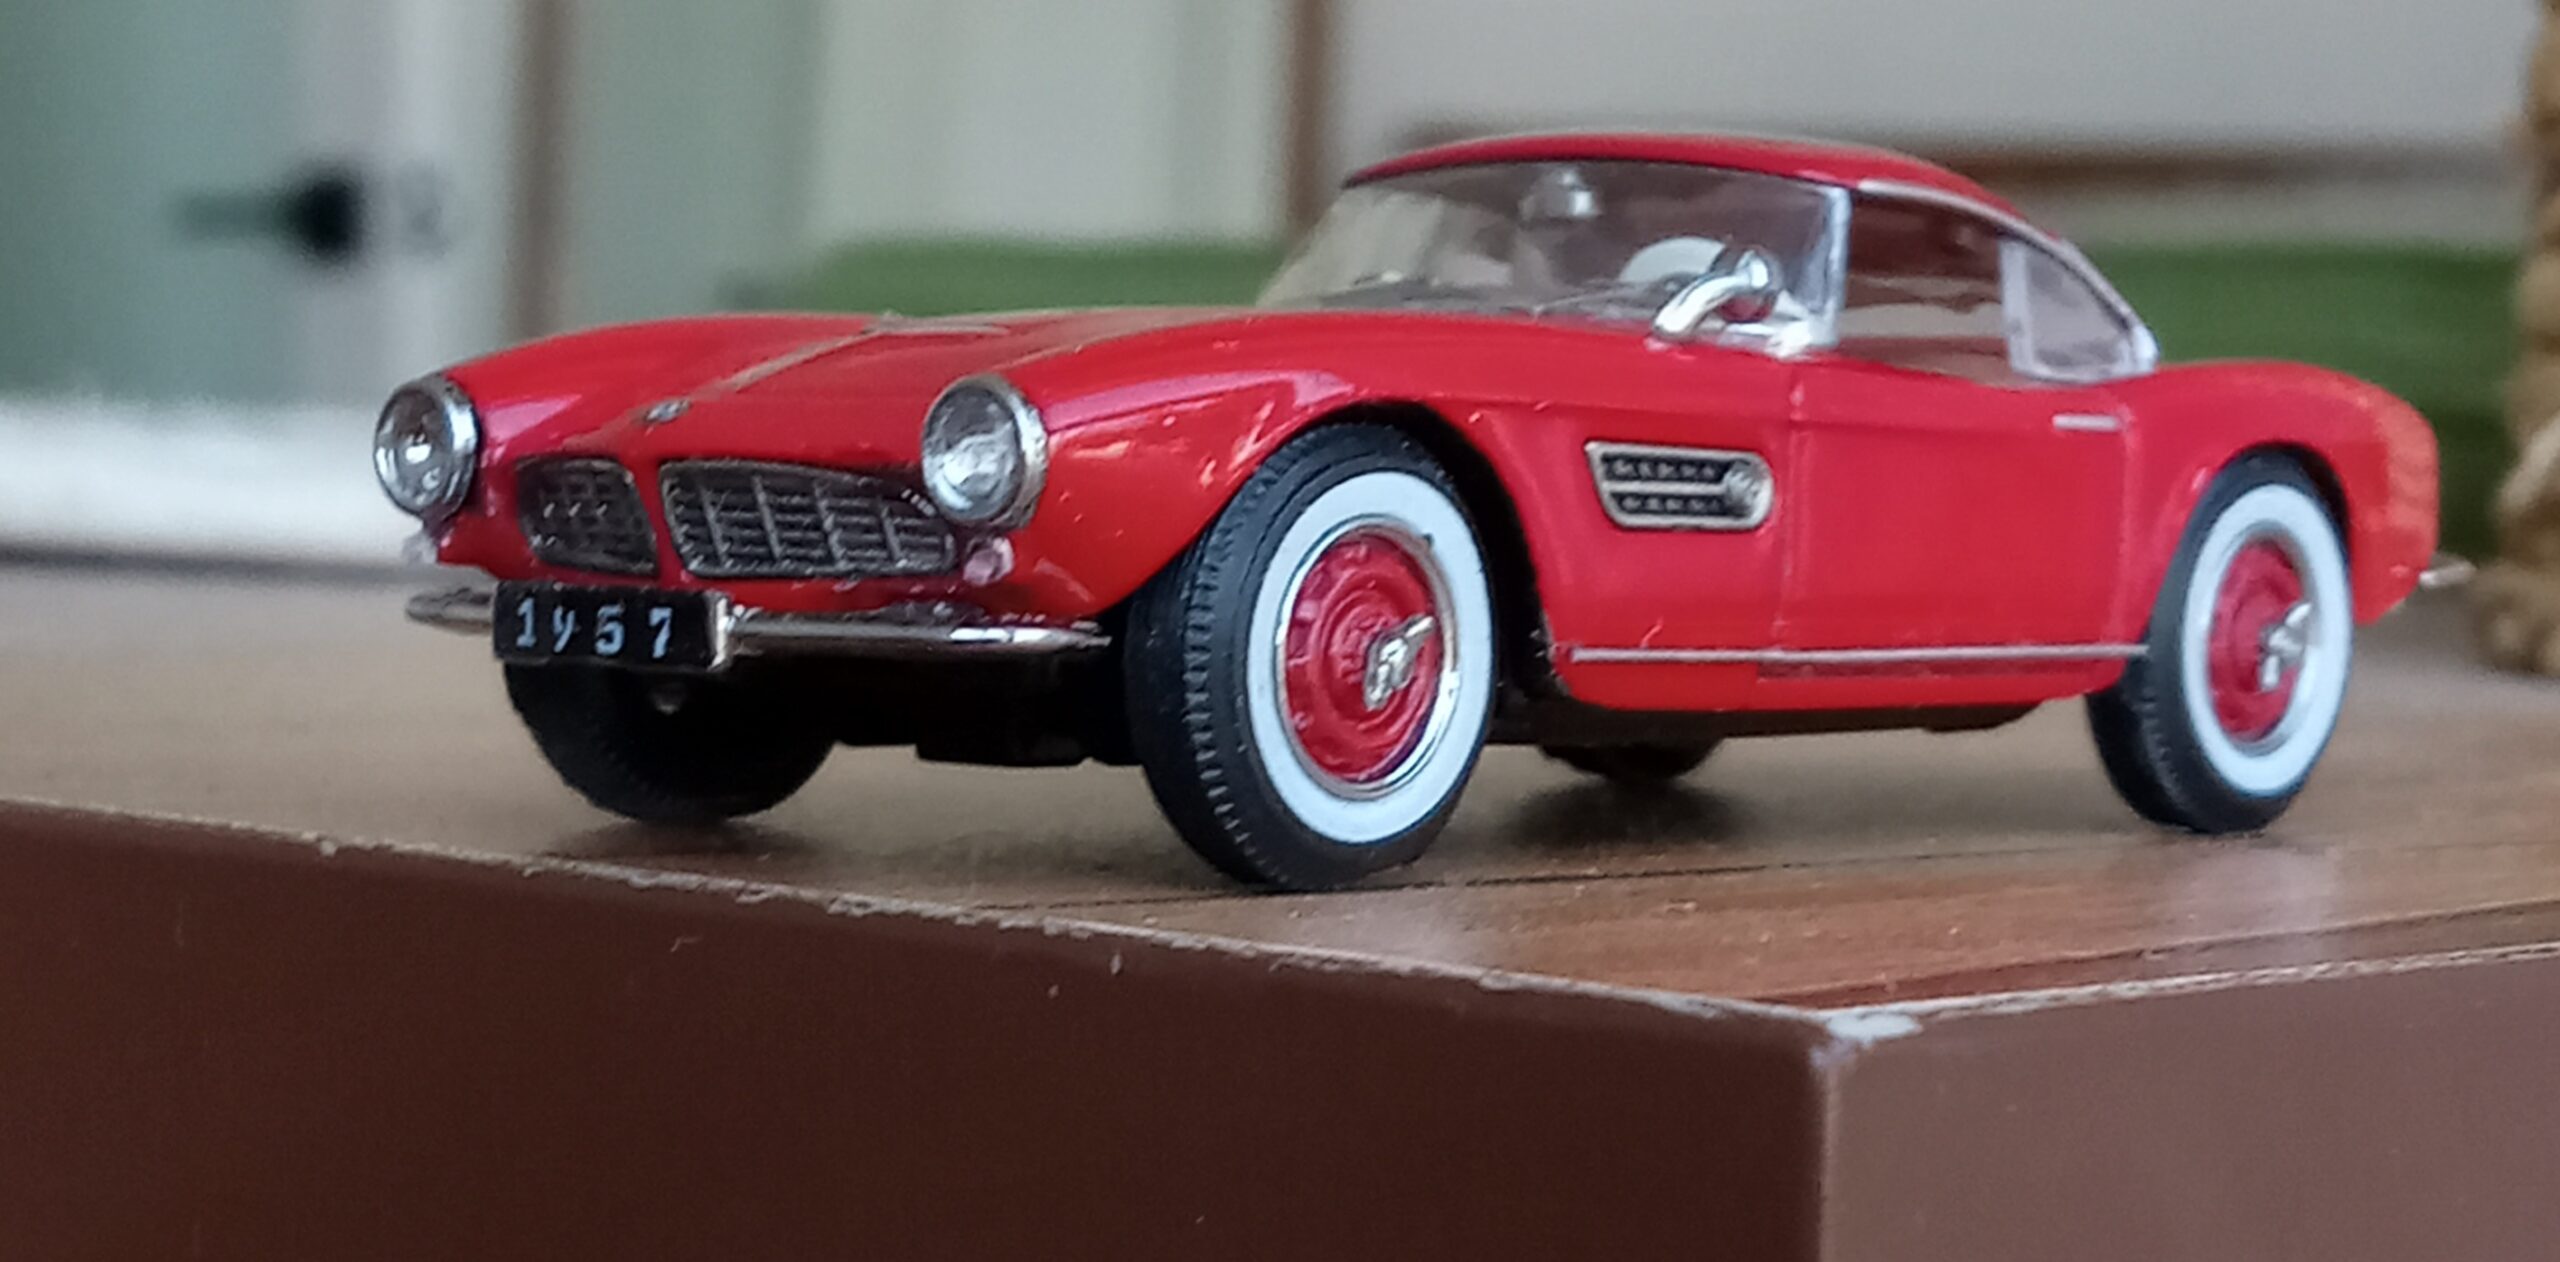
@改造前のイラストと同じ画角で:
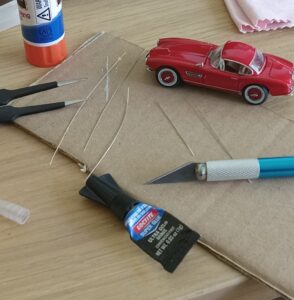
@改造箇所リスト:
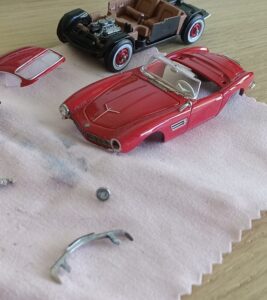
こんな感じで改造箇所を羅列してひとつづつ見て行きましょう。
(実際には、4か月ほどかけて徐々に気付いた箇所なので、あしからず。)
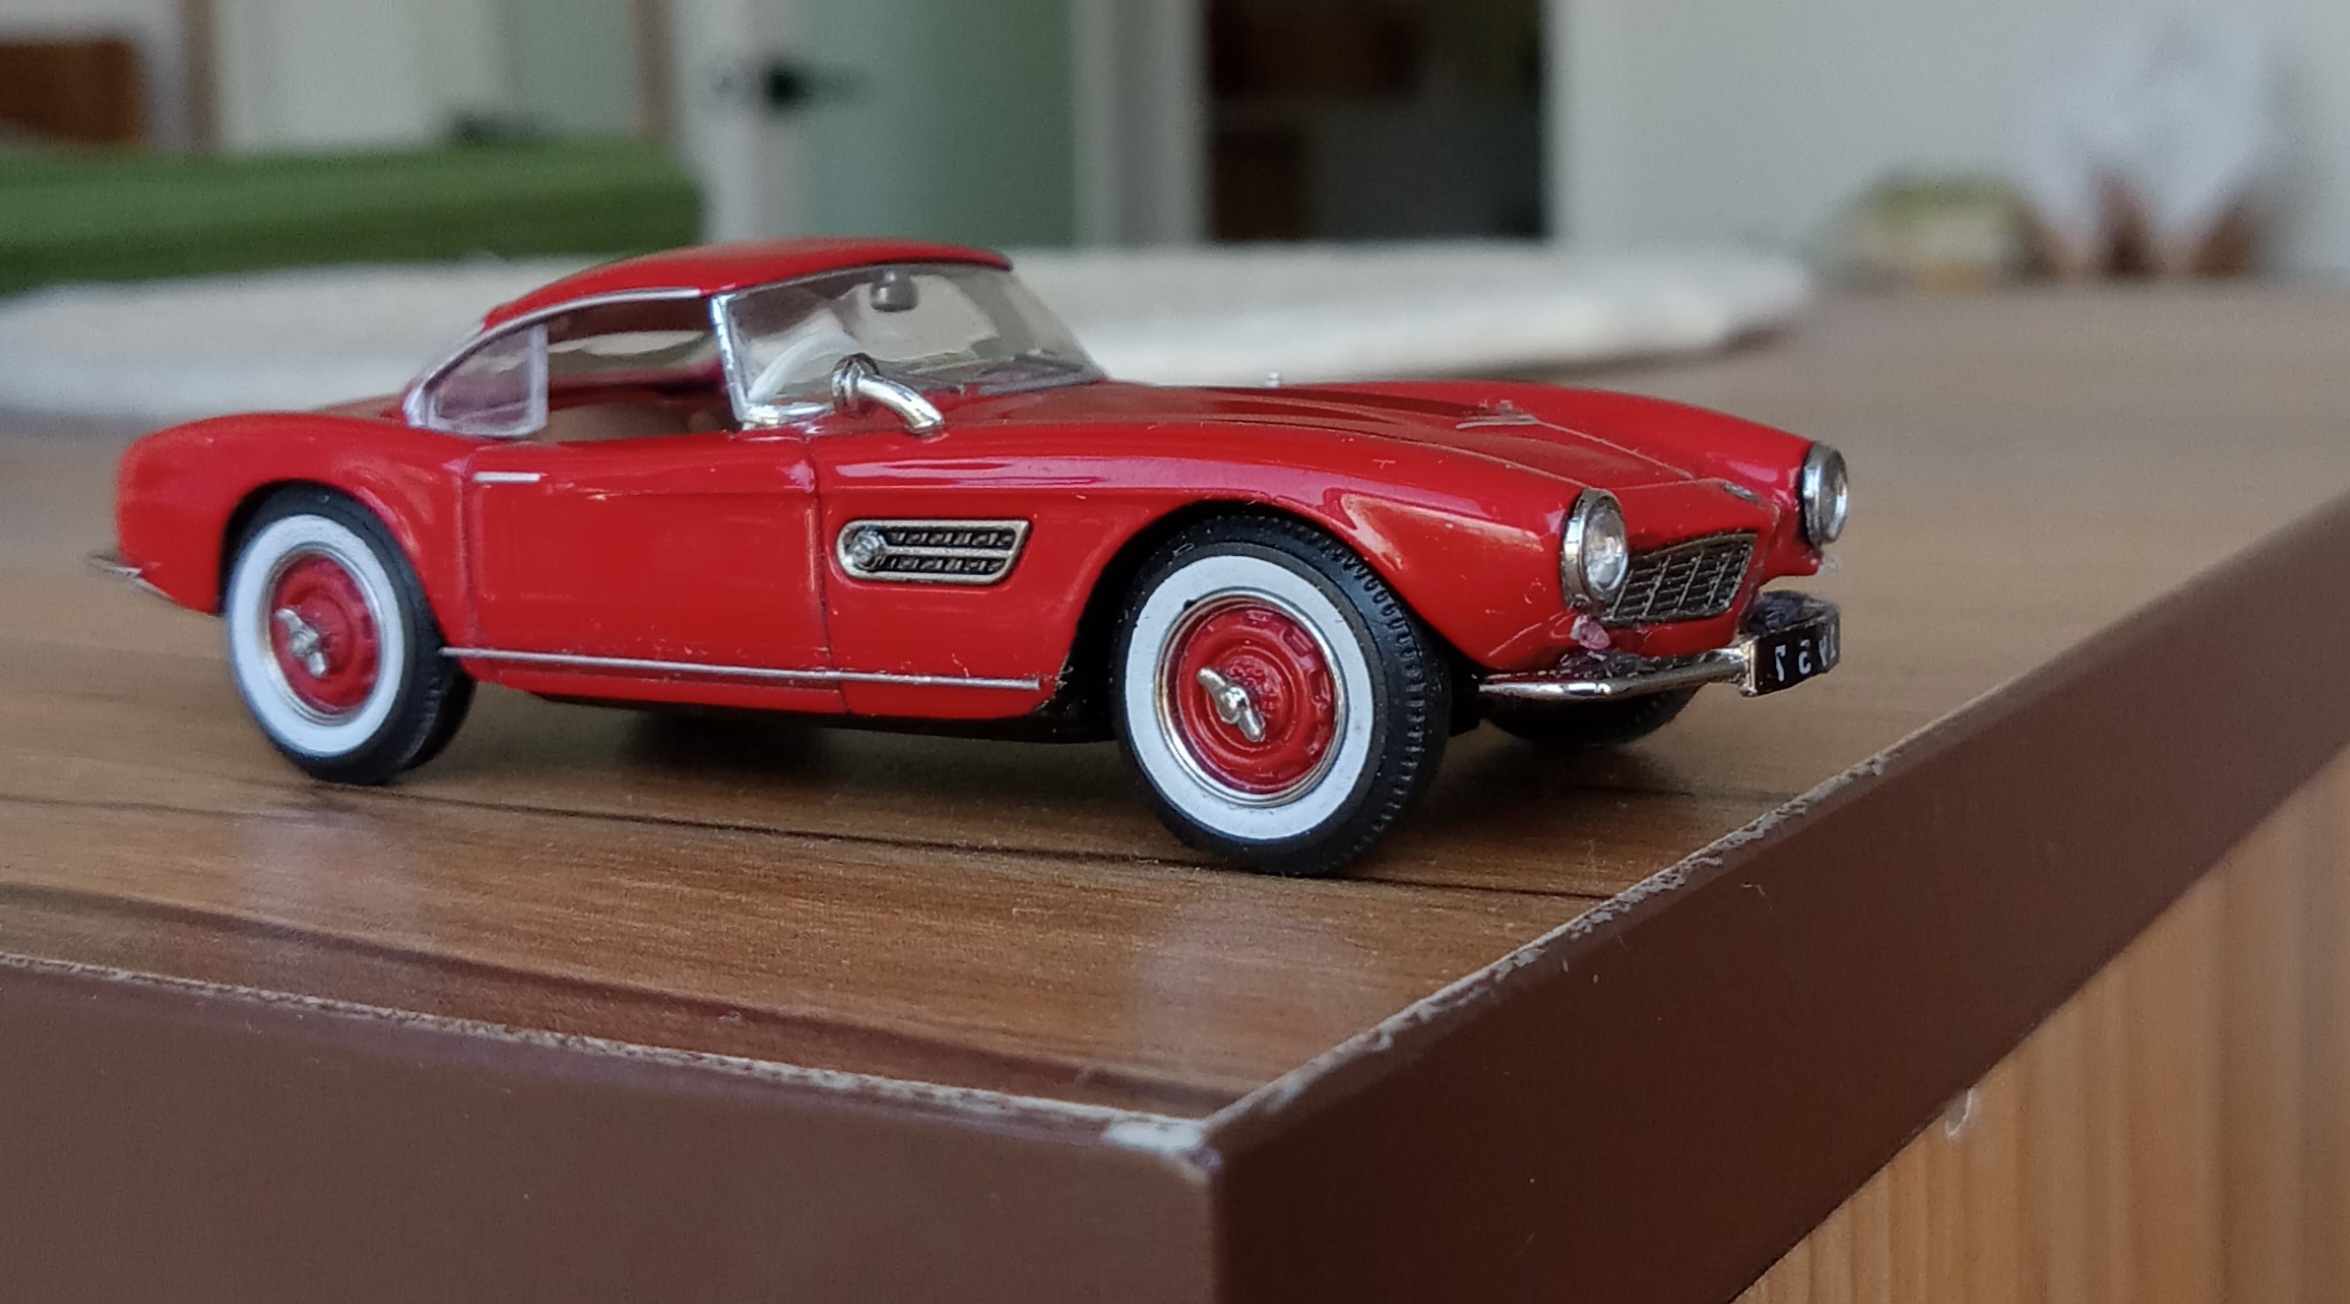
1:タイヤホイールを外して、AUTOWORLD社製の67年エルドラド(アイスブルー)のホワイトレター・タイヤに装換+車高/ホイールベースの微調整
2:ウインドシールド上端を2㎜ほど削り、ハードトップの前端の内側、後端の内側も少し削って、HT装着時の全高を2㎜程削ります
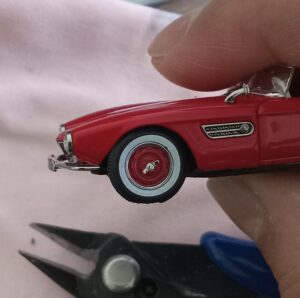
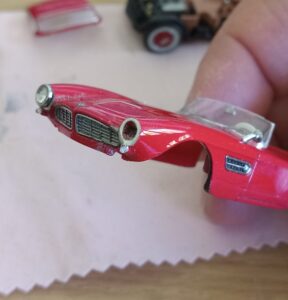
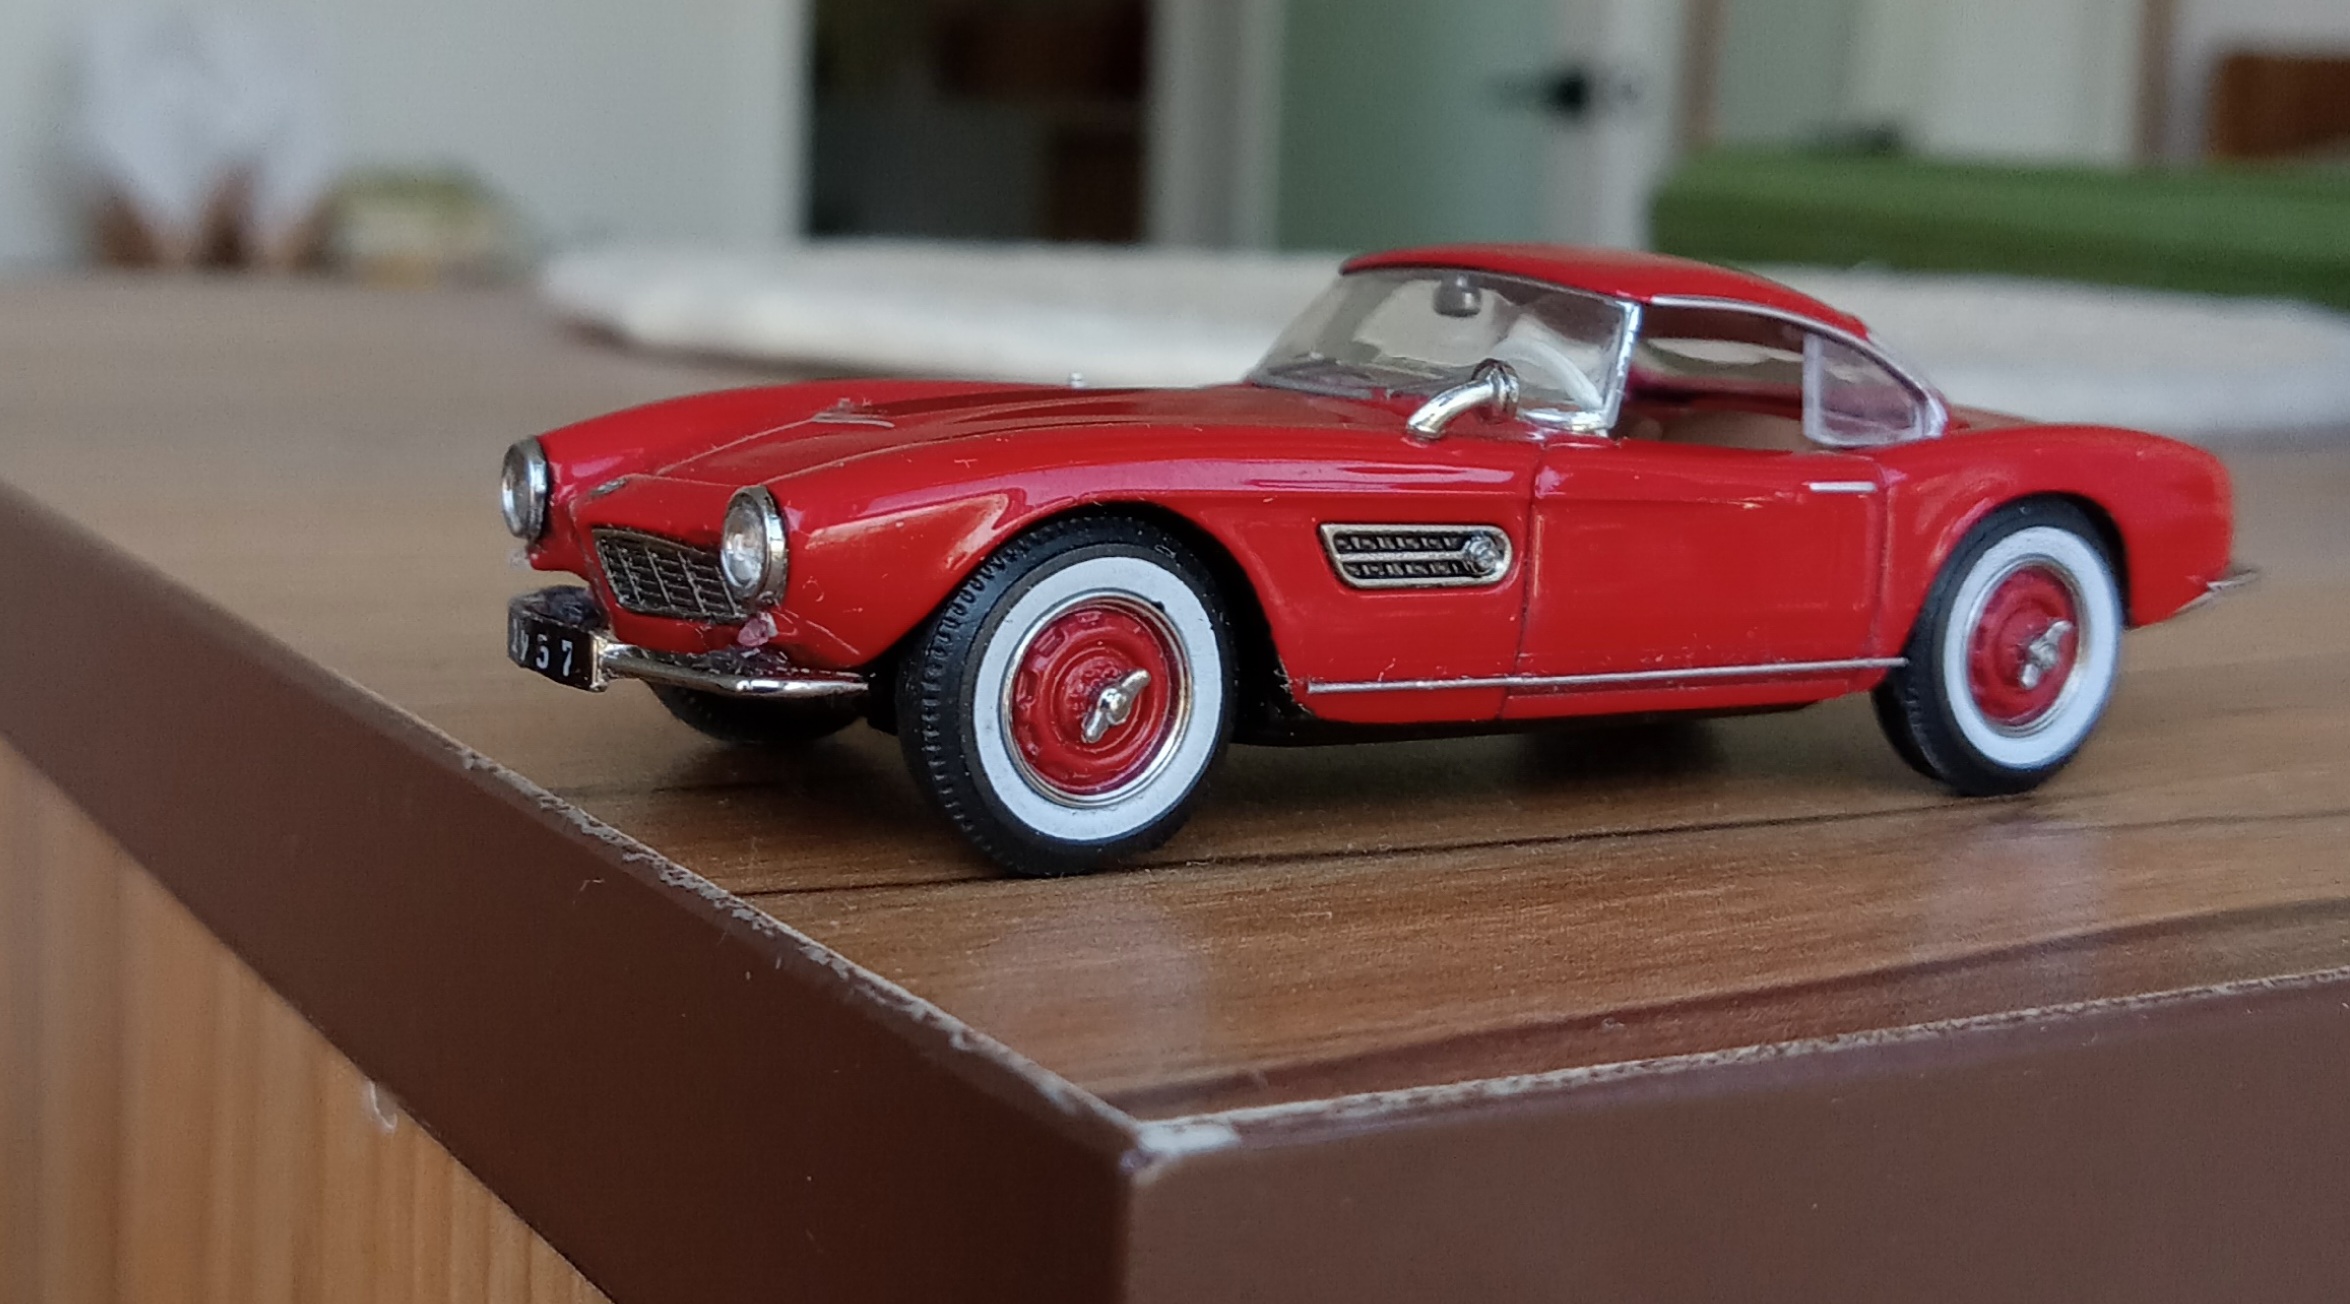
3:イラストとサイドビューの図版を参考に、前後バンパー位置を上方に2㎜程度移動します+フロントバンパーはさらに前方にも2㎜移動させ、接着
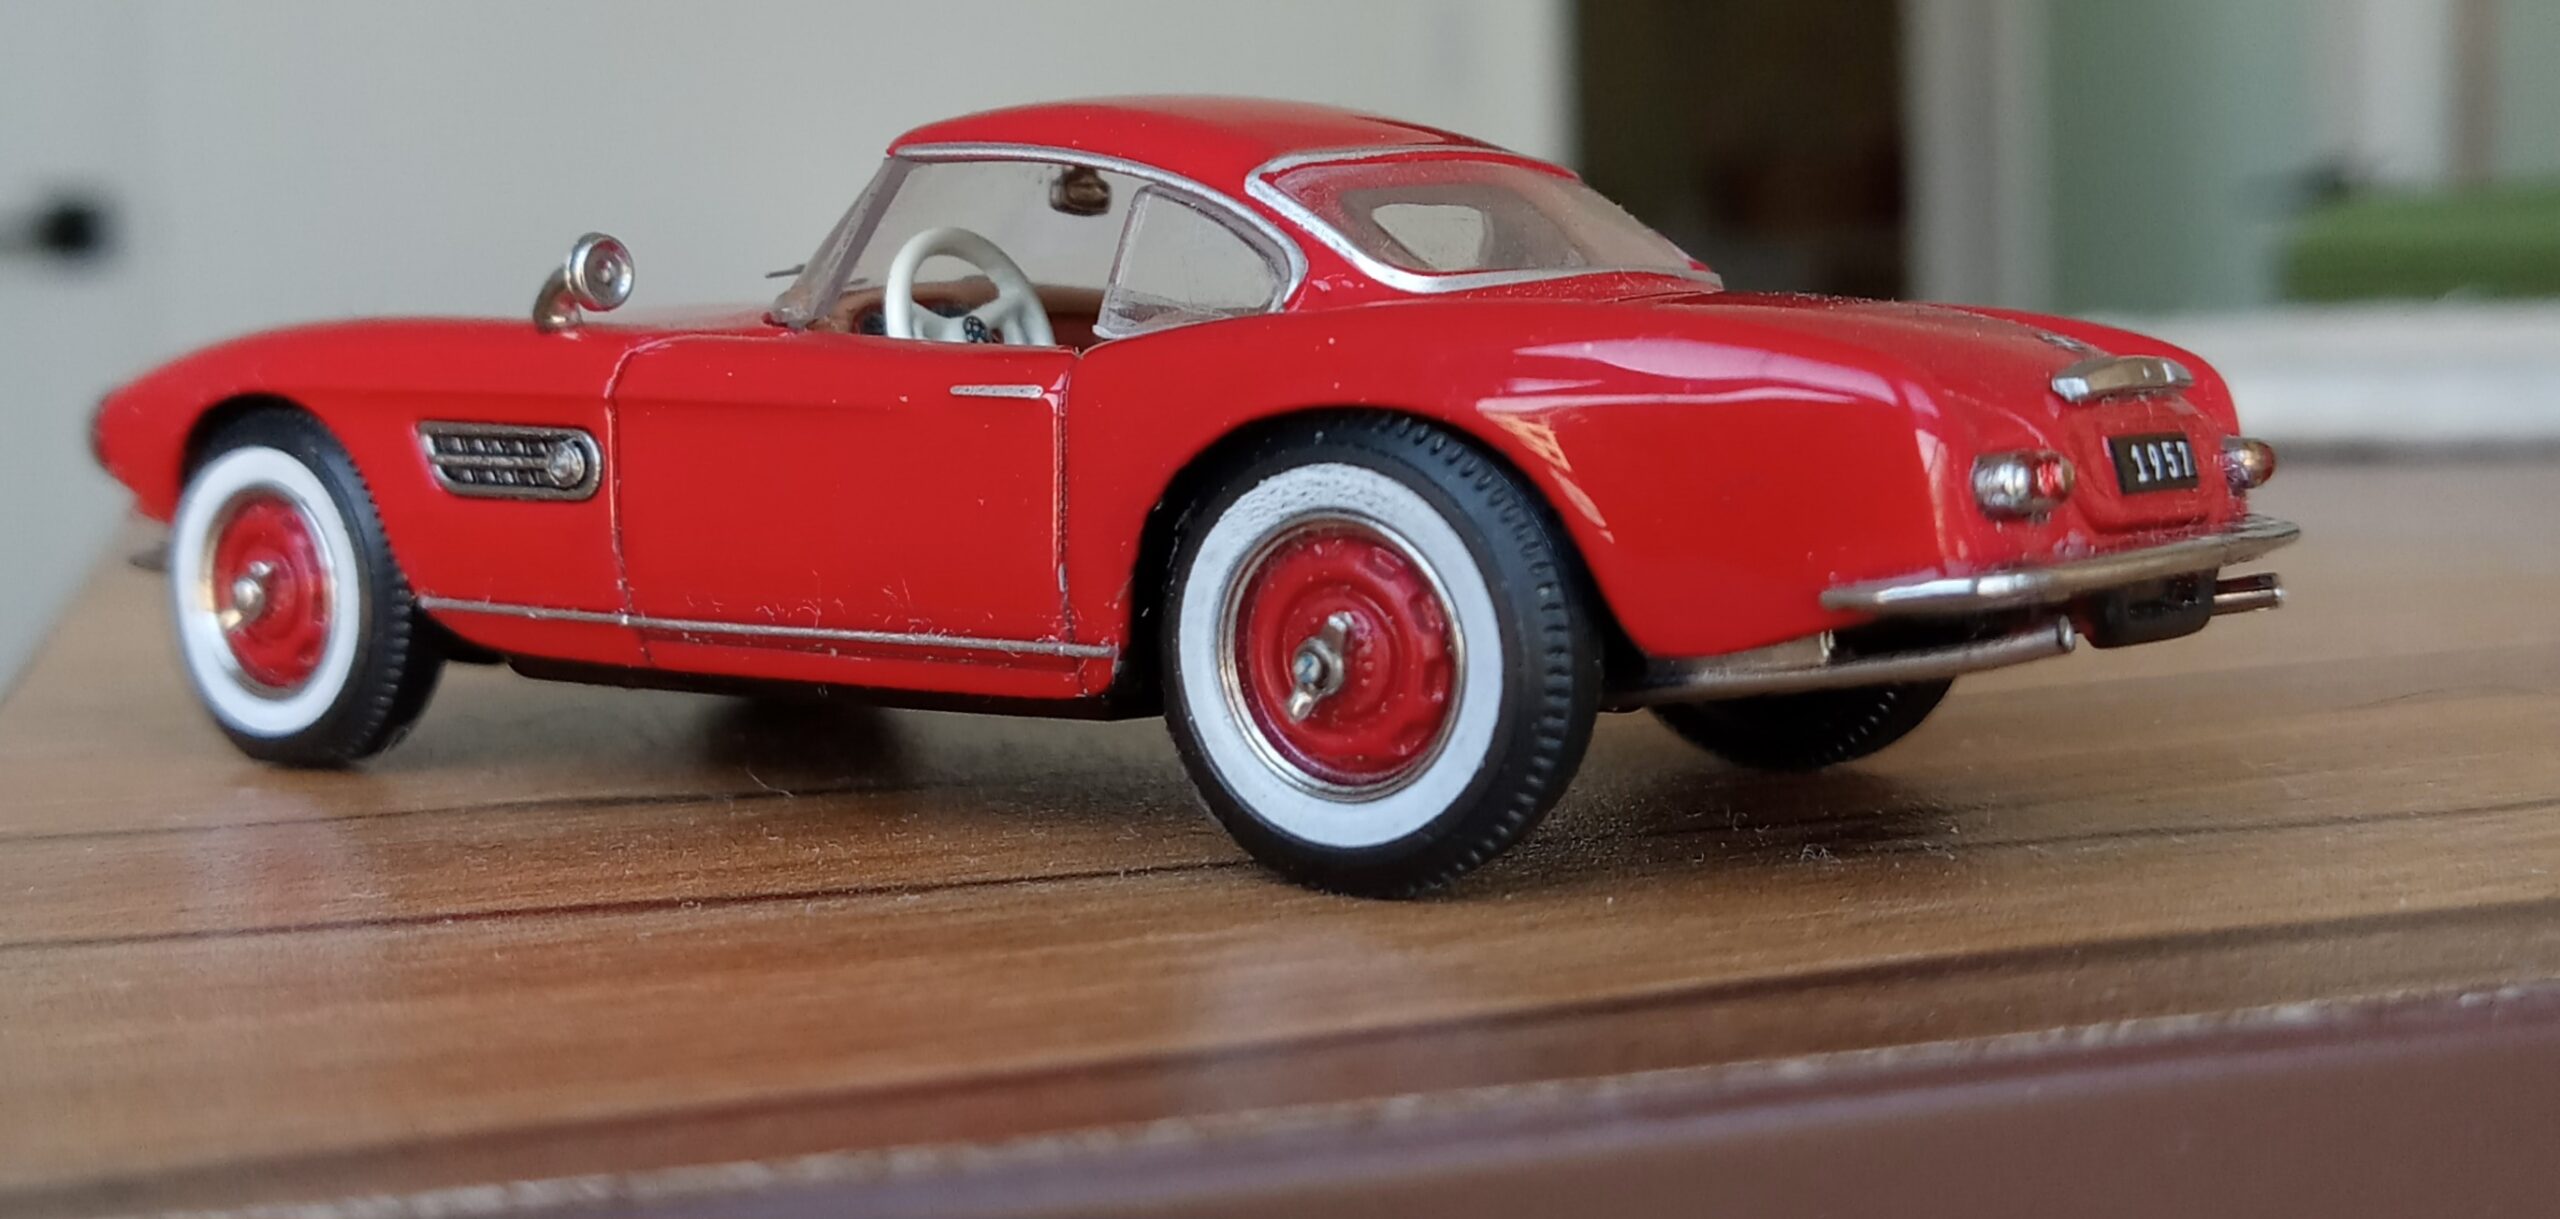
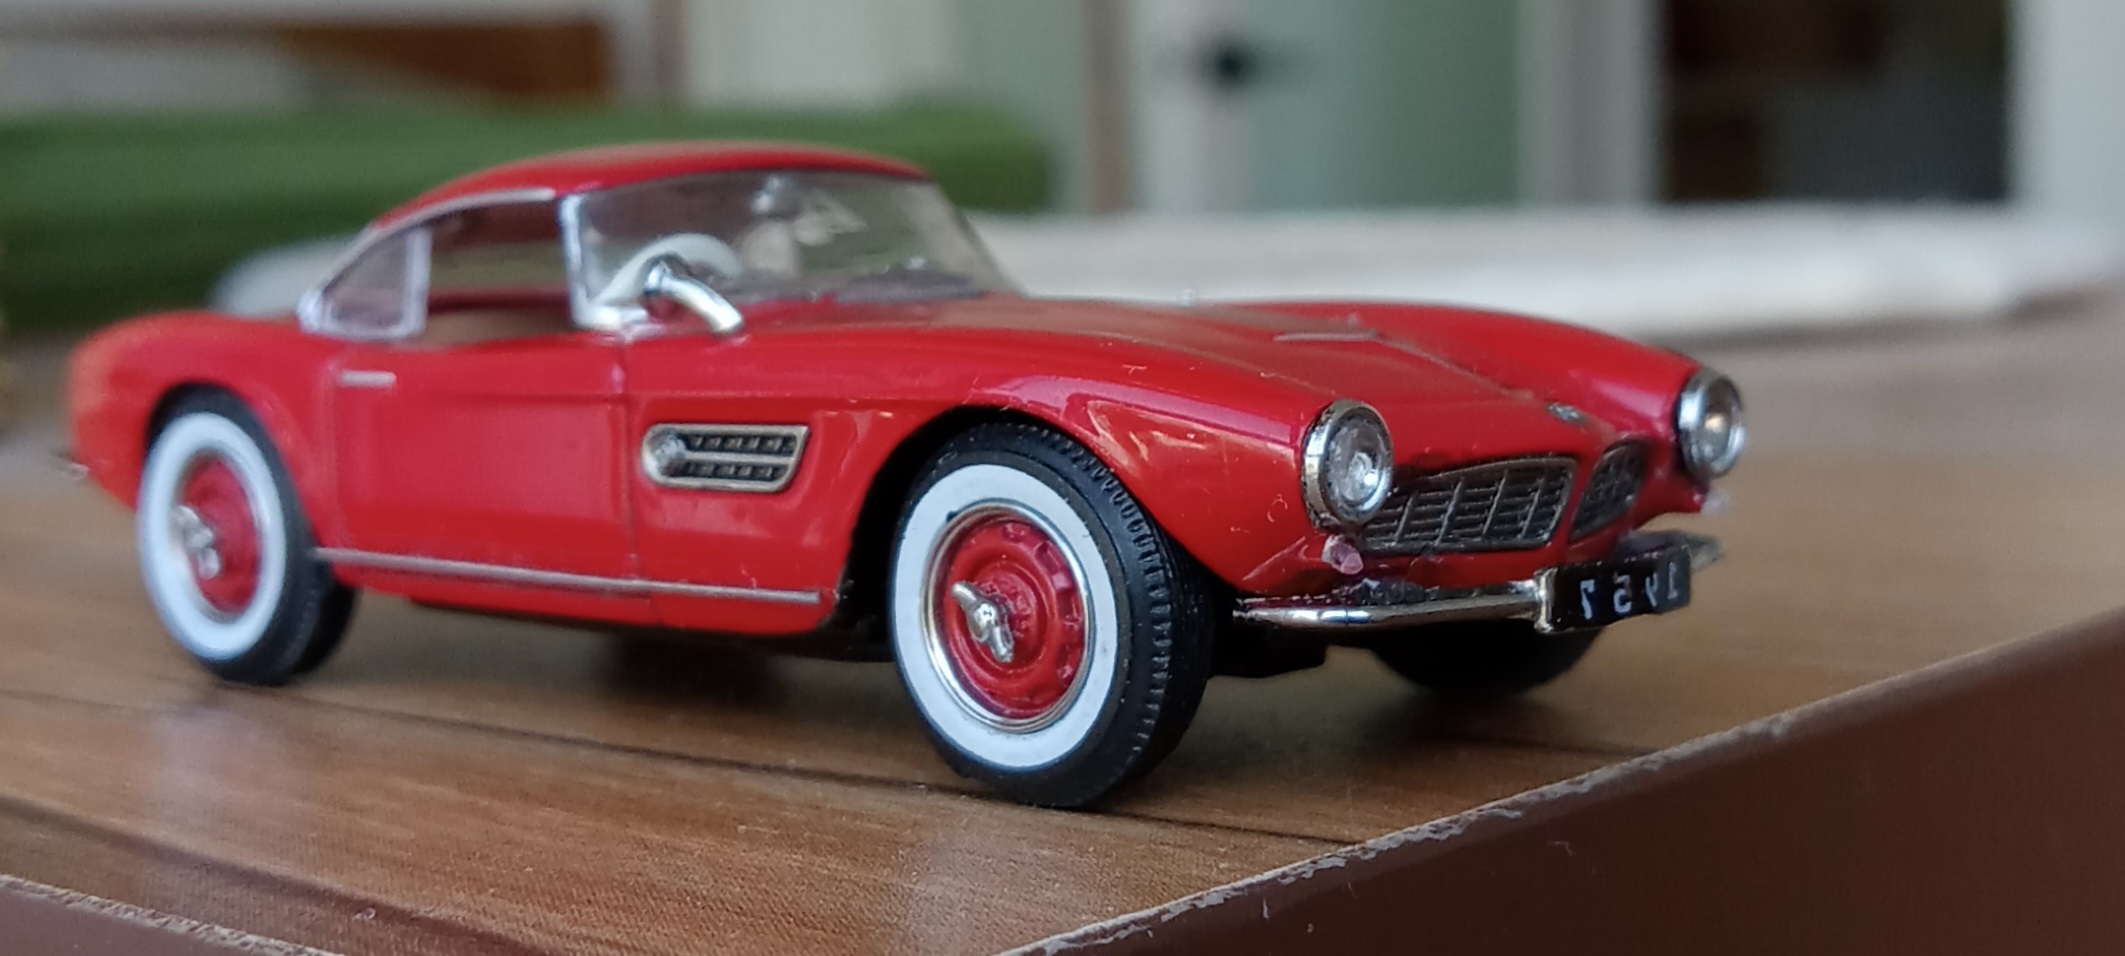
4:サイドビューの図版を参考に、ボディー横のロッカー部の形を滑らか担うよう削り、更に極細の金属ワイヤーなどをメッキ加工して、サイドモールを追加
5:ヘッドライトを丁寧に外し、ボディー側を1㎜、ライトリング側を1㎜削って、断面が目立たないよう油性マーカーなどで修正塗装してライトを再接着
ーーーーーー>こうすることで、ボンネット先端部分の出っ張りを強調できます。
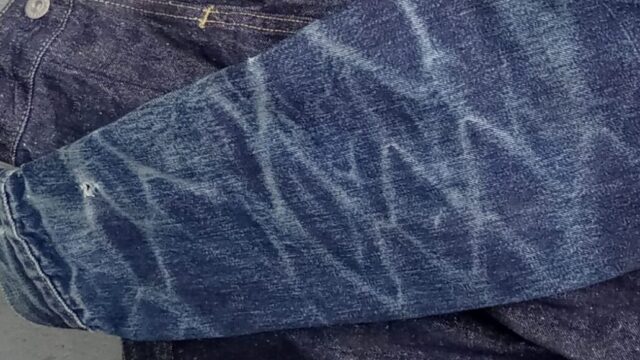
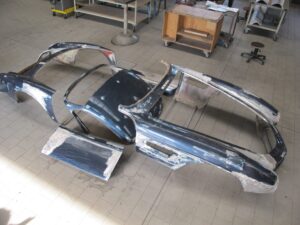
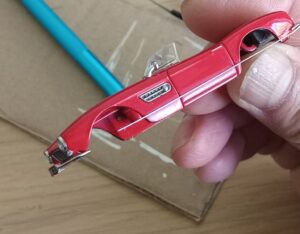
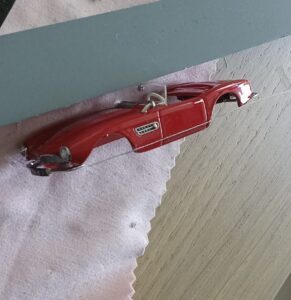
6:柔らかい布などでカバーして、やっとこ・ペンチなどを使い、慎重にリアフェンダー以降のボディーを【上向きに5度ぐらいの角度】になるように押し曲げます。
ーーーーーーー>相当な力技になります、【勘】が頼りの荒技ですが全体に【撓り・しなり】が加わり、ボディーの流れに勢いが出て、効果絶大!!
#改造箇所1ー6
それでひとつづつ画像入りで、解説していきます。
1:タイヤホイールを外して、AUTOWORLD社製の67年エルドラド(アイスブルー)のホワイトレター・タイヤに装換+車高/ホイールベースの微調整
ーーーーーーー>車高が低くなりすぎて、かえって前後バンパーの高さとハードトップの高さが目立ち始めました。
(AutoWorld社製、1/64 キャデラックエルドラド 1967からホワイトウオールタイヤを拝借しました。サイズとホイールがフィットする溝がぴったりでした)
2:ウインドシールド上端を2㎜ほど削り、ハードトップの前端の内側、後端の内側も少し削って、HT装着時の全高を2㎜程削ります
ーーーーーー>ハード・トップの裏側を削って、車高を前輪中心に少し上げてみました。
ーーーーーー>やはり前後バンパーの高さが気になります。

3:イラストとサイドビューの図版を参考に、前後バンパー位置を上方に2㎜程度移動します+フロントバンパーはさらに前方にも2㎜移動させ、接着
ーーーーーーー>バンパー位置の調整で、ボディーの下端のラインに下に突のスイープが出来て、『動かずとも』車に勢いが加わりました。
ーーーーーーー>イメージが例のサイドビューに一気に近づきました。
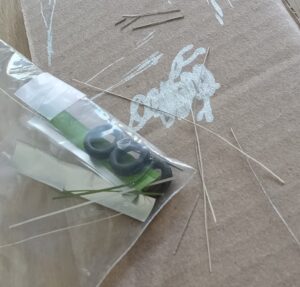
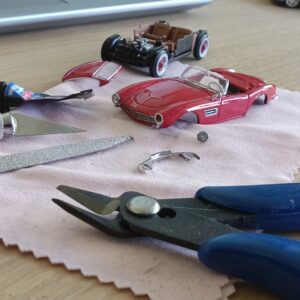
4:サイドビューの図版を参考に、ボディー横のロッカー部の形を滑らか担うよう削り、更に極細の金属ワイヤーなどをメッキ加工して、サイドモールを追加
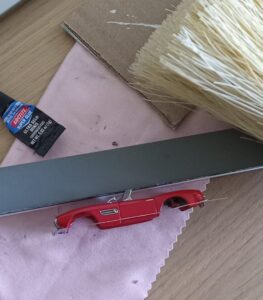
(最初はプラバン、銅線、次に鉄線、和帚の繊維、最後は化学繊維製のほうきの中から一番細いものを選んで、メッキ加工して、エポキシ系ボンドで接着!何とかやり遂げました。)
ーーーーーーー>今後ミニカーのサイドモール追加工作は楽勝です!
ーーーーーーー>ヘッドライト・リングの厚みが気になり、ボンネット先端の『尖り』があまり見えません。
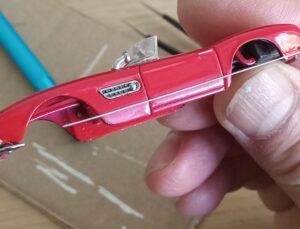
5:ヘッドライトを丁寧に外し、ボディー側を1㎜、ライトリング側を1㎜削って、断面が目立たないよう油性マーカーなどで修正塗装してライトを再接着
ーーーーーー>こうすることで、ボンネット先端部分の出っ張りを強調できます。
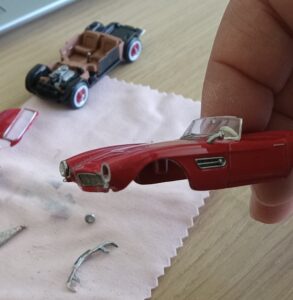
6:柔らかい布などでカバーして、やっとこ・ペンチなどを使い、慎重にリアフェンダー以降のボディーを【上向きに5度ぐらいの角度】になるように押し曲げます。
ーーーーーーー>相当な力技になりますが、【勘】が頼りの荒技ですが全体に【撓り・しなり】が加わり、ボディーの流れに勢いが出て、効果絶大!!
ーーーーーーー>最後に残ったのは、フェンダーミラーの作り替え&ホイールの色変えですが、力尽きました。ここはまた後程、、、、
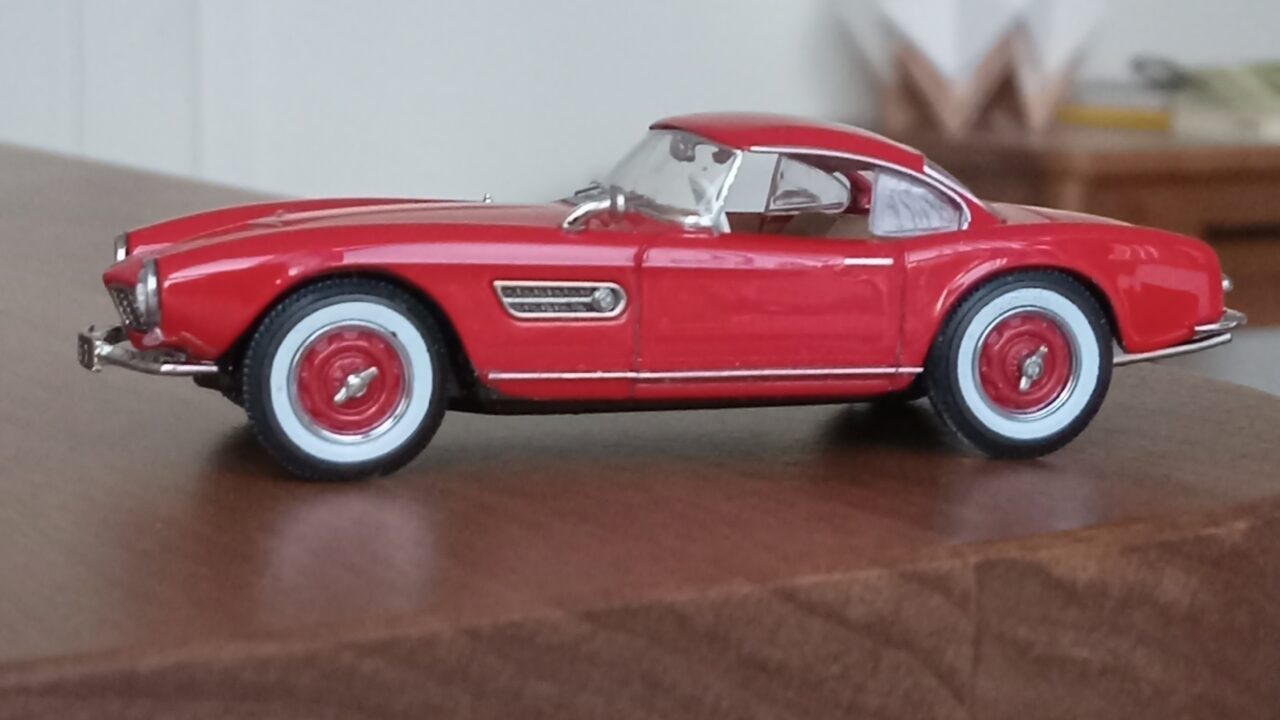
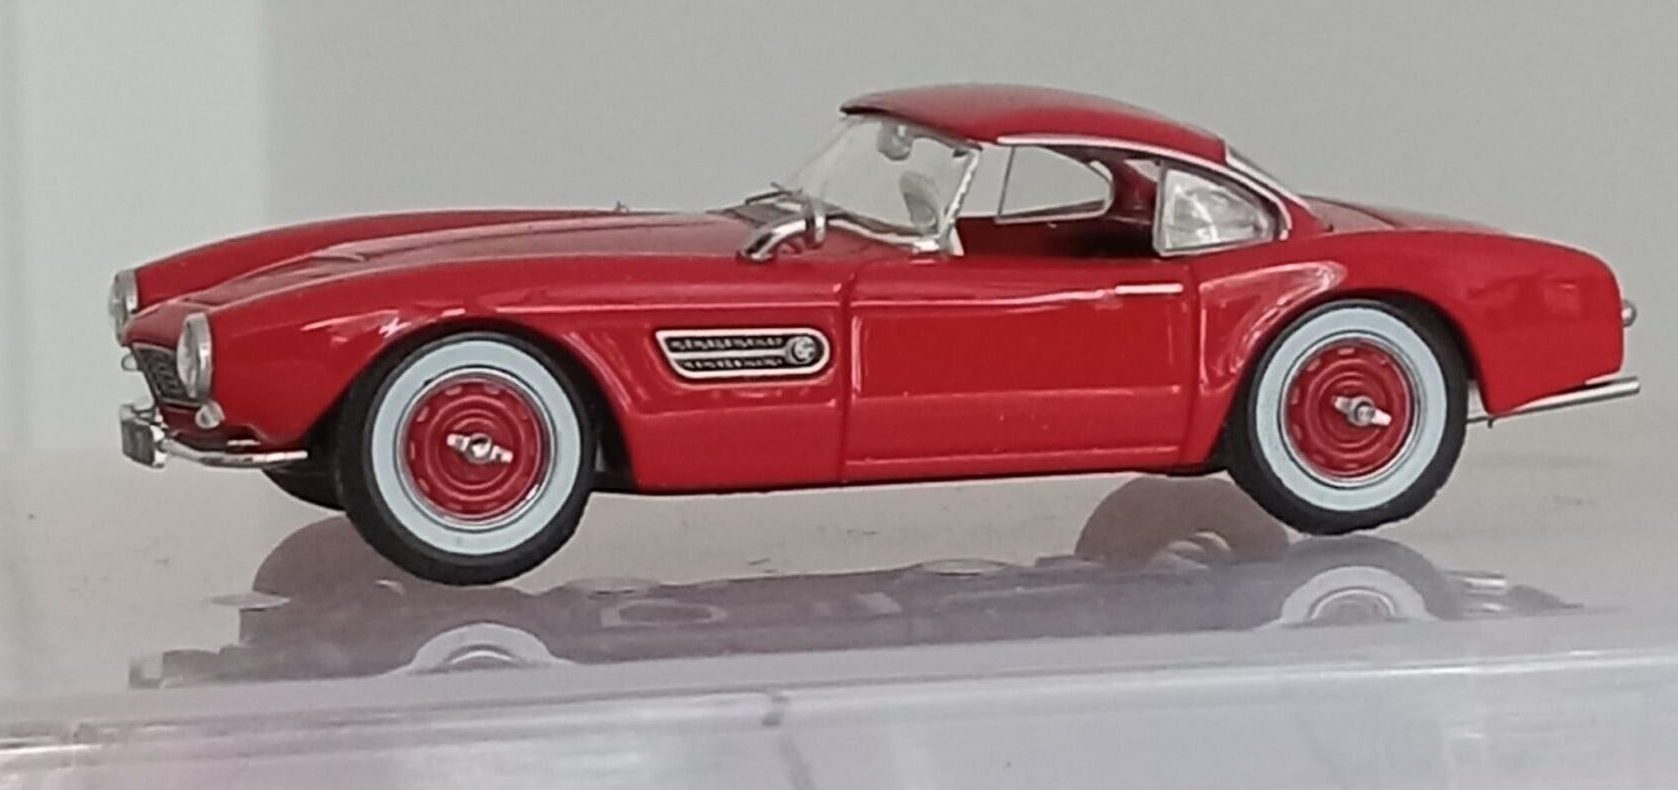
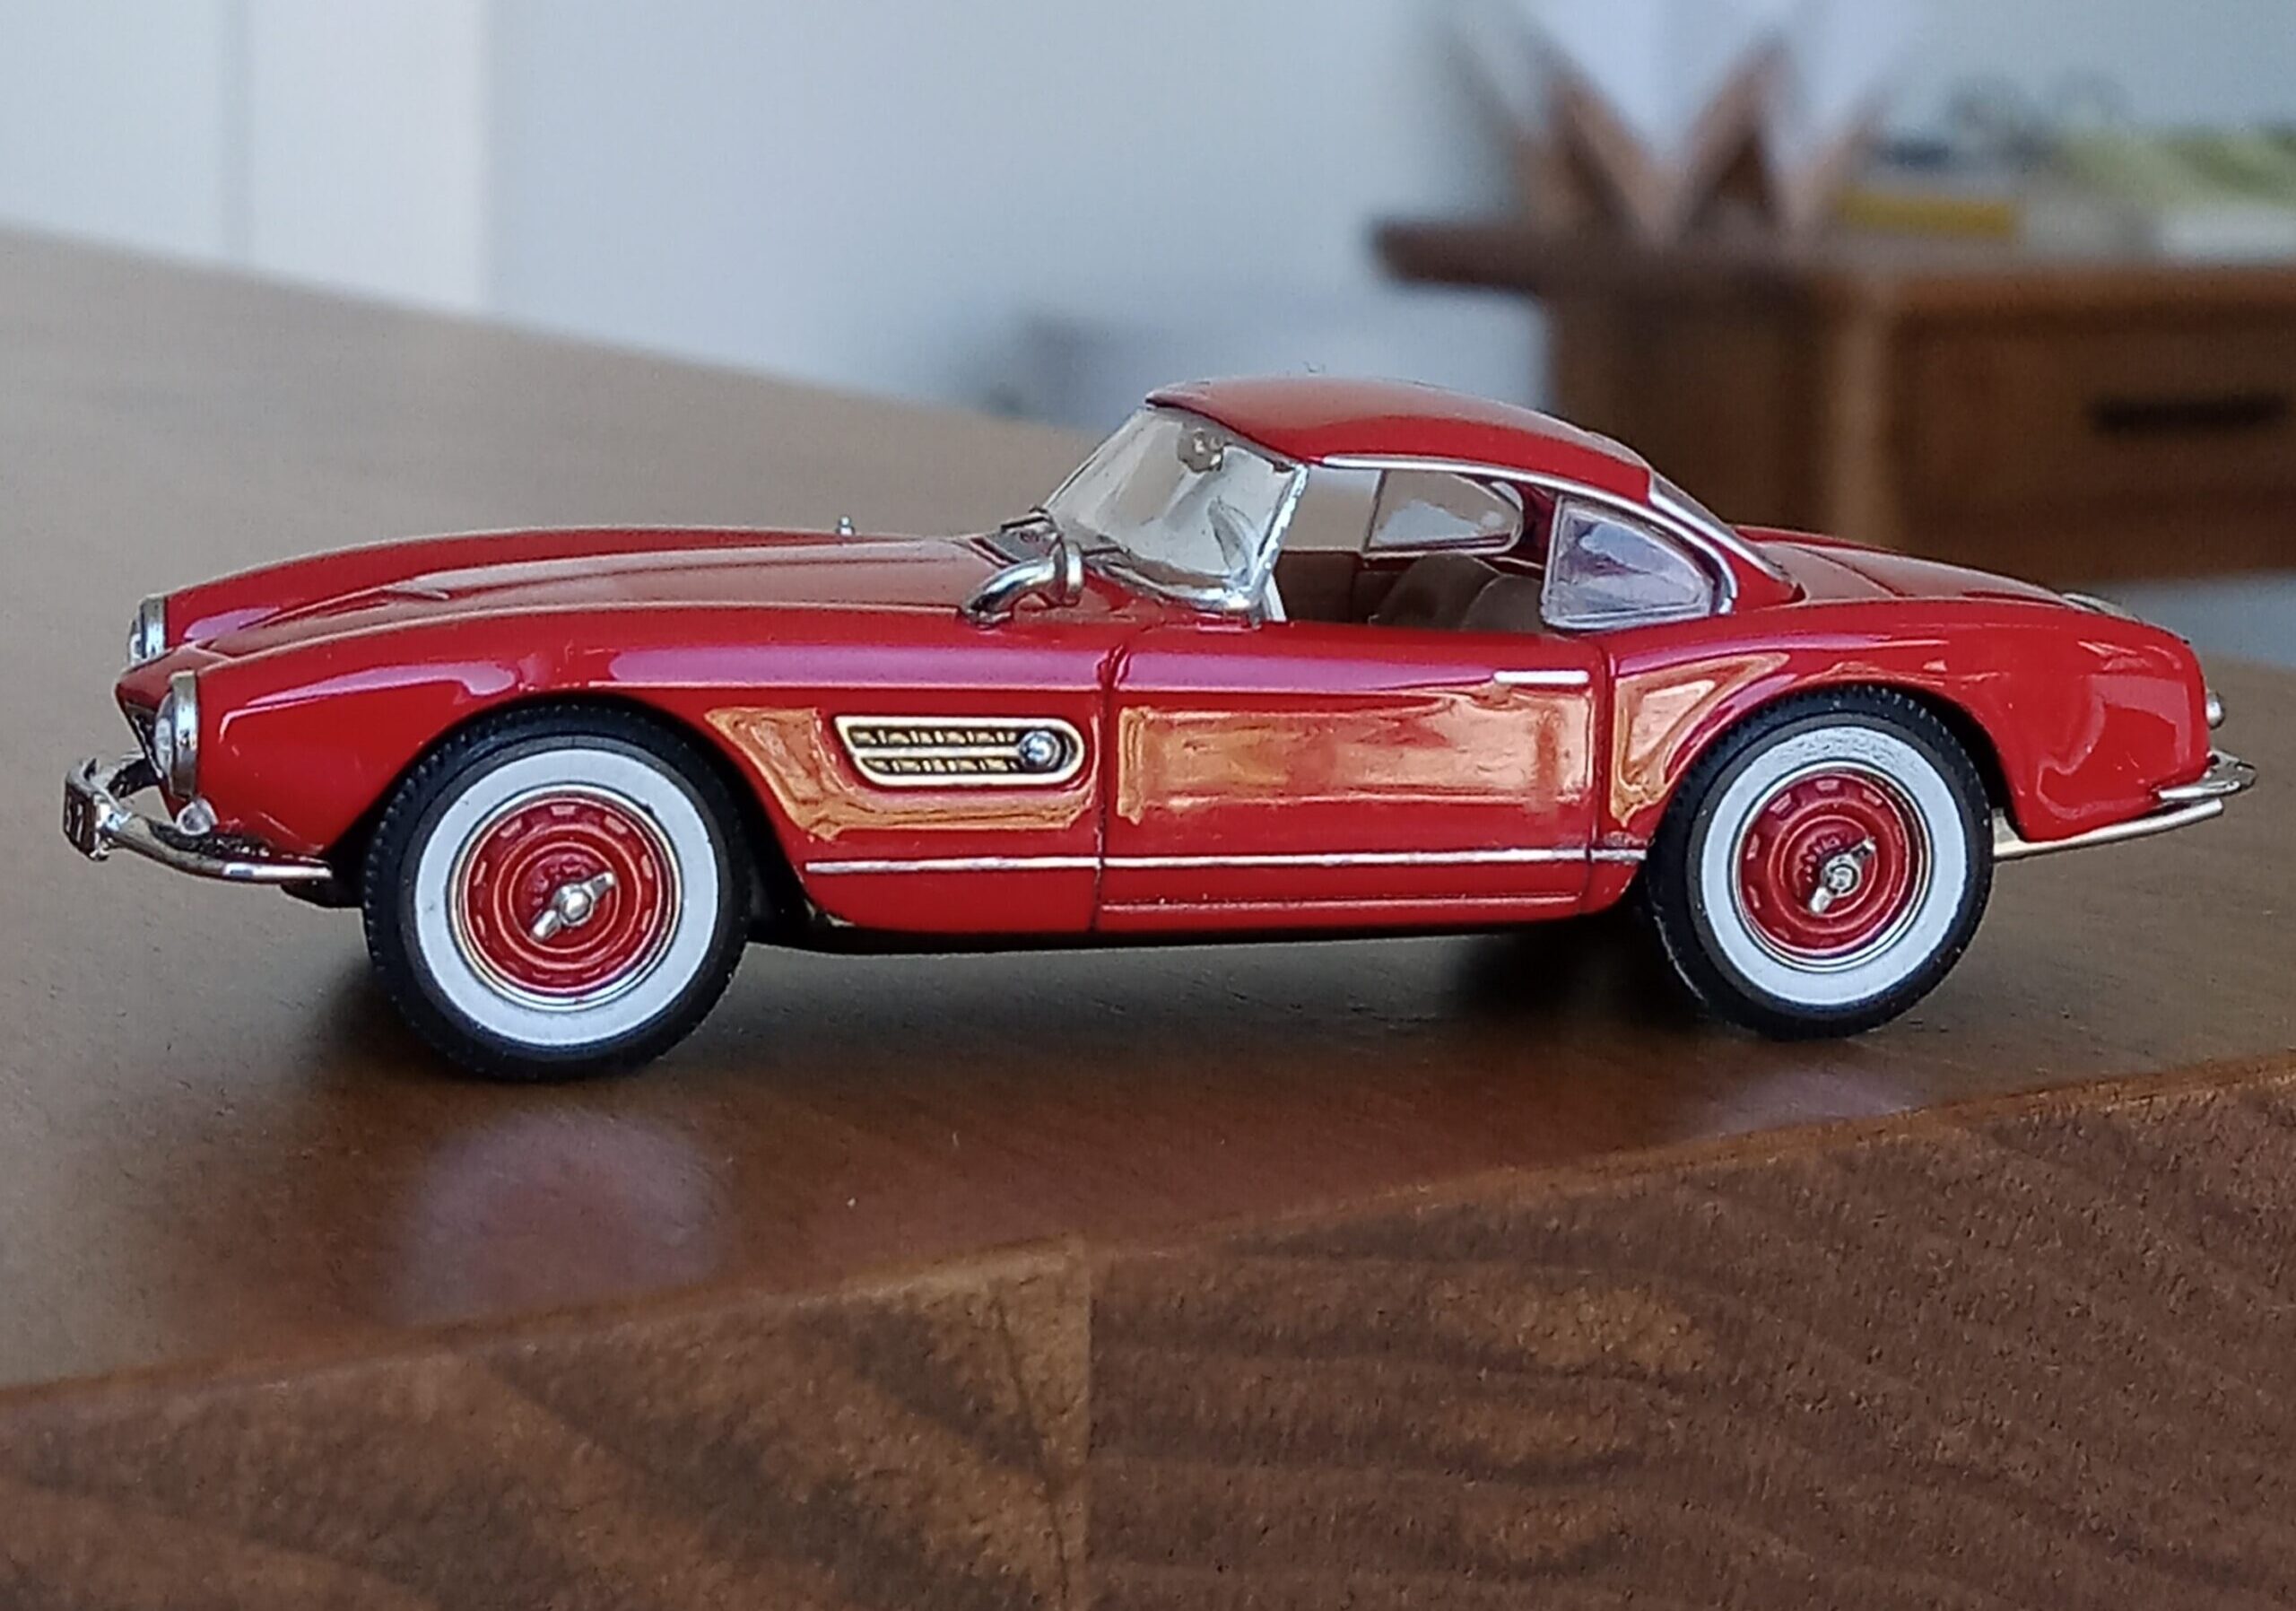
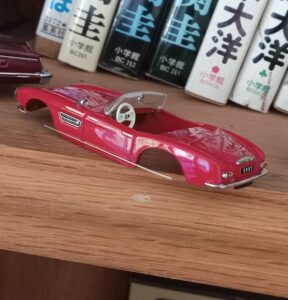
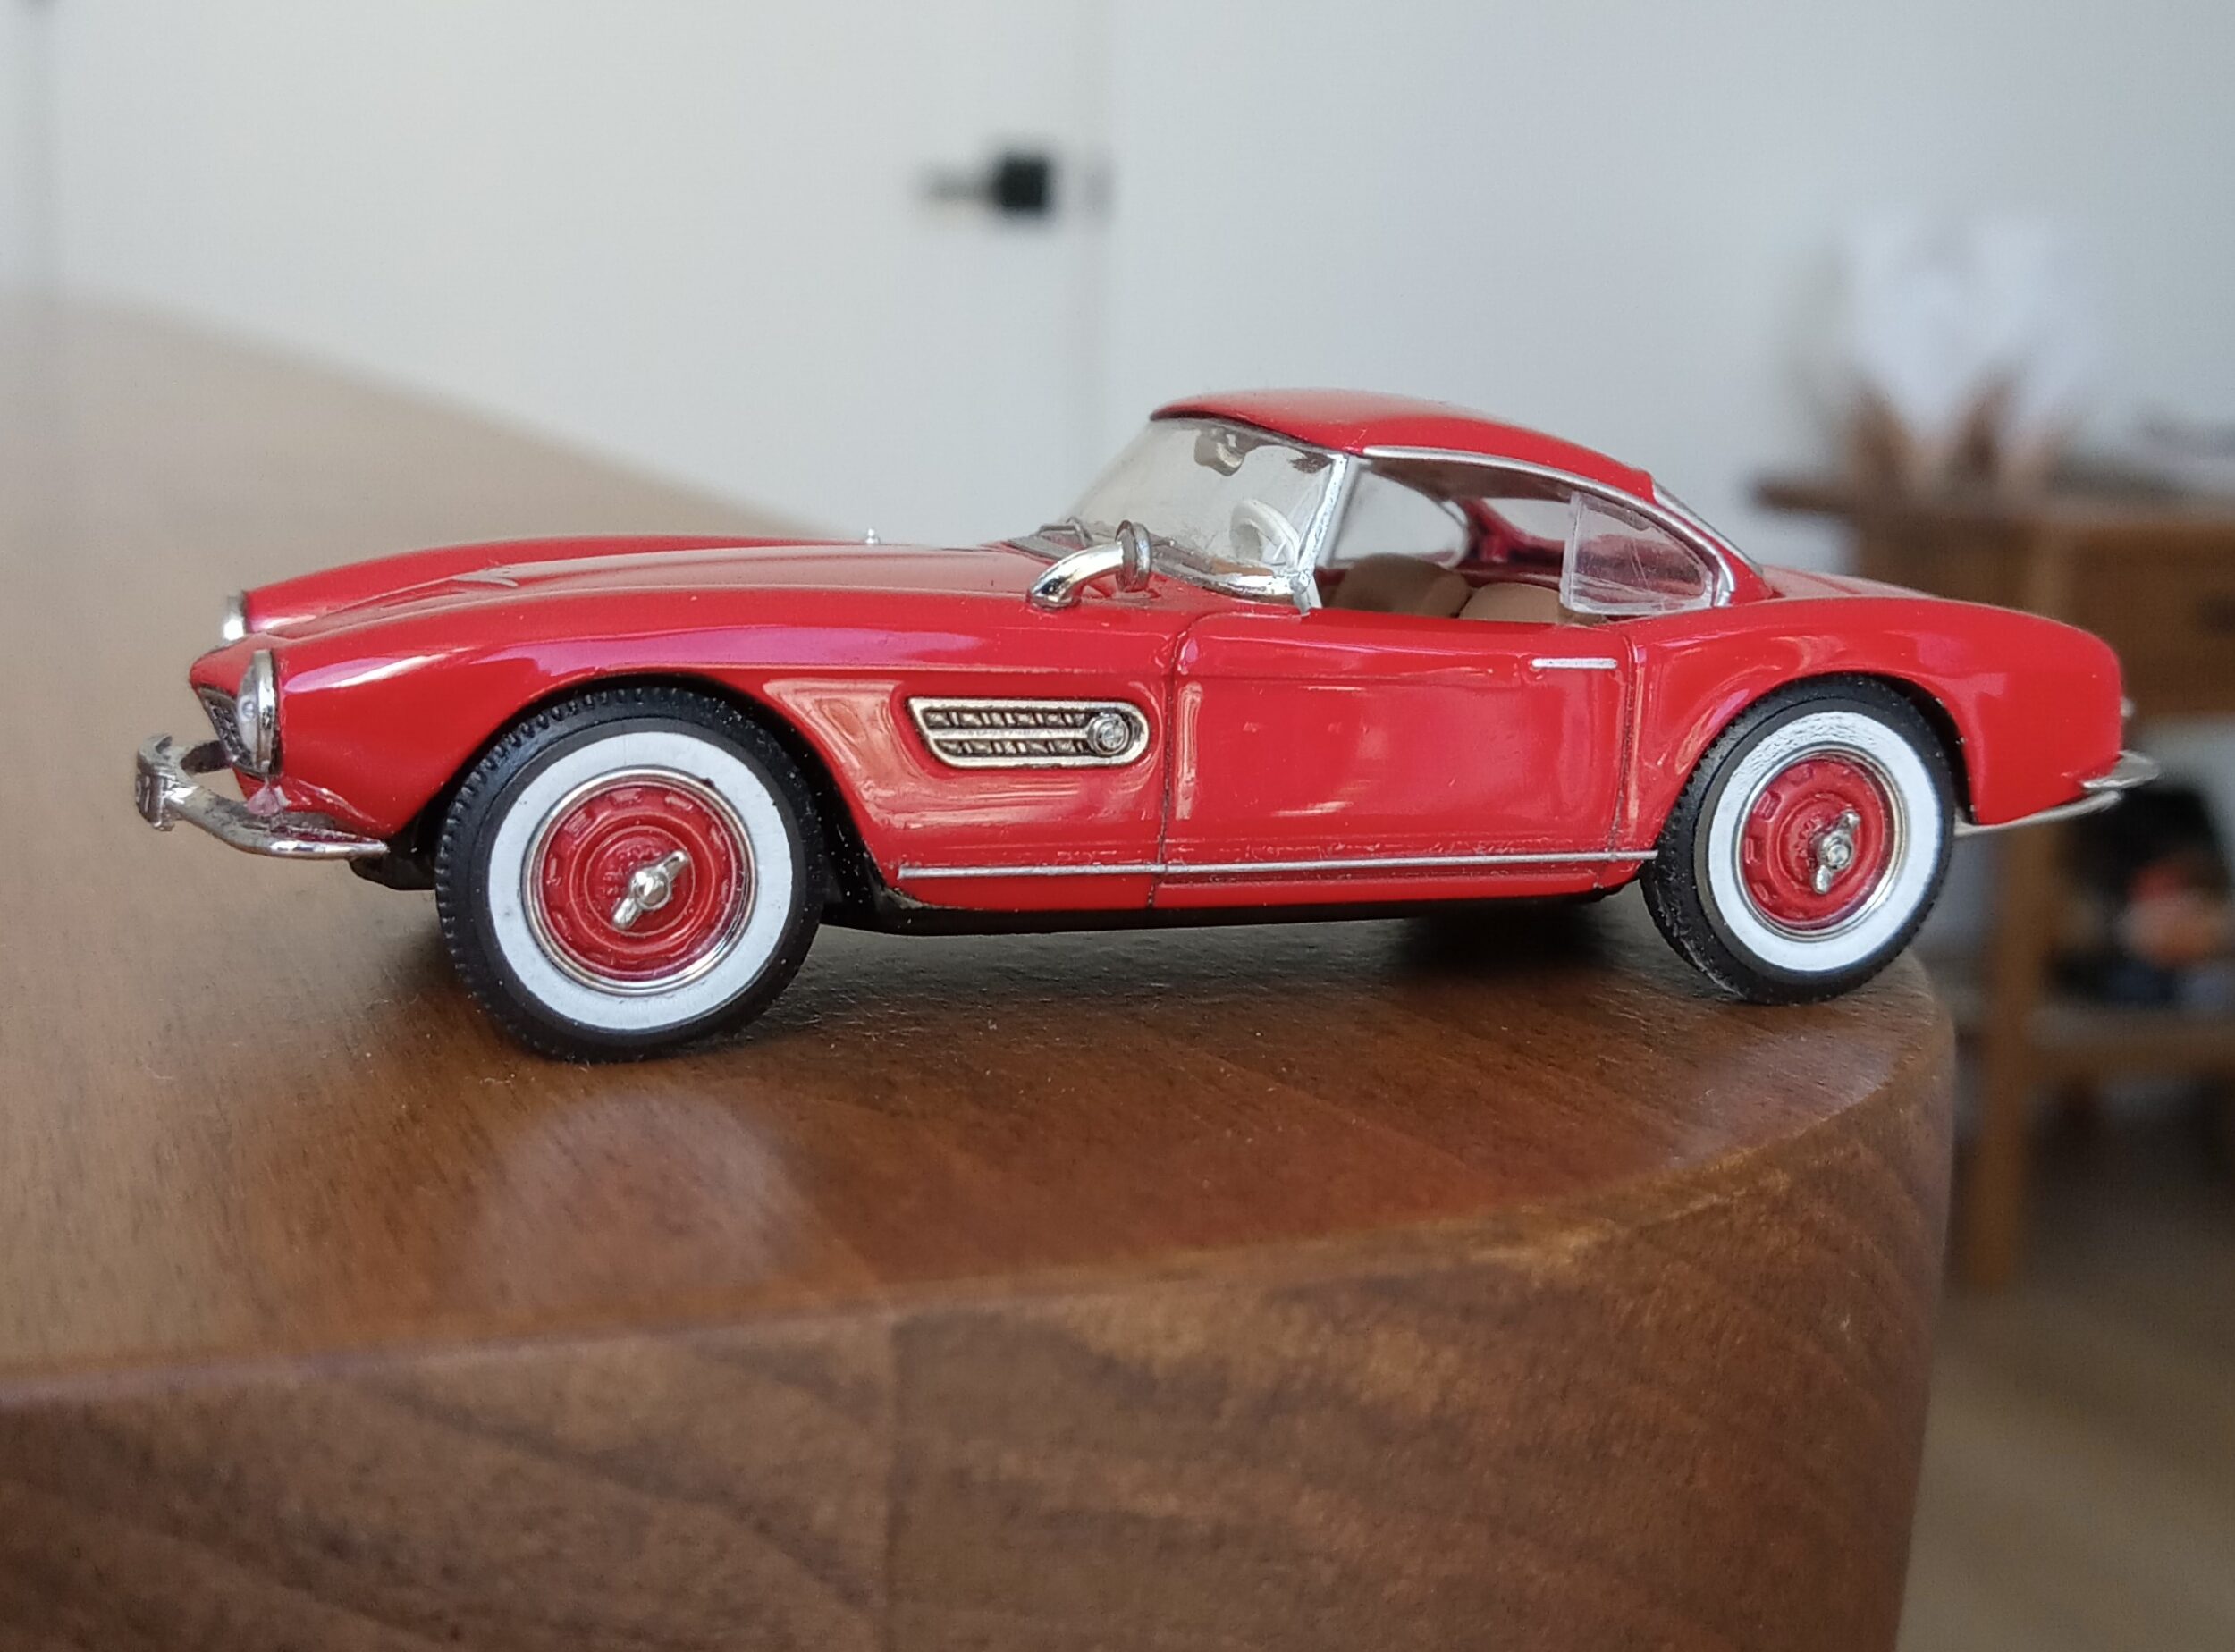
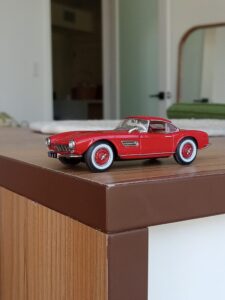
*サイド・バイ・サイドで比較してみます!!
ずっと『これがやりたかったです!!』
ここ3か月近くも、
『あーでもない、こーでもない」と、
少しづつ前進してきましたが、
やっと、大まかな外観の整合性は取れた感じです。
今後とも、
素晴らしいミニカーと、
素晴らしいデザインが
一緒に出会ったら、
こんな感じで、改造記事を書いてみたいです。
*改造車写真館:
ではおまけとして、
その他の画角の写真も載せてみます!!


第一回目の「ミニカー・改造記事」
いかがでしたでしょうか?
次回は未定ですが、
この分野が一番好みなので、
またすぐに改造記事を書く事になりそうです。
お楽しみに―
*付録:
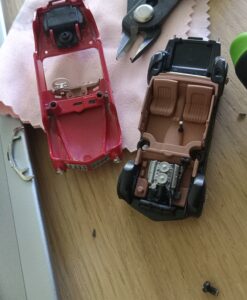
*カシメ止めとねじ止め:
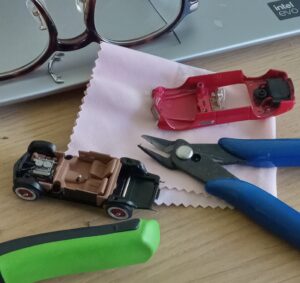
1/64のミニカーは、ボディーと車体が伝統的な「カシメ留め」という
ダイキャスト・メタル製のボディーから生えた「中央に円錐形の凸面のある円柱」を
先の丸いハンマーのようなもので潰すことでしっかり留めてあるのですが、
これを外すのが非常に大変で、
大きなドリルでカシメ部分を4−5mm粉砕しないと外れません。
(最近の中国企劃のものはネジ止めなので助かりますが、もともと出来がいいので、
改造の必要もありません。)
*改造に最適なミニカーは?
やはり出来が大味なホットホイールや、マッチボックスの$1、45位のものに
いろいろな部品を使って改造するのが最高です。
マスキングで窓枠や、装飾部分のメッキ加工を追加することで、
工芸品的な味が加わり、見違えるほど素晴らしくなります。
ホットホイールや、マッチボックスの従来の廉価版商品中には
骨格はピカイチなものが多く存在しており、
自分の目を信じて、
手を加えれば宝物に化けます!!
(ファッションモデルの発掘みたいな感じです)
やはり小さな1/64のミニカーの場合、本物より若干カコイイぐらいじゃないと、
写真を撮っていても張り合いがありません。(笑)
本ブログと記事内容につきまして:
ブログ記事を書くにあたり私の目標は、立体造形(料理も含めて)とのかかわりを通じて、私個人の特徴的(ネジ曲がり方も含めて)な評価軸を解明することで、「美しさ・美味しさ」に対する好奇心や、探求心を、どのように満足・充足させてきたのかを明記しておくことです。
従いまして、記事の中に出てくる、数字や年号、微細なデータなどには細心の注意を払っておりますが、時に大きな間違いや勘違いを犯していることも考えられます。特に自動車記事における主要諸元や、年号などには紛らわしいものも多く、あくまで参考程度に考えていただければ幸いです。
私としては、記事の中で個人的な外観デザインや味覚の評価、そこから広がる後半部分につなげるための、『流れ』を作るための客観的材料として年号やデータを挿入している感じです。あくまで重視したいのは、私個人の頭の中で起こる、記憶の錯そう的混沌から生まれる新たな『見方』や『情報の予想外のつながり』です。その勢いを作り出す、『流れ』の一環として、諸データが副次的に必要となるわけです。
話がそれますが、大好きな落語の世界に「三題噺」という、その場て会場から募った3つのお題を使って1つのお話に仕立てるといったお遊びがございますが、私はそれに近いことを立体造形の特徴や(料理のお味)をお題にして行っている感じがします。その中で頭の中に去来する数々の着想が、全く予想外で楽しく、次回からの記事内容を大幅に変えたり、新展開につながっています。
当ブロブの仕組み:
『好奇心の点と線 x 気まぐれ脳内回路=予想外の新展開』
こんな自分勝手なブログですが、今後ともよろしくお願いいたします。
追記:上記の『流れ』を作る為に必要な写真はできる限り、個人所有のミニカー・自前の料理などを使い撮影しておりますが、その他の必要最小限の図版や写真を他のブログ主様の記事や諸会社ホームページなどからお借りしております。(記事内容に合うよう加工させていただき、使用時は最小の解像度で載せております。)問題がある場合、ご連絡いただければ直ちに降ろさせていただきます。
追記2:当ブログ記事に掲載のミニカー写真等(個人撮影)は許可なしで、どのようにお使いいただいても結構です。私個人の創造性はこの世のもの、と言う認識の上で記事を製作しています。
!!!!!!!!!!!!!!!!!!!!!!!!!!!!!!!!!!!! COPY !!!!!!!!!!!!!!!!!!!!!!!!!!!!!!!!!!!!!!!!!!!!!!!!!!!!!!!
こちらは以前、メールにて友人宛に書いた、
最近の中国製1/64ミニカーの怪異進撃について、私見を述べた時の内容ですが、
中国メーカーのオーナーや設計者の自動車に対する情熱が伝わる内容です。
宜しかったら、
ご参考までにーー
n
Part 1: GFCC 1/64 BMW 507 Hardtop, 【Faithfully Reproduces the 1958 Promotional Catalog Illustration?!】
#Project Goal:
The cover illustration + side view from the promotional catalog:
#Miniature Car Modification Series Begins!
In the previous article,
[Favorite Auto Photo Gallery——Top 10 Shots as of December 2025],
it secured an impressive 3rd place:
GFCC 1/64 BMW 507 Hardtop [Antique Red]
However,
while taking photos for that article,
an illustration from a 1957 promotional catalog—one that’s been flickering in my mind for 25 years—kept popping into my head and wouldn’t leave…
A strong desire welled up inside me to make this magnificent GFCC 1/64 507
resemble that promotional illustration.
I started making various modifications,
but then one improvement point after another kept appearing,
and things spiraled out of control.
Because of this,
I’ve suddenly decided to start
Miniature Car Modification Article Vol.001,
which I’ve been nurturing for a while. Yay!
*Masterpiece Mini Car: GFCC’s 1/64 BMW 507 Hardtop [Antique Red] Explained
#Pre-Modification Evaluation of the GFCC 507:
Released in late 2024 by GFCC, a new Chinese mini car company, this 1/64 diecast model: BMW 507.
When I saw the above photo on AliExpress,
I found it hard to believe it was truly 1/64 scale (Hot Wheels size).
Until I noticed the bulky finish of the fender mirrors,
I was absolutely convinced it was either 1/18 scale or at least
a 1/43 scale model. Shock
As someone who has collected nearly all ‘BMW 507 mini cars’ (over 30 types) sold worldwide over the past nearly 30 years, this GFCC ‘507’ stands out as the absolute best, excelling particularly in the following points. (This is purely my personal opinion, though…)
【Strengths】
*Above all, the profoundly tasteful body sculpting: Not merely traced from CAD-CAM data of the real car, but refined by a sculptor with artistic and sculptural sensibilities.
(It surpasses my previous personal favorite, the AMR-sculpted 1/43 Downhausen/MINI43 version.)
ーーーーー>AMR still holds the edge in the deformation of the lip sections on the rear fenders.
*The precision, scale, and perfect positioning of the tire/wheel sculpting relative to the body.
(This was a weakness in Mini Champs’ 1/43 version, but GFCC’s rear tire placement is especially superb.)
*The beauty of the red paint finish – neither too thick nor too thin.
(Again, unbelievable for 1/64 scale; even after painting, the door cut lines remain sharp and look like they could actually open.)
* Absolutely no loss of scale feel despite the opening hood and trunk.
(The hood snaps shut perfectly with magnets.)
* The hardtop’s execution: perfect in size, shape, and paint separation.
(Hardtop miniatures are rare; I can only think of Level’s kit and Märklin’s 1/43 scale.)
ーーーーーー> This alone is worth a triple-sized rice bowl. (lol)
*The superb detail representation of headlights, taillights, interior trim, etc.
*Etched + color-processed BMW emblems (9 total)
————————> Hardly visible to my aging eyes though… sob
【Disappointing aspects】
(There are almost none, but…)
*For some reason, only the rearview mirror has a clunky sculpt, making this part feel like a traditional 1/64 scale model.
*The sculpting on the front grille and side air vents lacks a bit of sharpness.
*The chrome rings on the headlights are slightly too thick, making the protrusion at the front edge of the hood less visible when viewed from the side.
*The front and rear bumpers are positioned a bit too low.
Regarding the disappointing aspects,
I forced them into the flow of the “modification project” I’ll be doing next.
It’s truly a wonderful 3D model, and for the first release, I bought 5 out of 10 available.
#Emerging Miniature Car Company: What is GFCC?
Afterwards, I became interested in this miniature car company called GFCC.
Upon researching it, I found that:
Initially, they released 1/43 scale die-cast American car miniatures.
Then they switched to 1/64 scale, rapidly expanding their lineup with ultra-precise miniature cars.
Their specialty lies in vintage European luxury cars.
To date, they’ve produced:
* Rolls-Royce (50s-60s?)
* Jaguar E-Type
* Ferrari California
* Mercedes-Benz 300SL Roadster
Each model features over 10 exterior colors and separate soft-top/hard-top options, all produced without licensing.
The BMW 507 Series will launch around December 2024:
* The above 6 variants will be released first,
* Followed shortly by a limited-edition Elvis Presley white version in special packaging,
* Later joined by an Elvis pre-restoration version with a battered red paint job,
* a large boxed limited edition with silver paint and whitewall tires,
*and, showing keen business acumen, as of December 2025, even metallic paint finishes,
*including original colors, have been newly released.
The latest release is
*my personal favorite, the Ferrari 250TR Testa Rossa with pontoon fenders.
I can’t take my eyes off this classic car-loving manufacturer going forward!
(These days, I’m really hoping they’ll release an Austin-Healey 4-cylinder version somehow…)
*Modification Project Begins!!
#First up: reference materials
While browsing various ads, promotional materials, and photos from the design phase, I became utterly captivated by the cover of the promotional catalog below:
* The beautiful illustration
* And the stunning side-view illustration of the actual car, slightly stylized,
perched in the lower right corner.
#Finally, the modification project begins!!
Over the past six months,
while photographing numerous 1/64 scale mini cars, I’ve developed a personal theory:
‘At the small 1/64 scale, unless it looks slightly cooler than the real thing, the impact when photographed is weak.’
To apply this theory to actual mini cars,
some of the mini cars featured in my blog posts
have been slightly modified in my own style.
Among them, the one I’m particularly obsessed with,
the “BMW 507,” has recently undergone significant additional modifications,
so I’d like to present it here.
@Same angle as pre-modification illustration:
@Modification List:
Let’s list the modifications and examine them one by one.
(Note: These changes were actually made gradually over about four months as I noticed areas needing improvement.)
1: Removed the tires and wheels, swapped them for AUTOWORLD’s 1967 Eldorado (Ice Blue) whitewall tires + Minor adjustments to ride height/wheelbase
2: Shaved about 2mm off the top edge of the windshield, and also shaved a little off the inside front edge and inside rear edge of the hardtop to reduce the overall height by about 2mm when the HT is installed
3: Referencing the illustration and side view diagram, move the front and rear bumper positions upward by about 2mm. Additionally, move the front bumper forward by another 2mm and secure it.
4: Referencing the side view diagram, shave the shape of the rocker panel along the body sides to make it smoother. Furthermore, add side molding by plating extremely fine metal wire or similar material.
5: Carefully remove the headlights. Shave 1mm from the body side and 1mm from the light ring side. Touch up the cut edges with an oil-based marker to minimize visibility, then reattach the lights.
ーーーーーー> This emphasizes the protrusion at the front edge of the hood.
6: Cover with a soft cloth and carefully bend the body from the rear fender backwards using pliers or similar tools, aiming for an upward angle of about 5 degrees.
——————> This requires considerable brute force and relies heavily on intuition, but it adds overall flex and flow to the body, creating tremendous visual impact!!
#Modification Areas 1-6
Now, I’ll explain each step with images.
1: Remove the tire and wheel, swap to AUTOWORLD’s 67 Eldorado (Ice Blue) whitewall tires + fine-tune ride height/wheelbase
ーーーーーーー>The ride height became too low, making the front/rear bumper heights and hardtop height stand out more.
2: Shaved about 2mm off the top edge of the windshield. Also shaved a little off the inside front edge and inside rear edge of the hardtop to reduce the overall height by about 2mm when the HT is installed.
────────> Shaved the underside of the hardtop to raise the ride height slightly, centered on the front wheels.
────────> The height of the front and rear bumpers is still noticeable.
3: Referencing the illustration and side view diagram, I moved the front and rear bumper positions upward by about 2mm. + I also moved the front bumper forward by an additional 2mm and secured it.
ーーーーーーー> Adjusting the bumper positions created a downward sweep along the lower edge of the body line, adding a sense of momentum to the car ‘even without movement’.
——————> The image suddenly came much closer to that side view example.
4: Using the side view illustration as a reference, I sanded the shape of the rocker panel on the side of the body to make it smoother. Then, I added side molding by plating extremely fine metal wire.
(I started with plastic sheet, copper wire, then iron wire, Japanese broom fibers, and finally selected the thinnest option from a chemical fiber broom. I plated it and bonded it with epoxy adhesive! I managed to pull it off somehow.)
——————> Adding side moldings to mini cars will be a breeze from now on!
——————> The thickness of the headlight rings was noticeable, making the ‘point’ at the front edge of the hood less visible.
5: Carefully remove the headlights. Shave 1mm off the body side and 1mm off the light ring side. Touch up the cut edges with an oil-based marker to blend them, then reattach the lights.
——————> This emphasizes the protrusion at the hood’s tip.
6: Cover with a soft cloth, then carefully use a crowbar or pliers to bend the body behind the rear fender upward at an angle of about 5 degrees.
————————> This requires considerable brute force and relies heavily on intuition, but it adds overall flex and spring to the body, giving the lines momentum—the effect is tremendous!!
————————> The last tasks left were rebuilding the fender mirror and changing the wheel color, but I was completely exhausted. I’ll tackle those later…
*Let’s compare them side-by-side!!
This is what I’ve wanted to do all along!!
For nearly three months now,
I’ve been tinkering away,
thinking “this won’t work, that won’t work,”
making slow progress.
But finally, the overall appearance feels consistent.
Going forward,
if I encounter
a fantastic mini car
and a fantastic design,
I’d like to write modification articles like this.
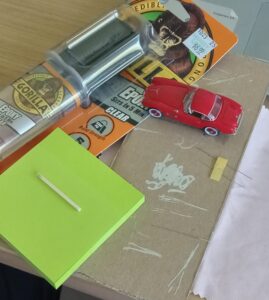
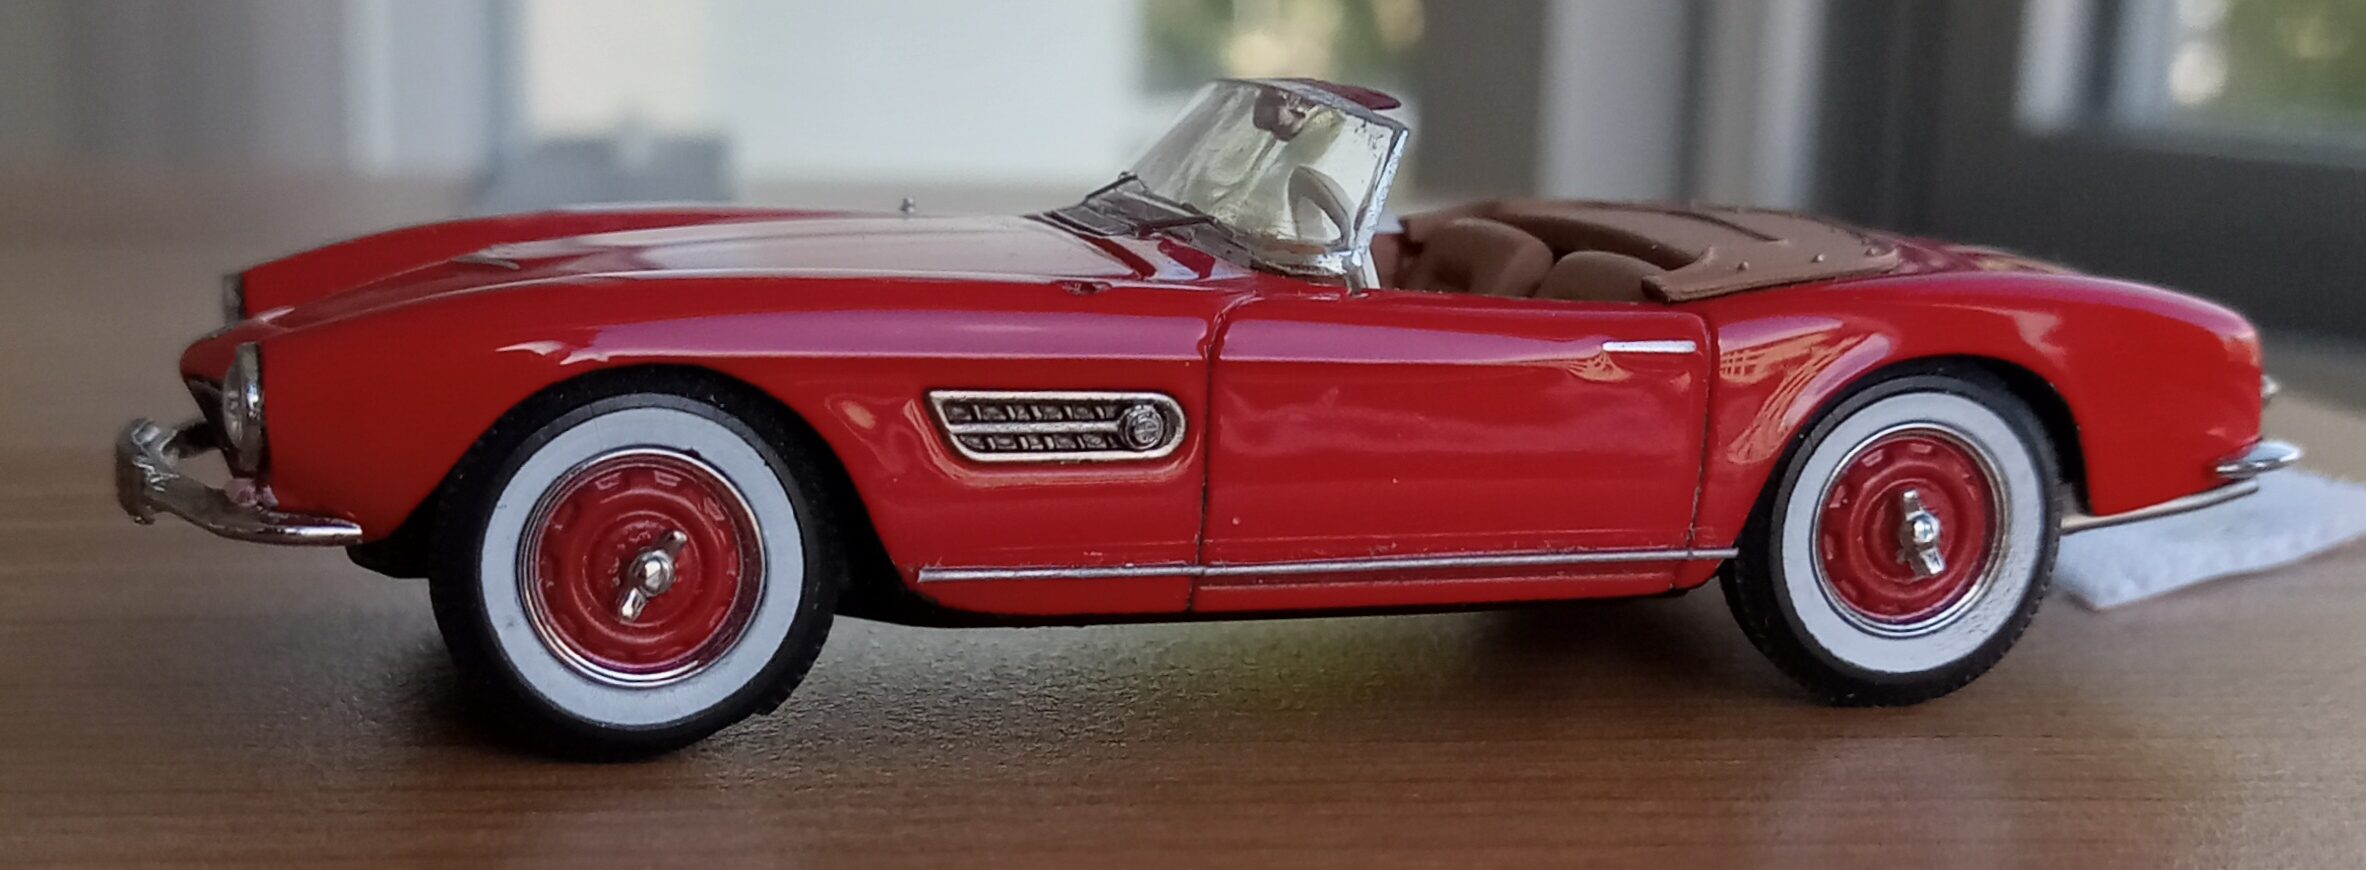
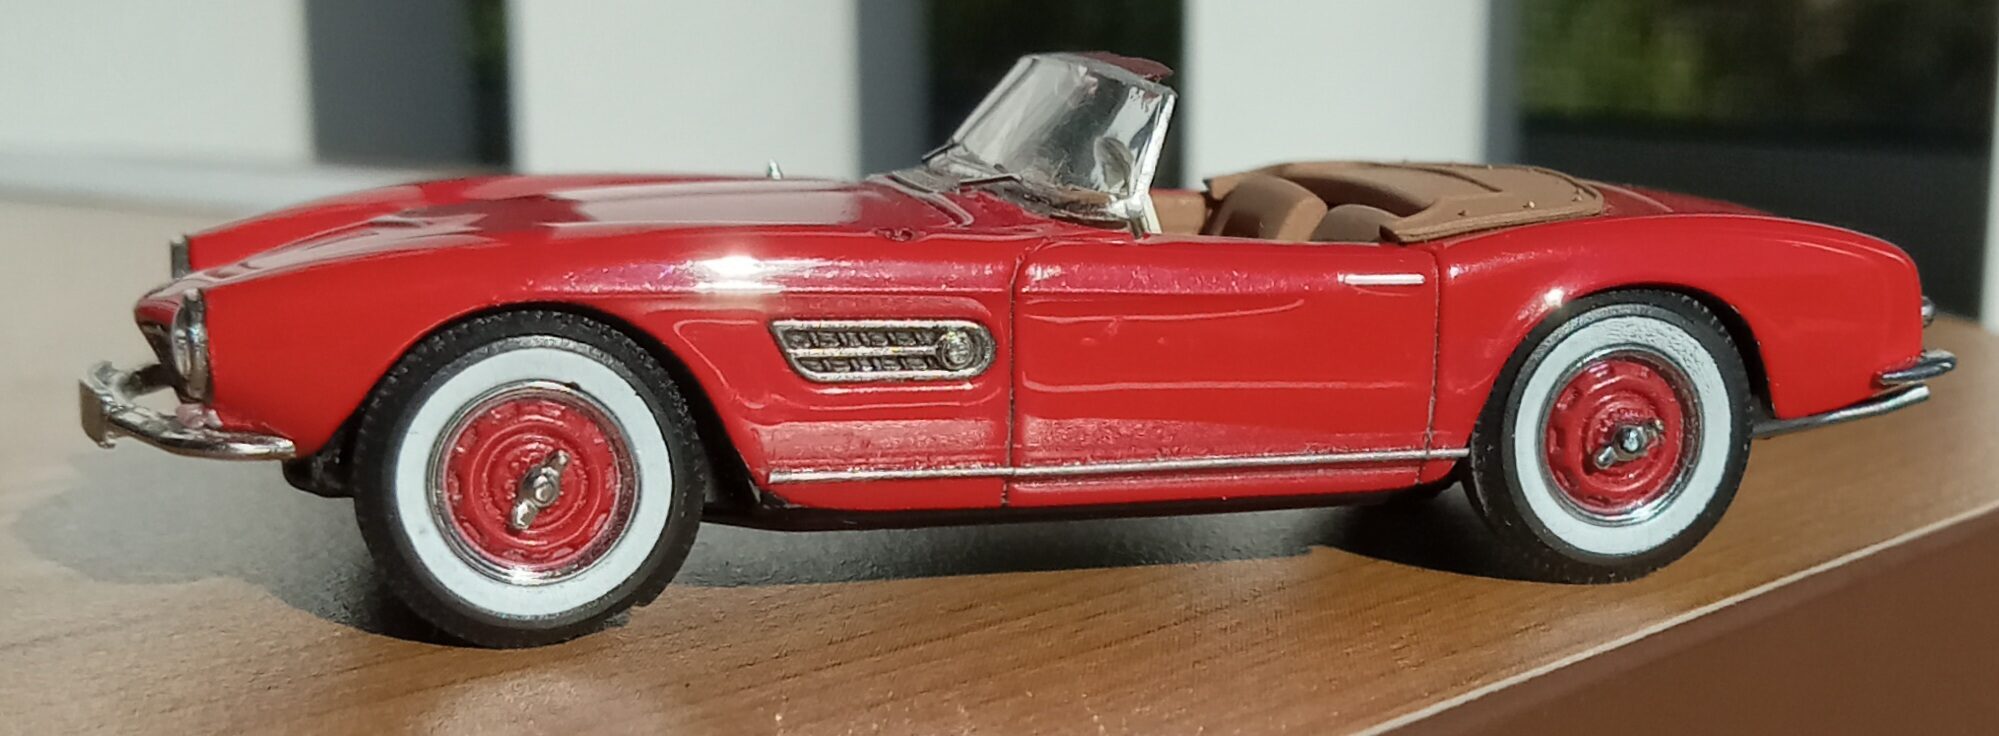
*Modified Car Photo Gallery:
As a bonus,
I’ll include photos from other angles too!!
How did you like this first “Mini Car Modification Article”?
The next one is undecided,
but since this field is my favorite,
I’ll probably write another modification article soon.
Stay tuned―
*Appendix:
*Rivet Fastening vs. Screw Fastening:
1/64 scale mini cars traditionally use “rivet fastening” to secure the body to the chassis.
This involves a “cylinder with a conical convex surface at its center” protruding from the die-cast metal body,
which is firmly held in place by crushing it with a rounded hammer-like tool.
Removing this is extremely difficult,
requiring a large drill to crush the rivet area by 4-5mm to detach it.
(Lately, Chinese-planned models use screws, which is a relief, but they’re well-made to begin with,
so no modification is needed.)
*Which mini cars are best for modification?
The best ones are definitely the more basic Hot Wheels or Matchbox $1.45 models.
Modifying them with various parts is the best.
Adding masking tape for window frames and plating on decorative parts
gives them an artisanal feel, transforming them into something truly remarkable.
Among Hot Wheels and Matchbox’s traditional budget models,
many have absolutely top-notch skeletons.
Trust your eyes,
and with a little work, they turn into treasures!!
(It’s like discovering a fashion model!)
After all, with tiny 1/64 scale minicars, if they aren’t at least a little cooler than the real thing,
taking photos of them just isn’t satisfying. (lol)
Translated with DeepL.com
これはCTAサンプルです。
内容を編集するか削除してください。