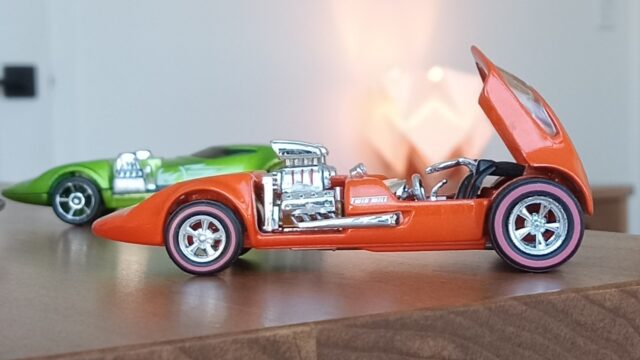
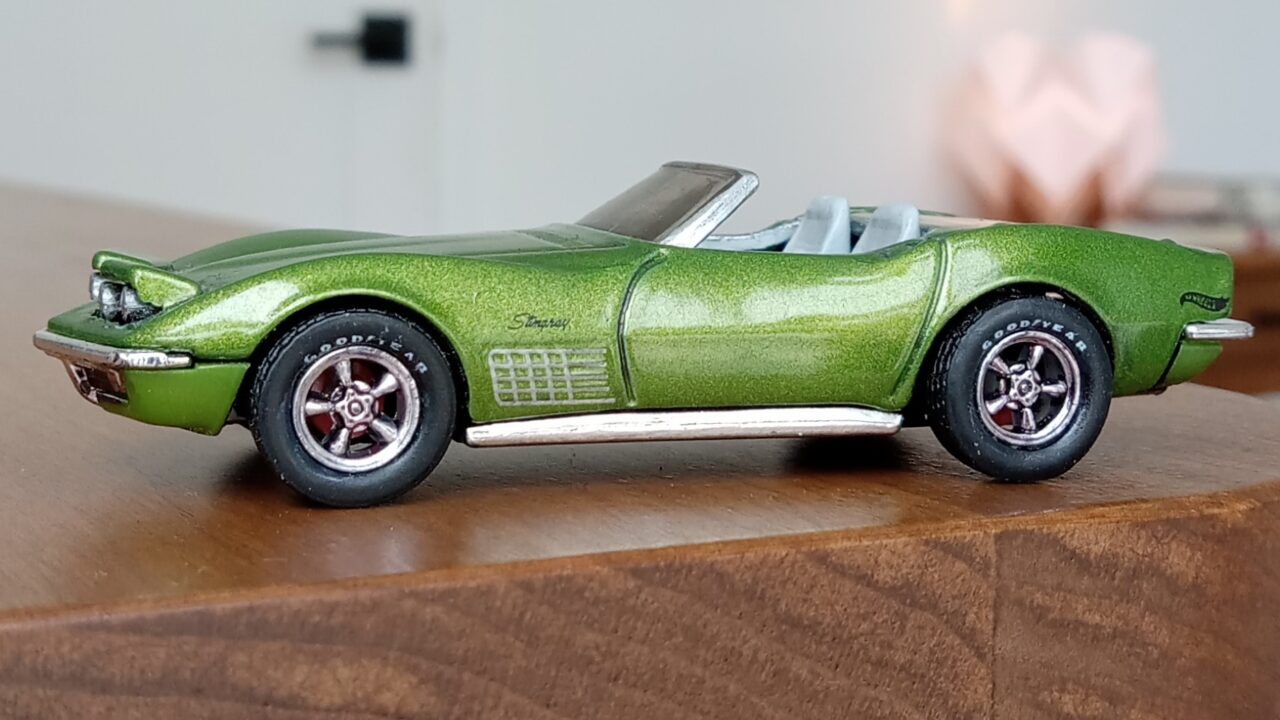
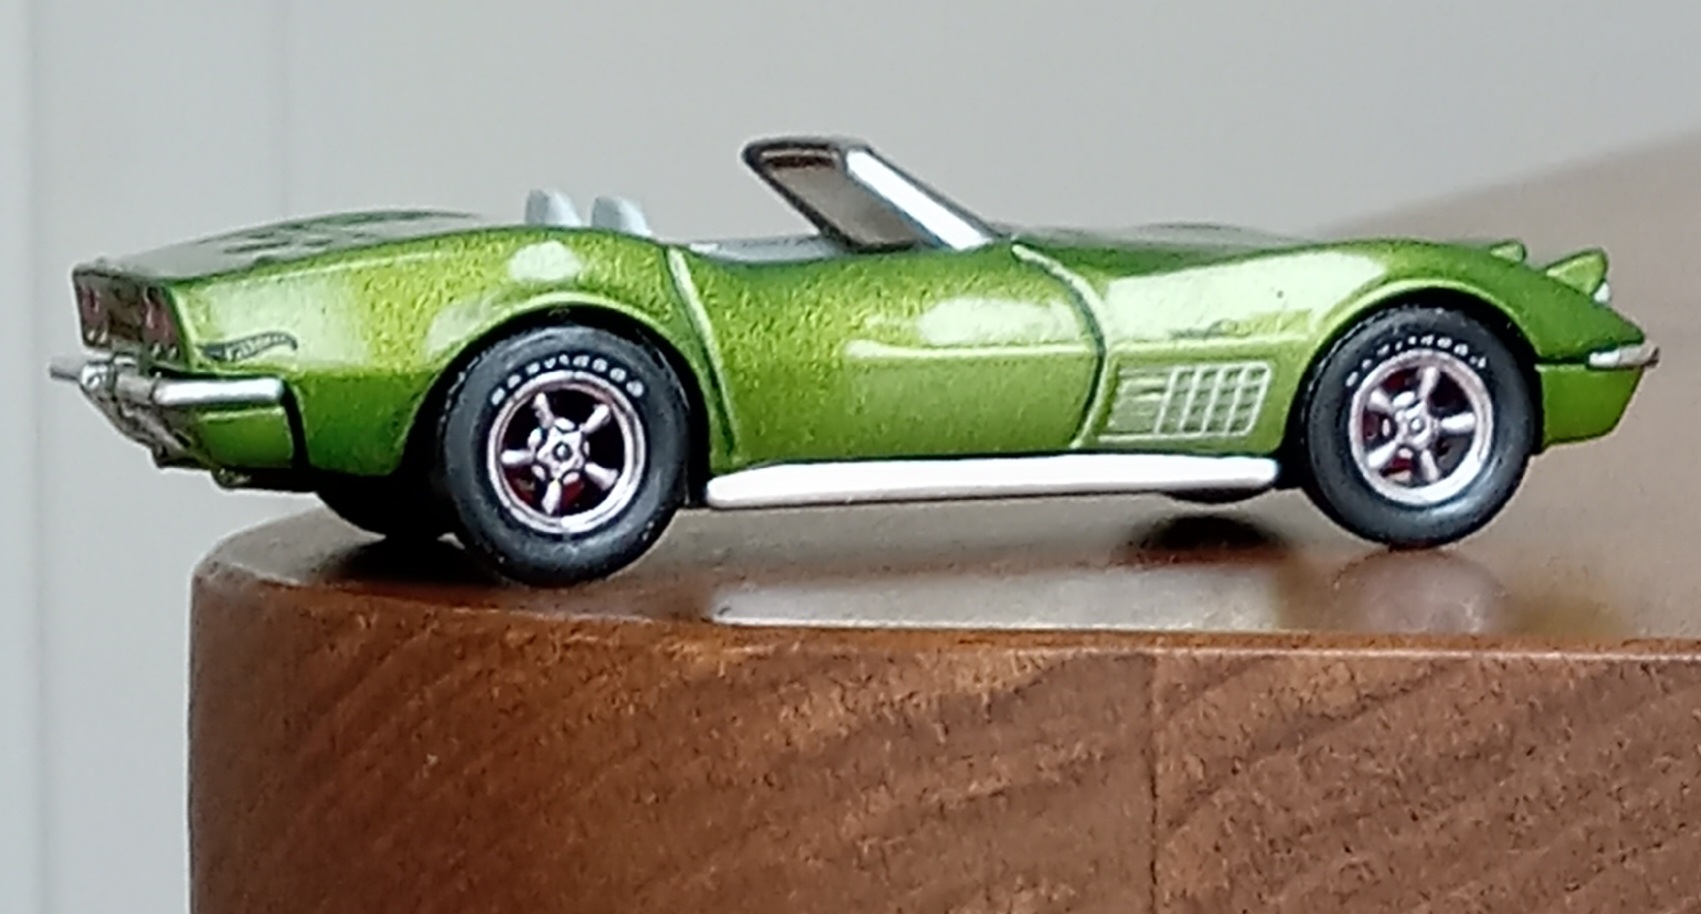
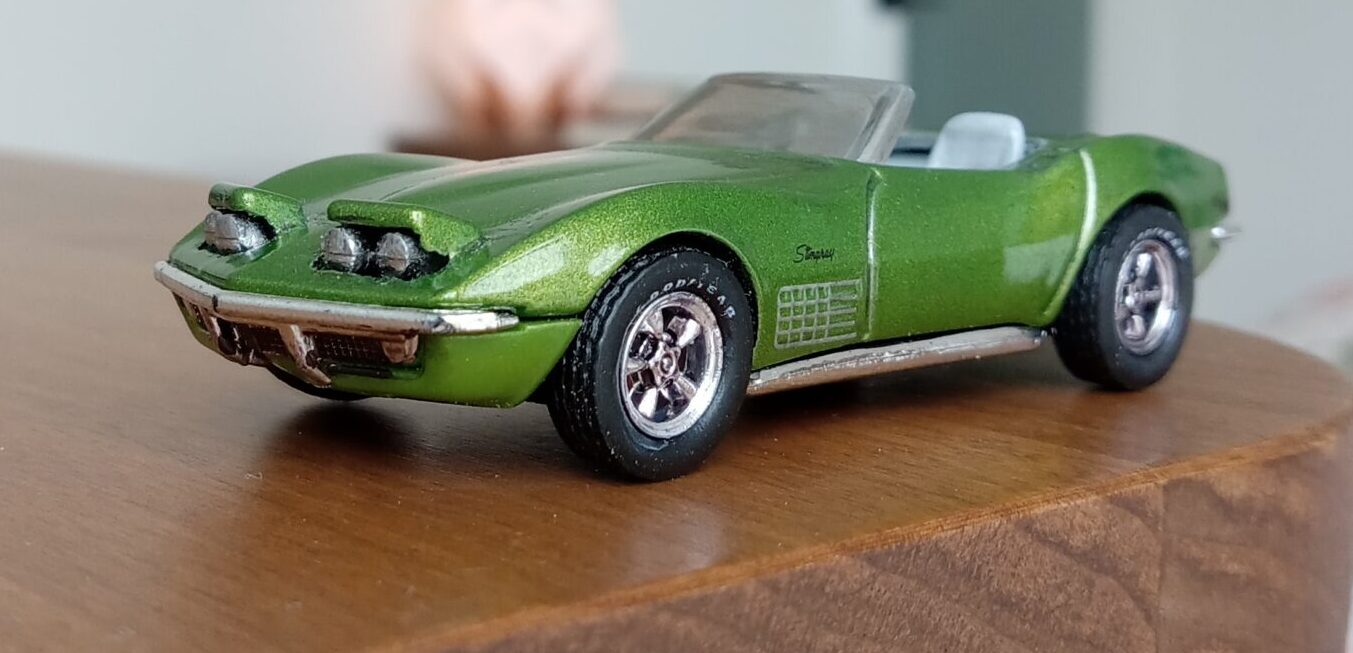
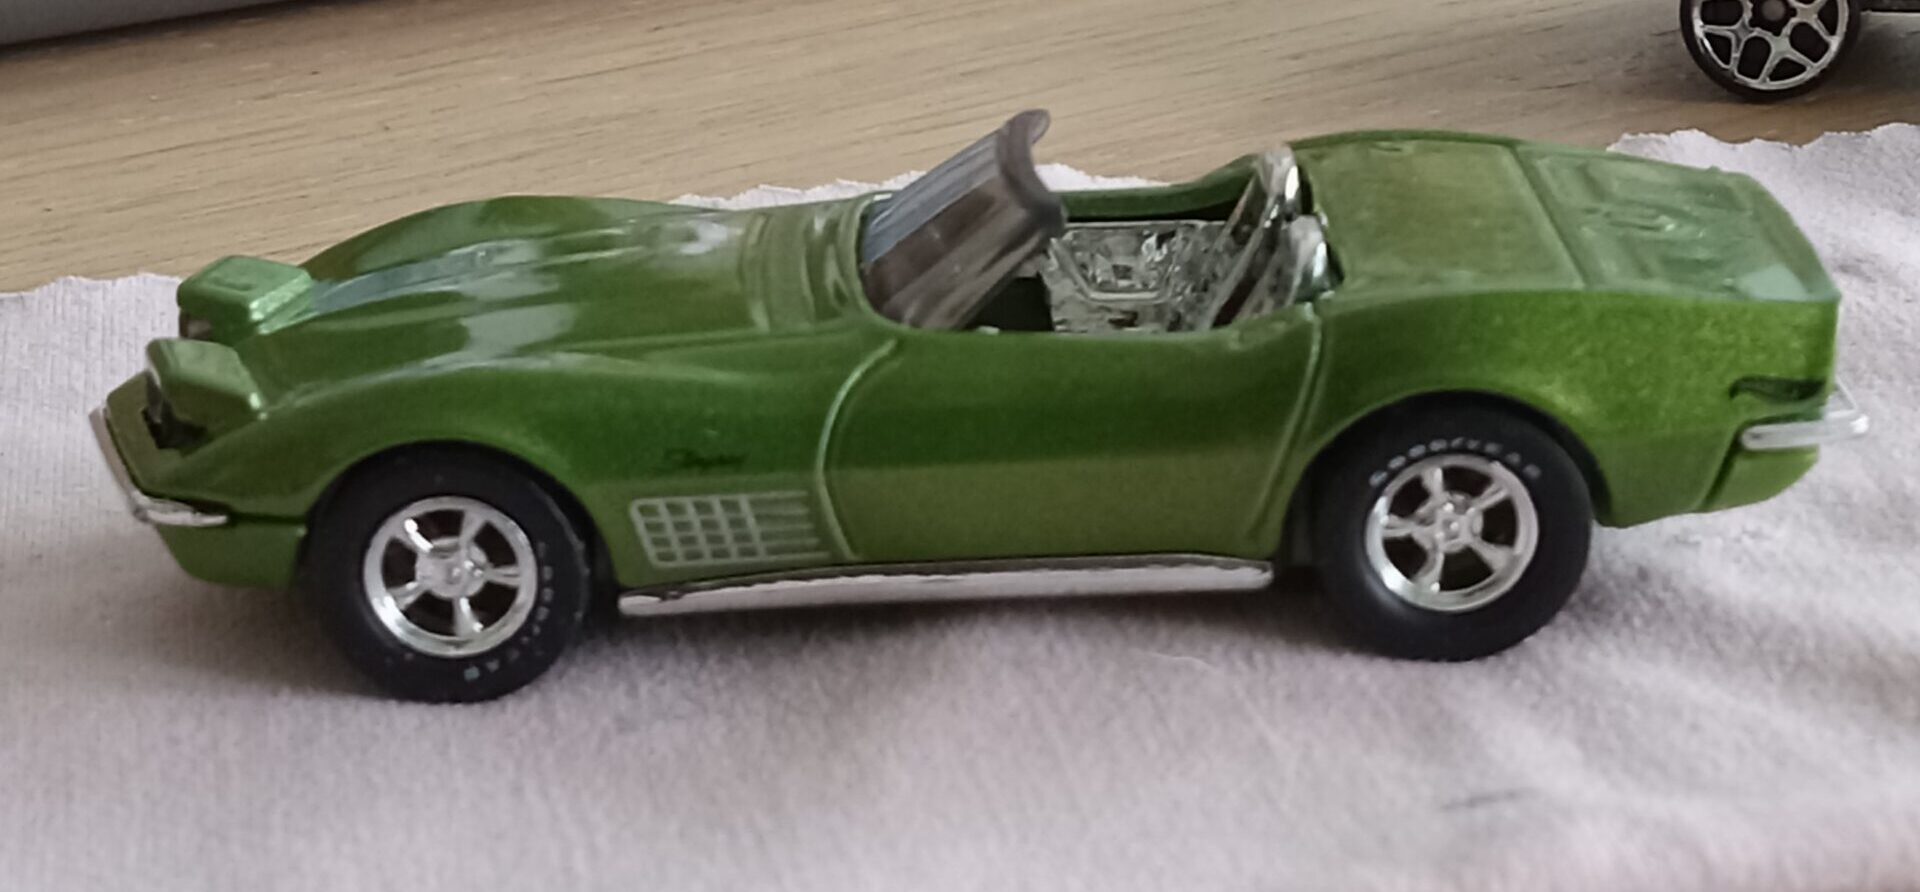
第2回:マテル社製、1/64 コルベット・スティングレー C3、1972【タイヤ&ホイール交換、メッキ・クロームにて細部追加】

今回取り上げますのは、
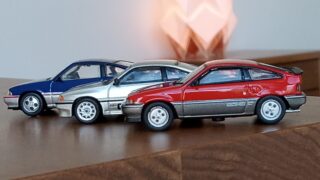
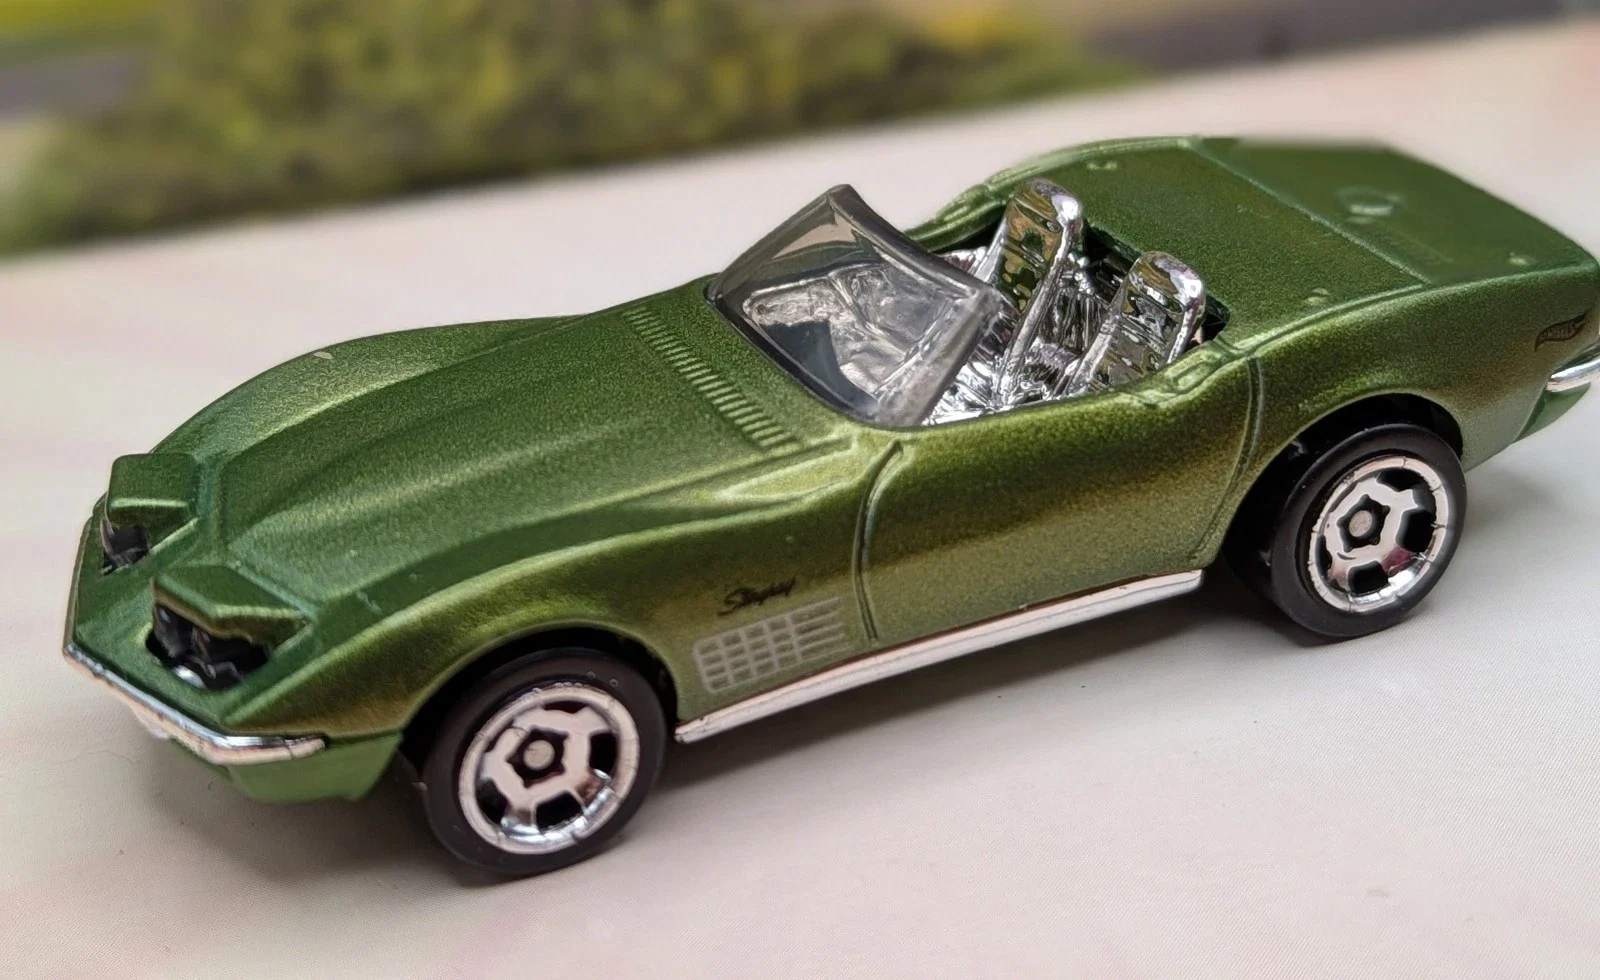
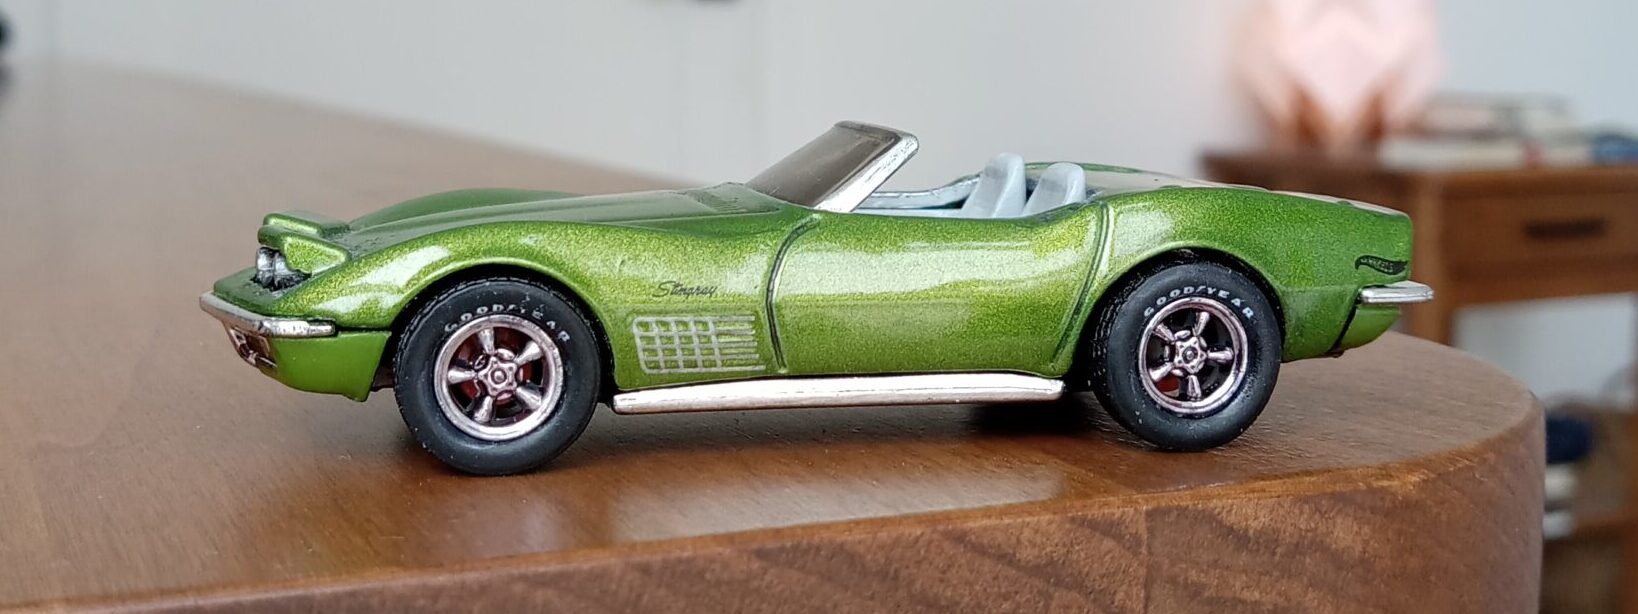
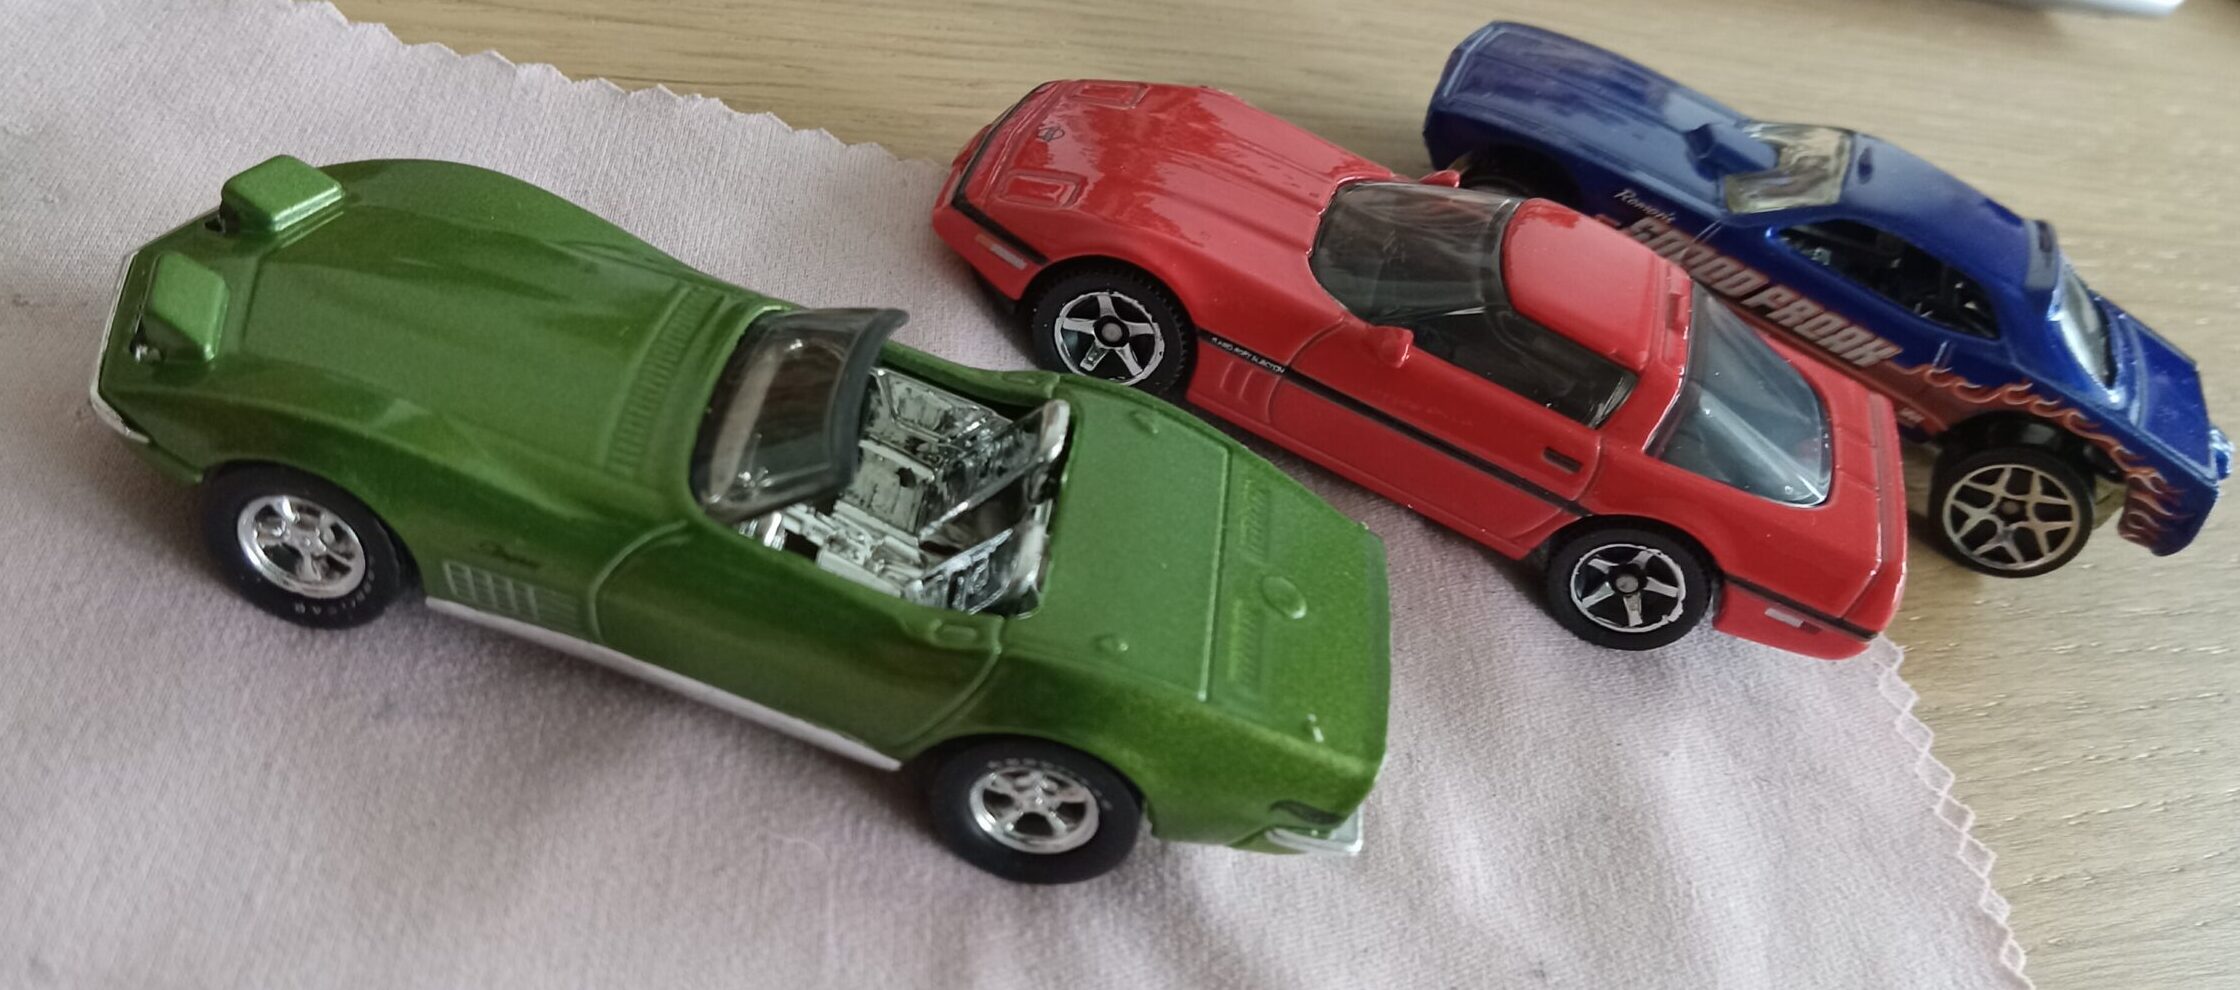
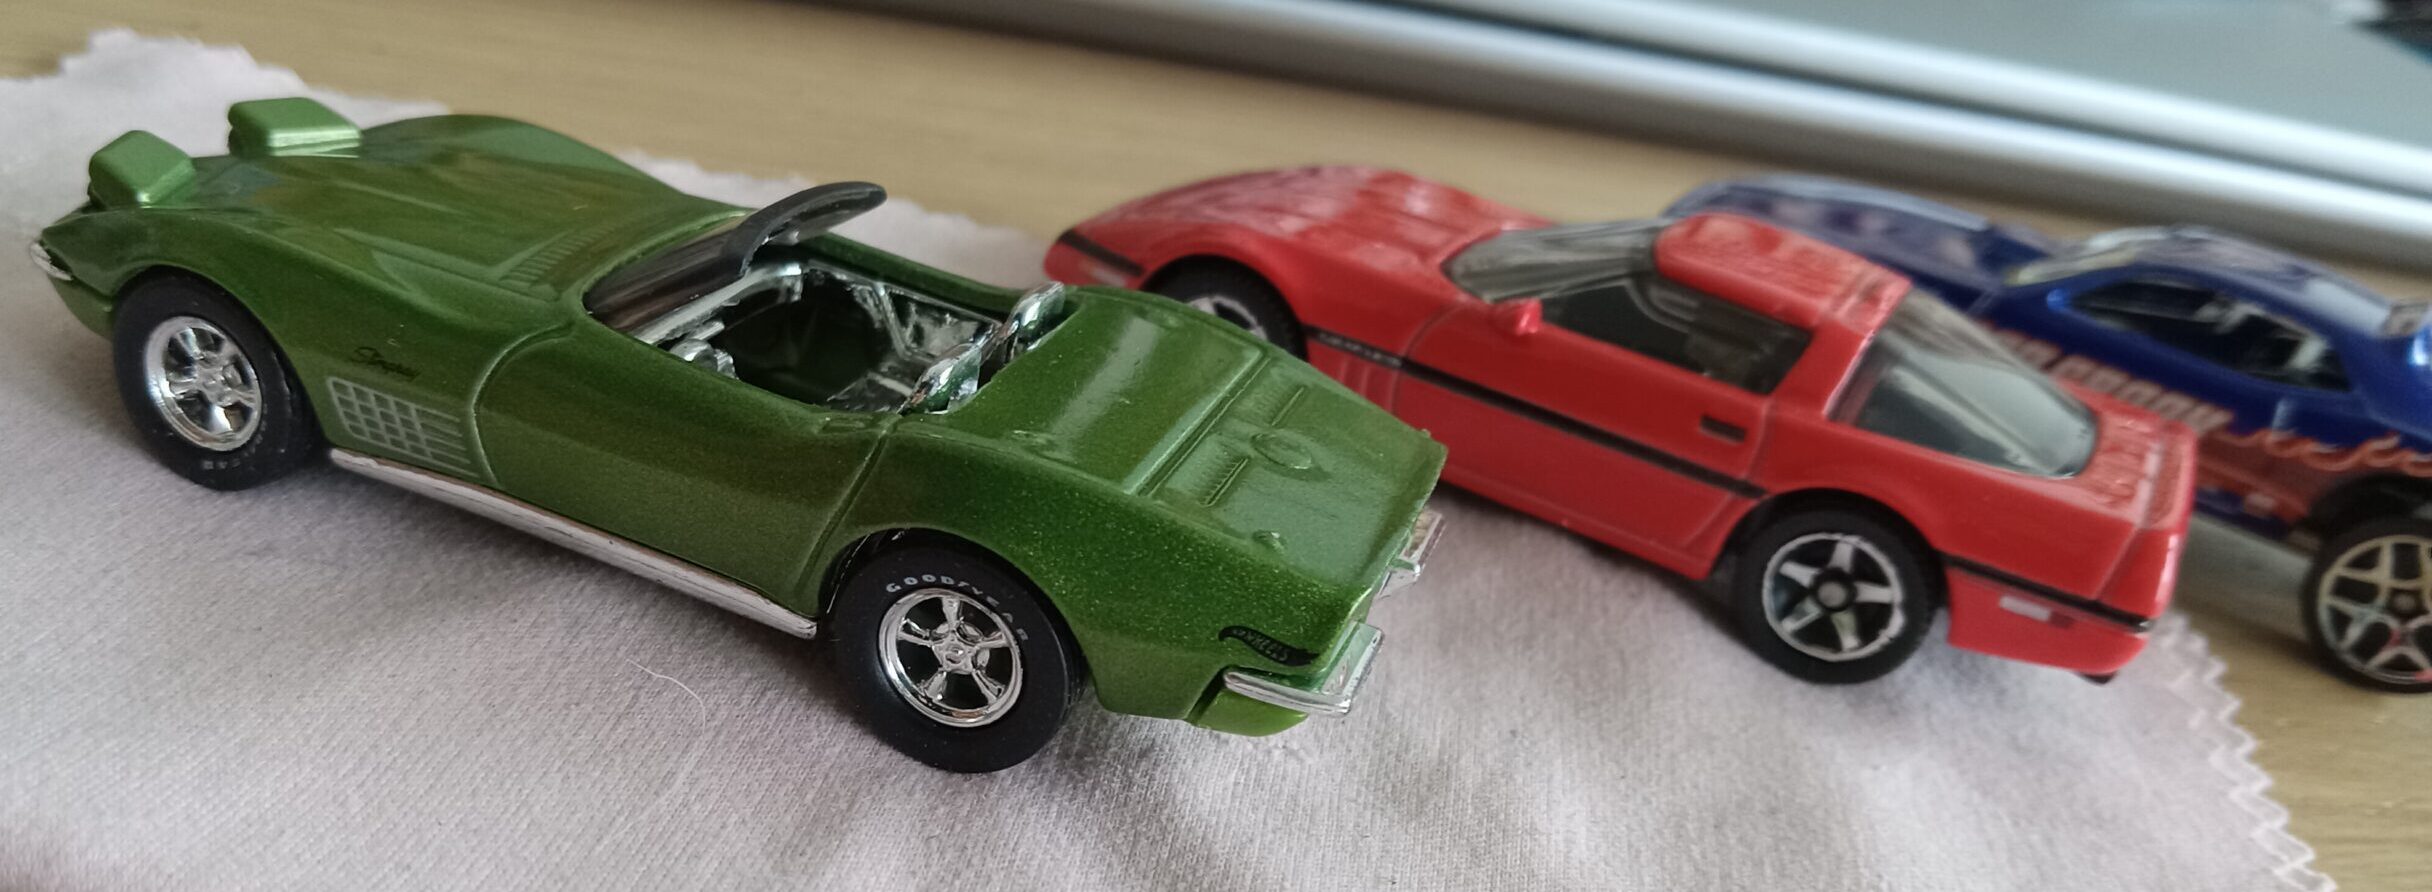
マテル社のホットホイール、通常版ですが、
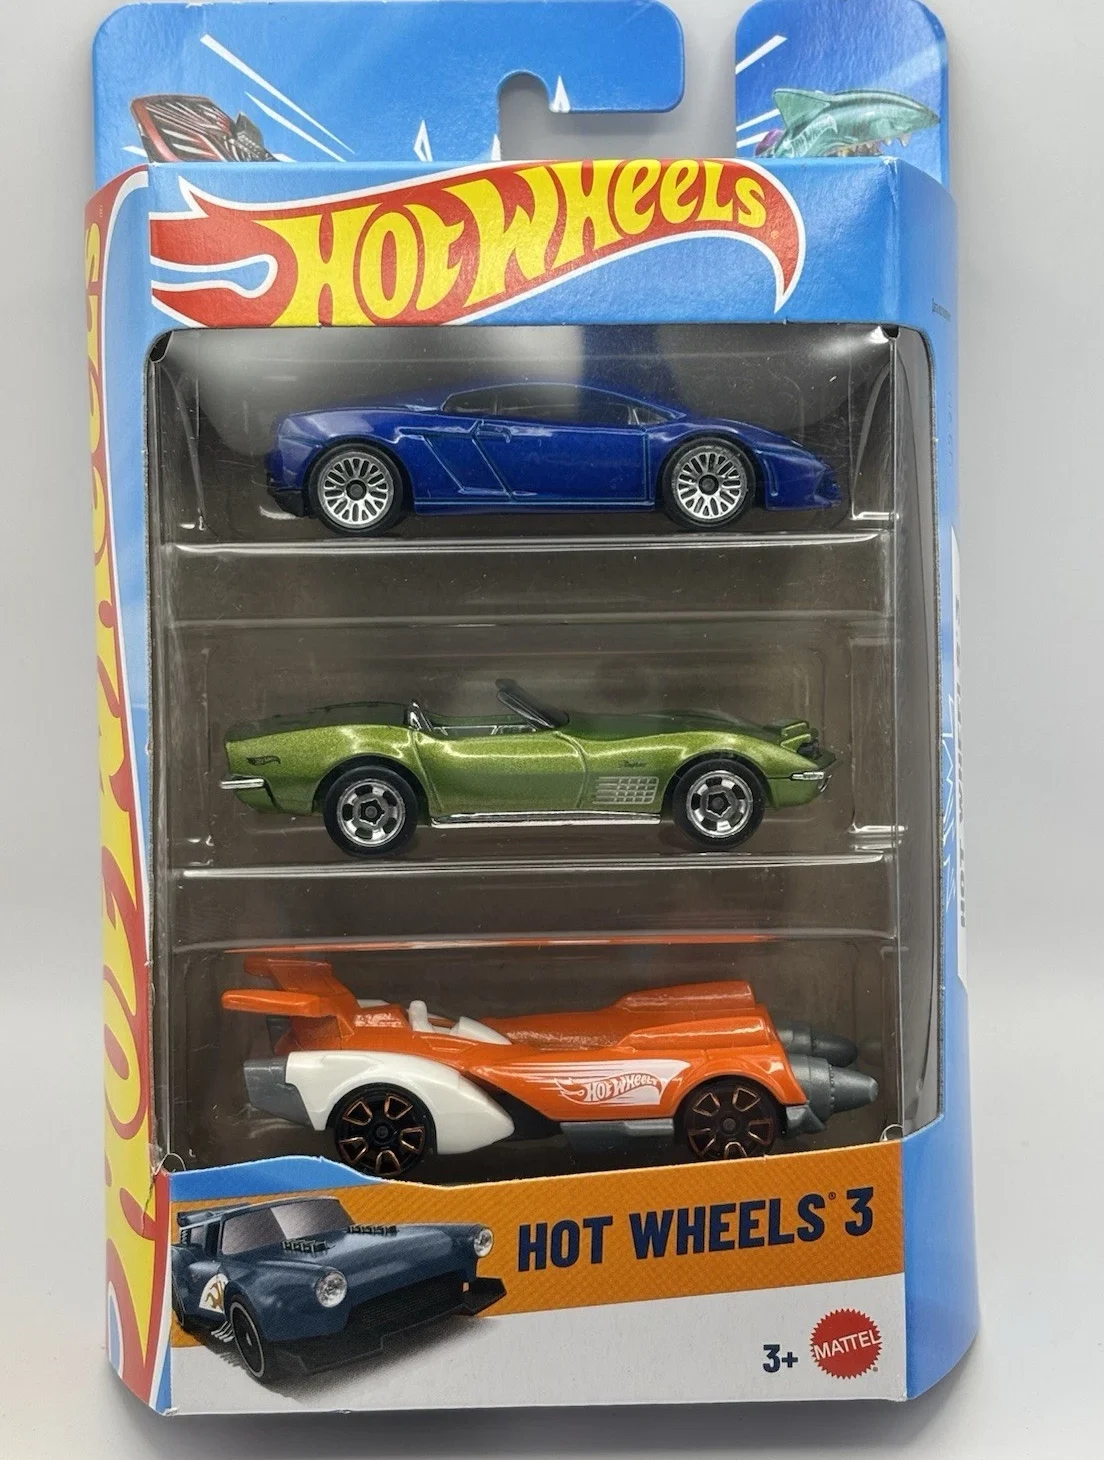
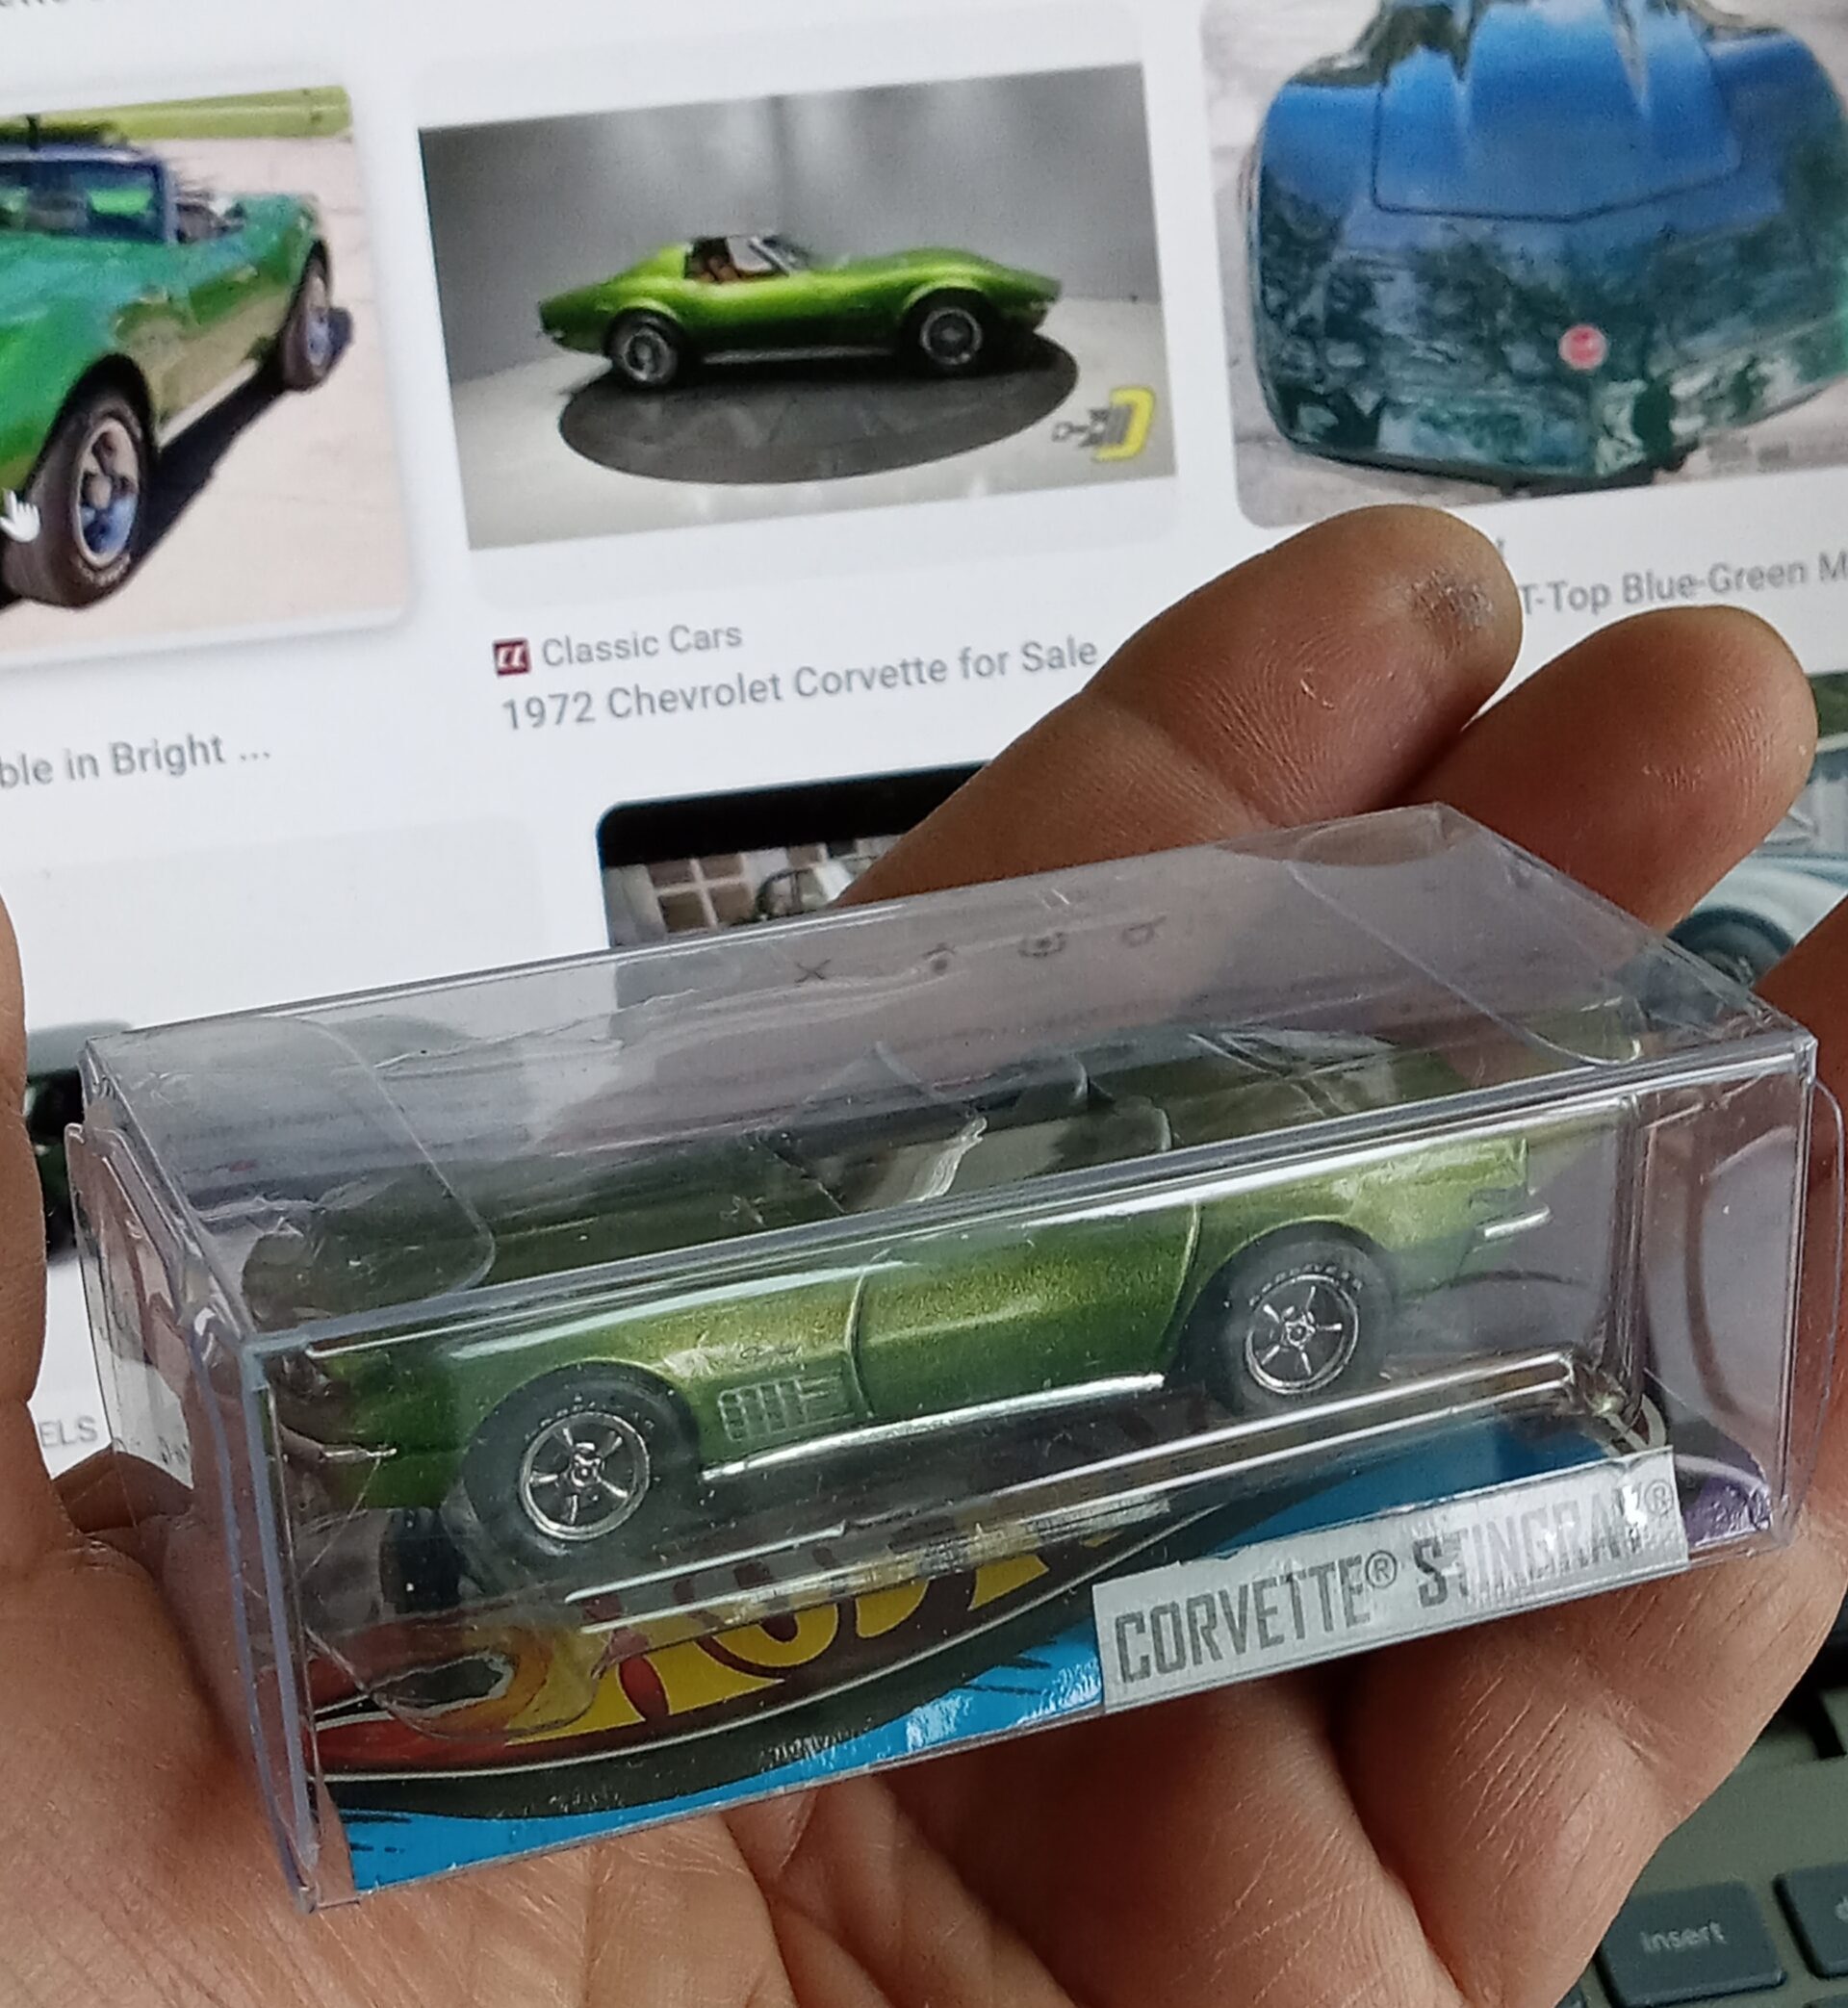
このグリーン・メタリックのものは、3個入りセットについてくるもので、
渋めの色合いが気に入って、
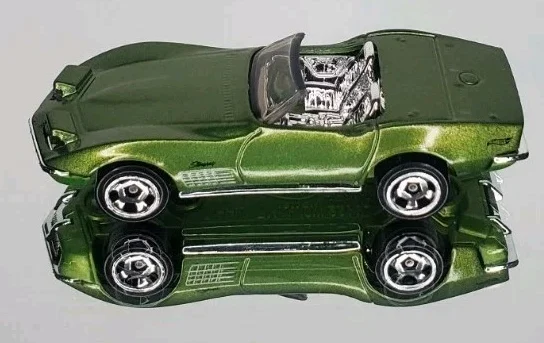
E-Bayの【Buy It NOW】にて入手しました。
(これが3個入りのパッケージとなります。)
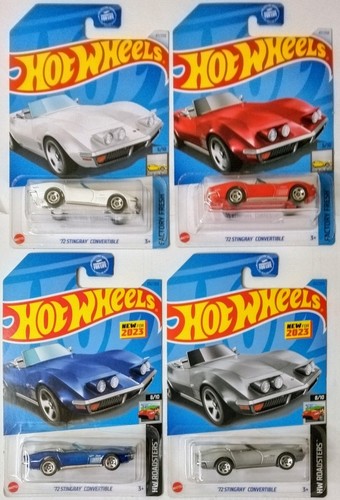
その他、
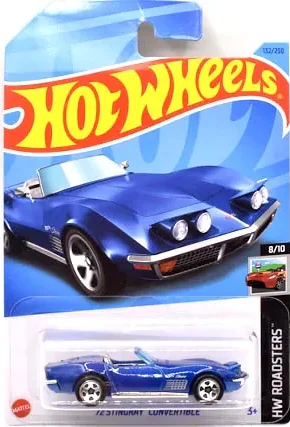
白、赤、銀、メタリック・ブルーなど
色んな色のものが発売されてます。
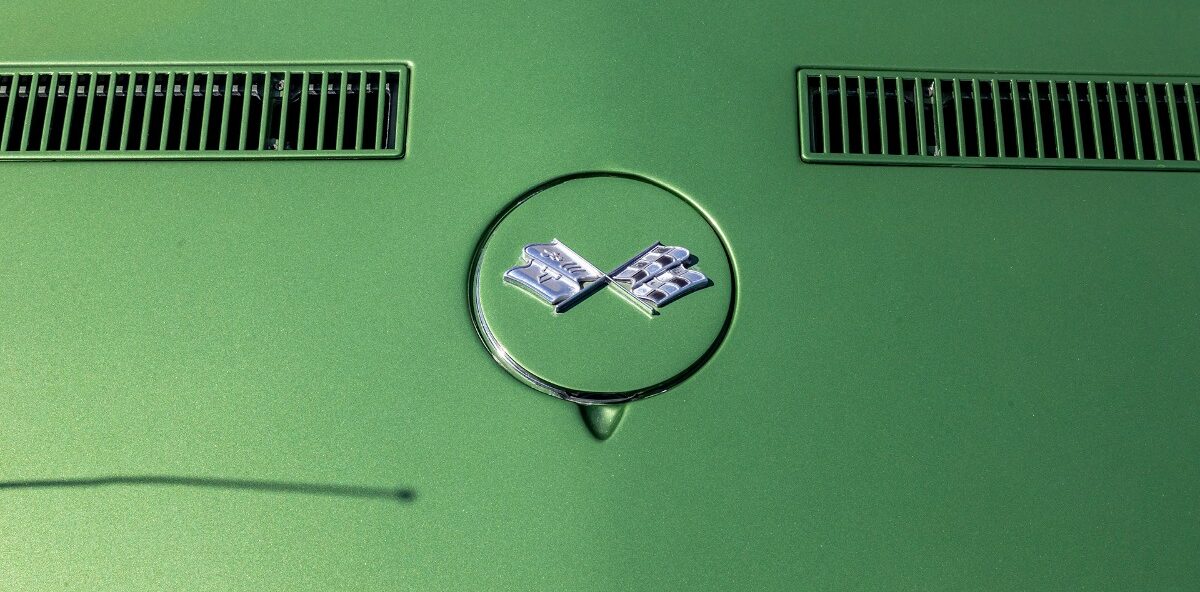
(通常版では珍しく、ボディー上に派手なロゴやマーキング類はなく、出来る限り、ストック(無改造)のオリジナル状態を再現しているのが私的にはすごくうれしいです。)
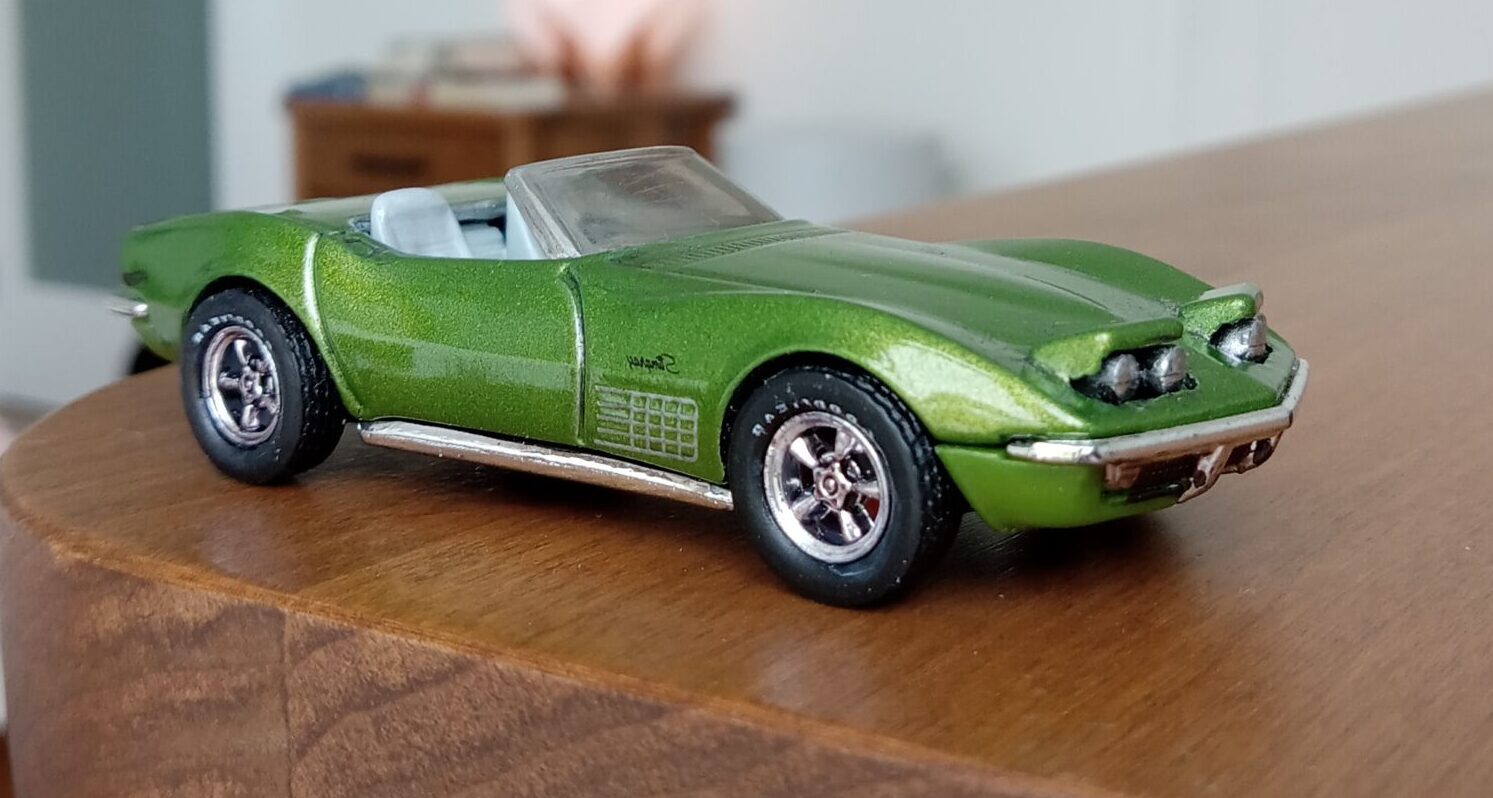
このキャスティングの一番の話題は、
デザイナーの実車がモデル:
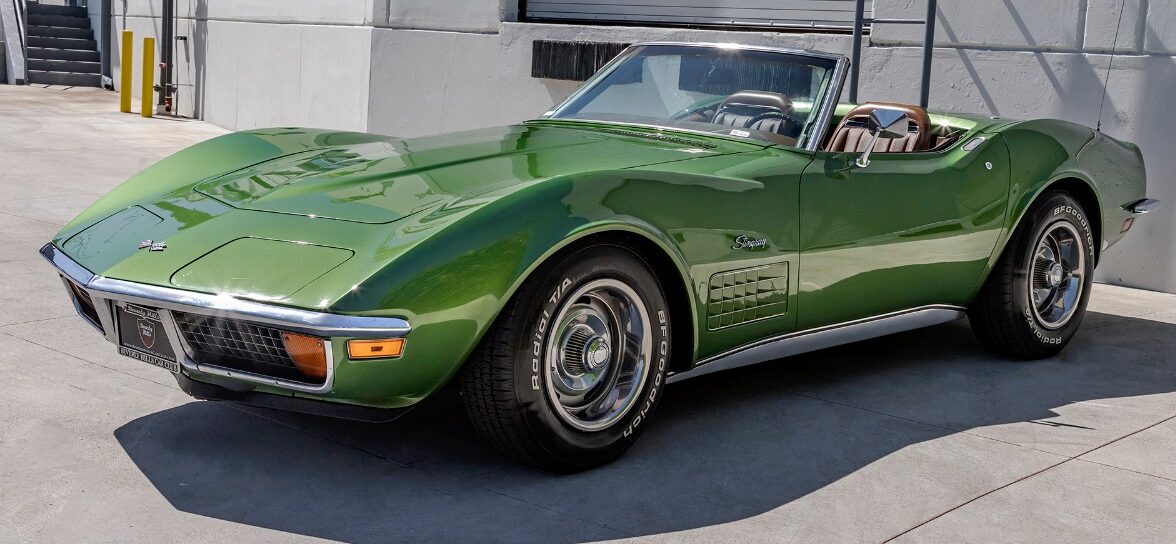
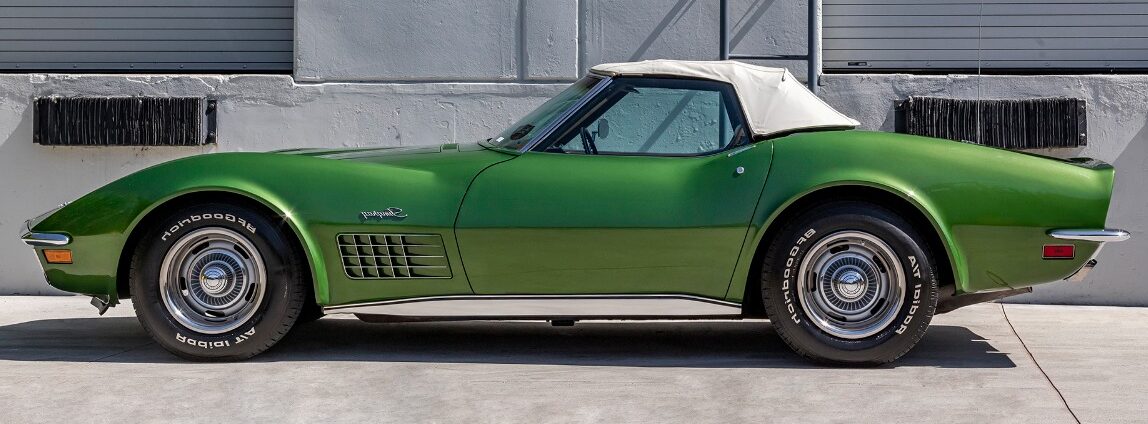
このミニカーは、ホットウィールの現役シニアデザイナーであるブライアン・ベネディクト(Bryan Benedict)氏が、妻から誕生日にプレゼントされた本物の「1972年式シロナガスクジラ(コバルトブルー)のシボレー・コルベット」をそのまま1/64スケールで立体化したものです。
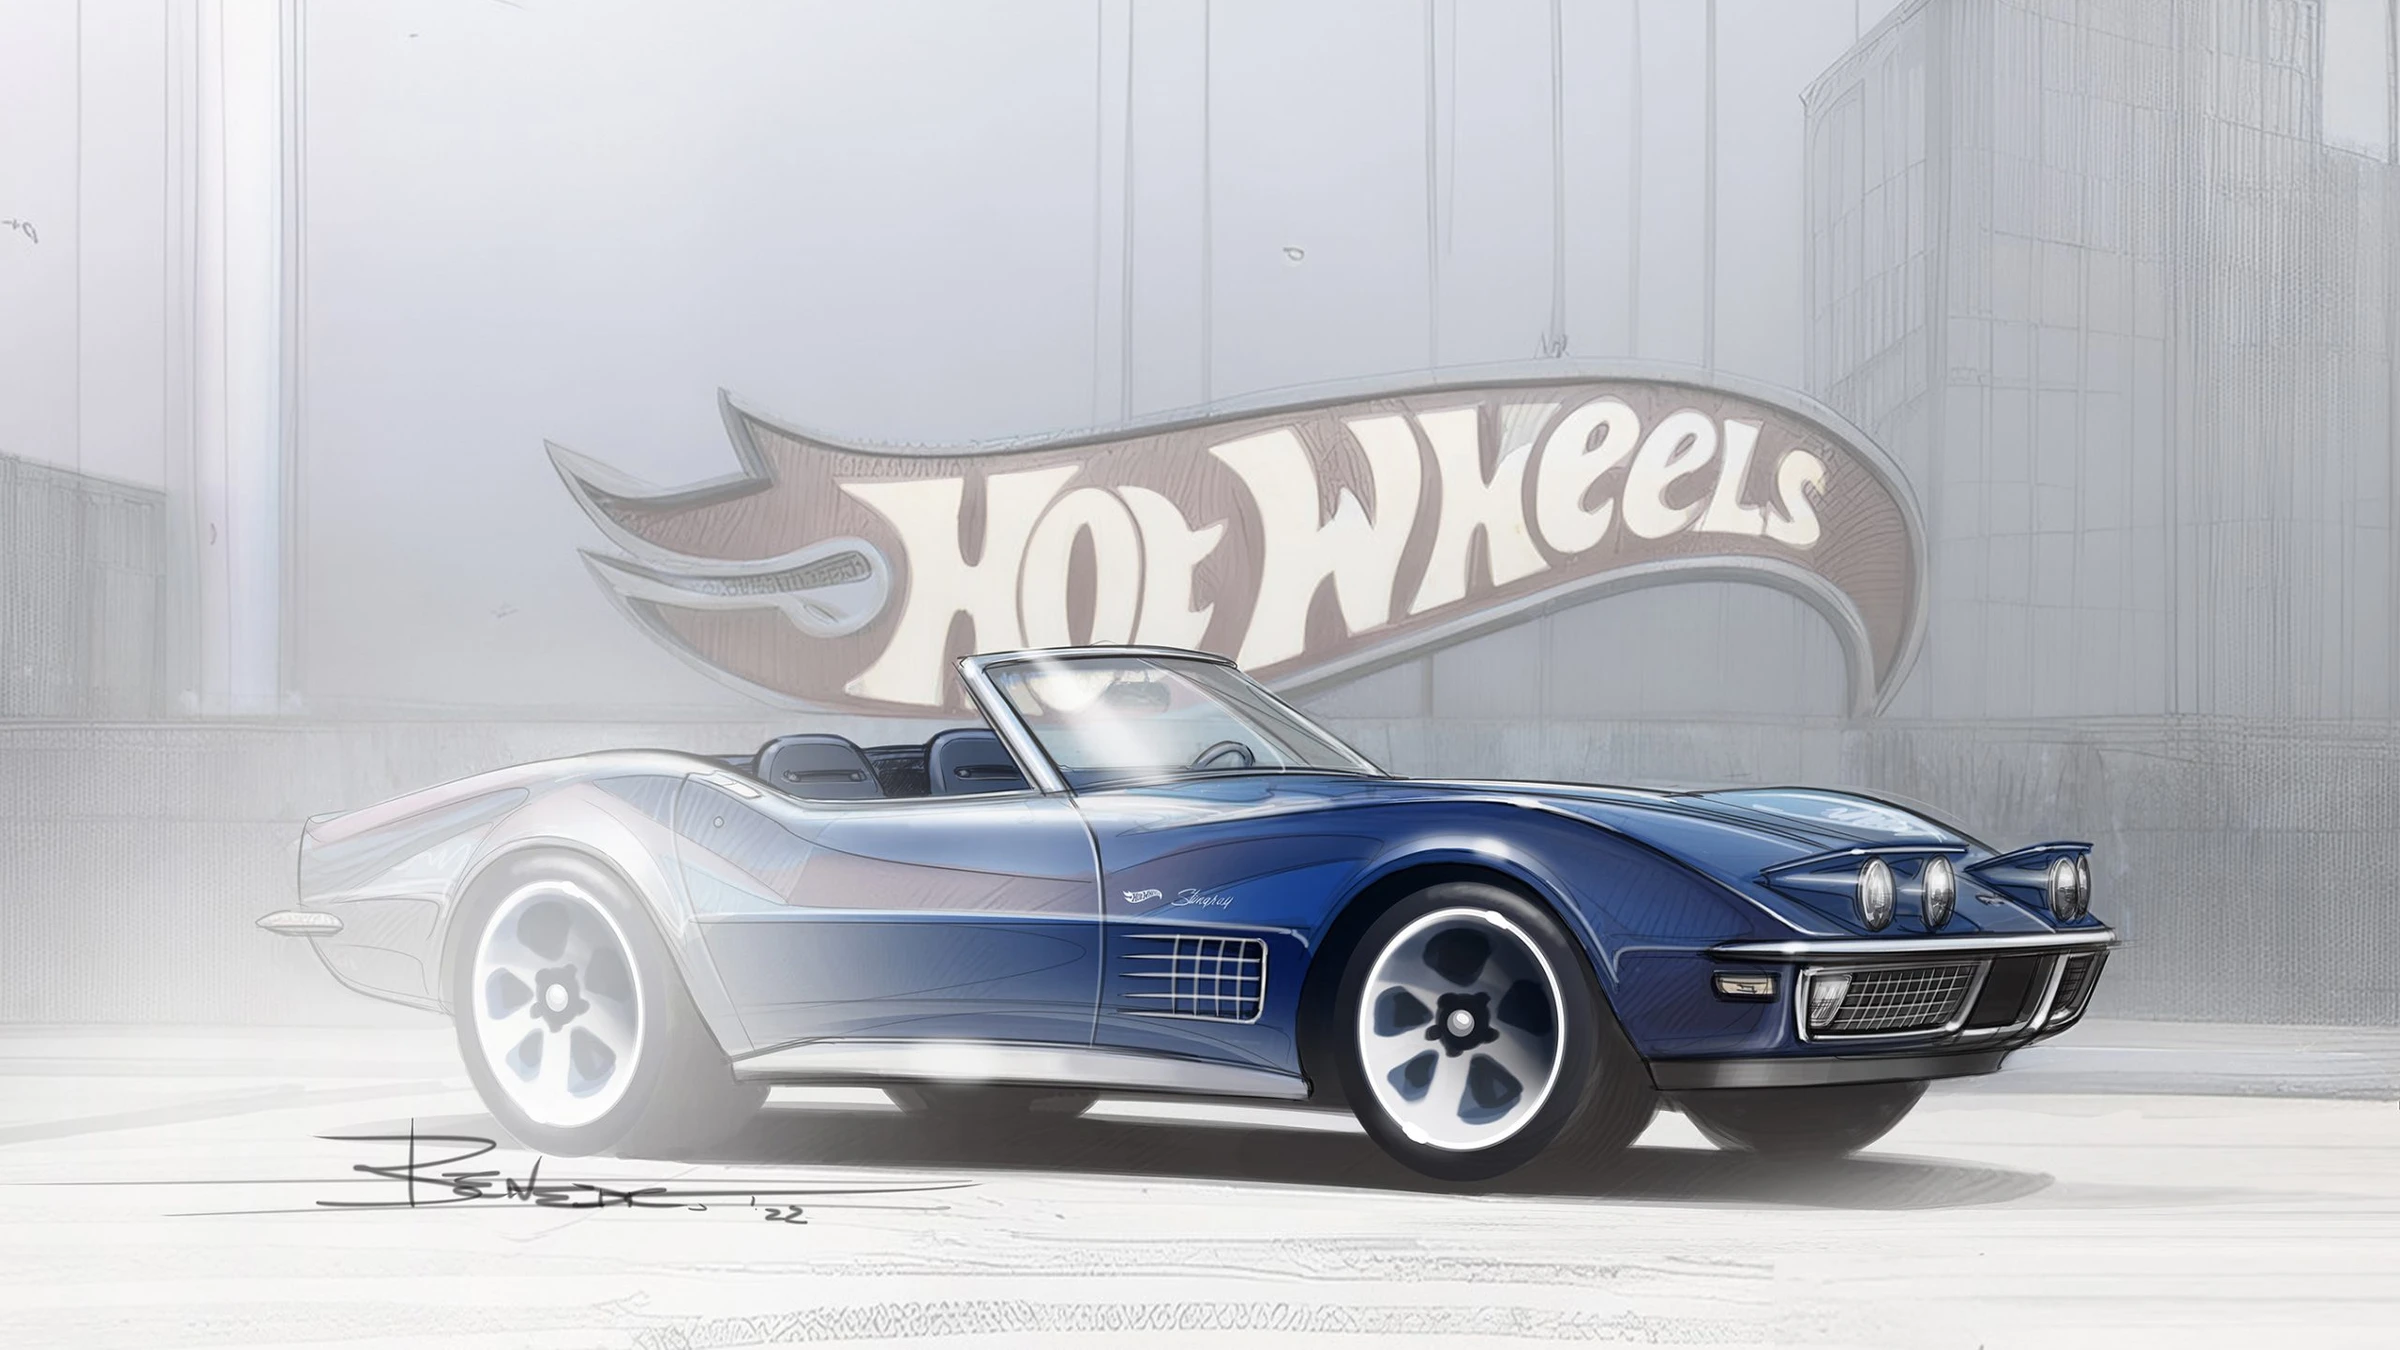
この珍しいホット・ホイールのデザイン過程はこちらでどうぞ。<https://driving.ca/car-culture/people/hot-wheels-designer-toy-diecast-car>
それでは、
立体改造プロジェクトの始まり、はじまり、
目次
#ミニカーの出来:
#改造プロジェクト:
#総評:
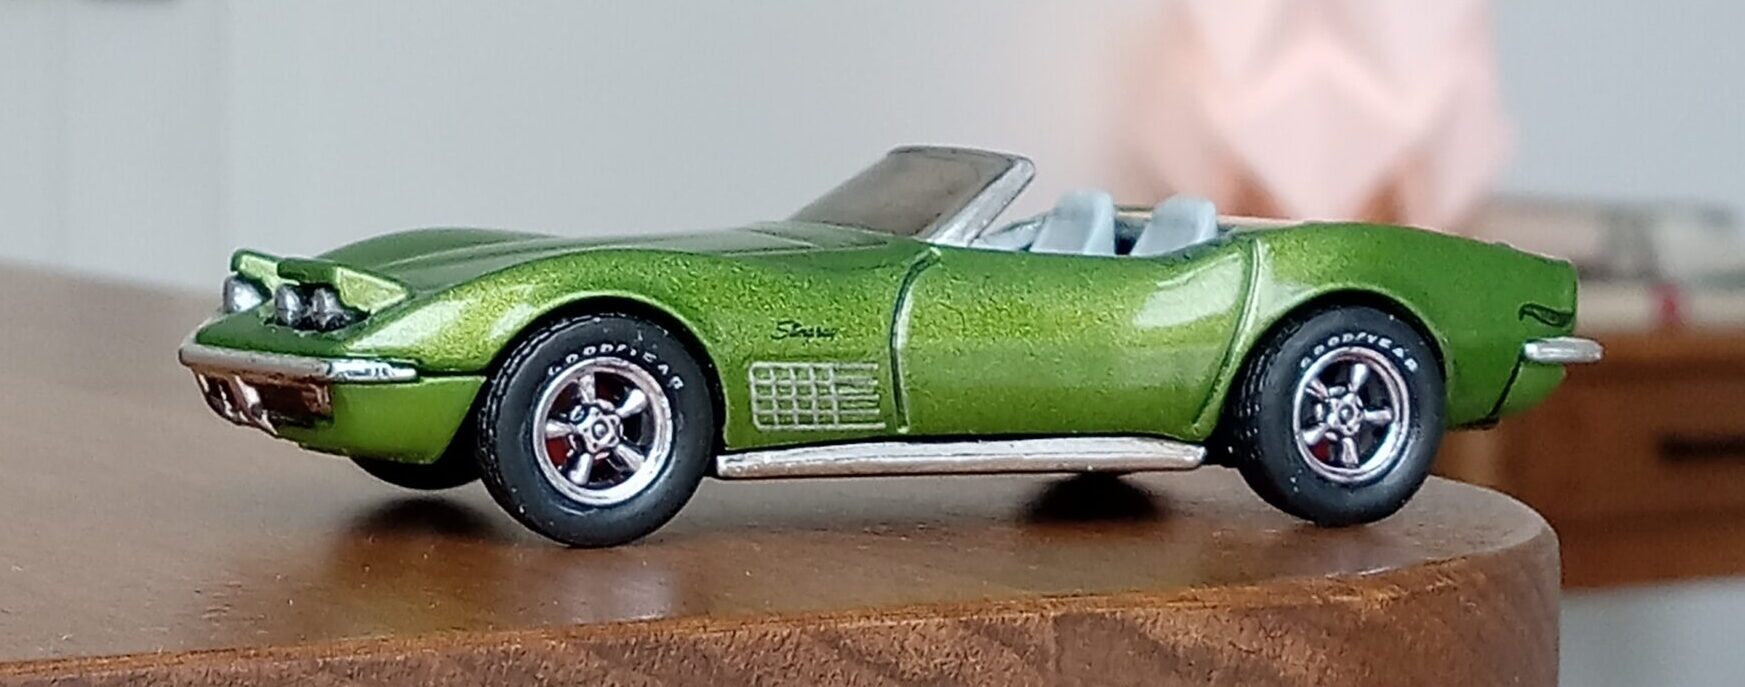
*ミニカーの出来:完璧なストック状態をモデル化
マッチボックスやホットホイールの通常版で、
時々あるのですが、
この、『72年型コルベット・ロードスター』も、
*大げさなデフォルメや、
*派手なマーキングや、ロゴやキャラクターのプリントなしで、
*実車に忠実な、プロポーション、ライトやグリルをシッカリ再現した、
大人のコレクター向け?の商品です。
とくに、メタリックブルーの商品は、
ブライアンベネディクト氏の実車そのままをモデル化してあり、
内装のクロームなところを除いては、
再度スクープやテールライトのプリントを含め、
素晴らしい出来になっています。
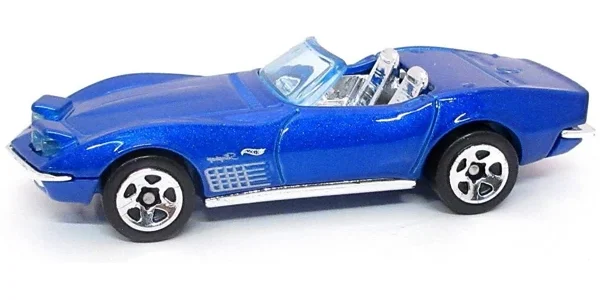
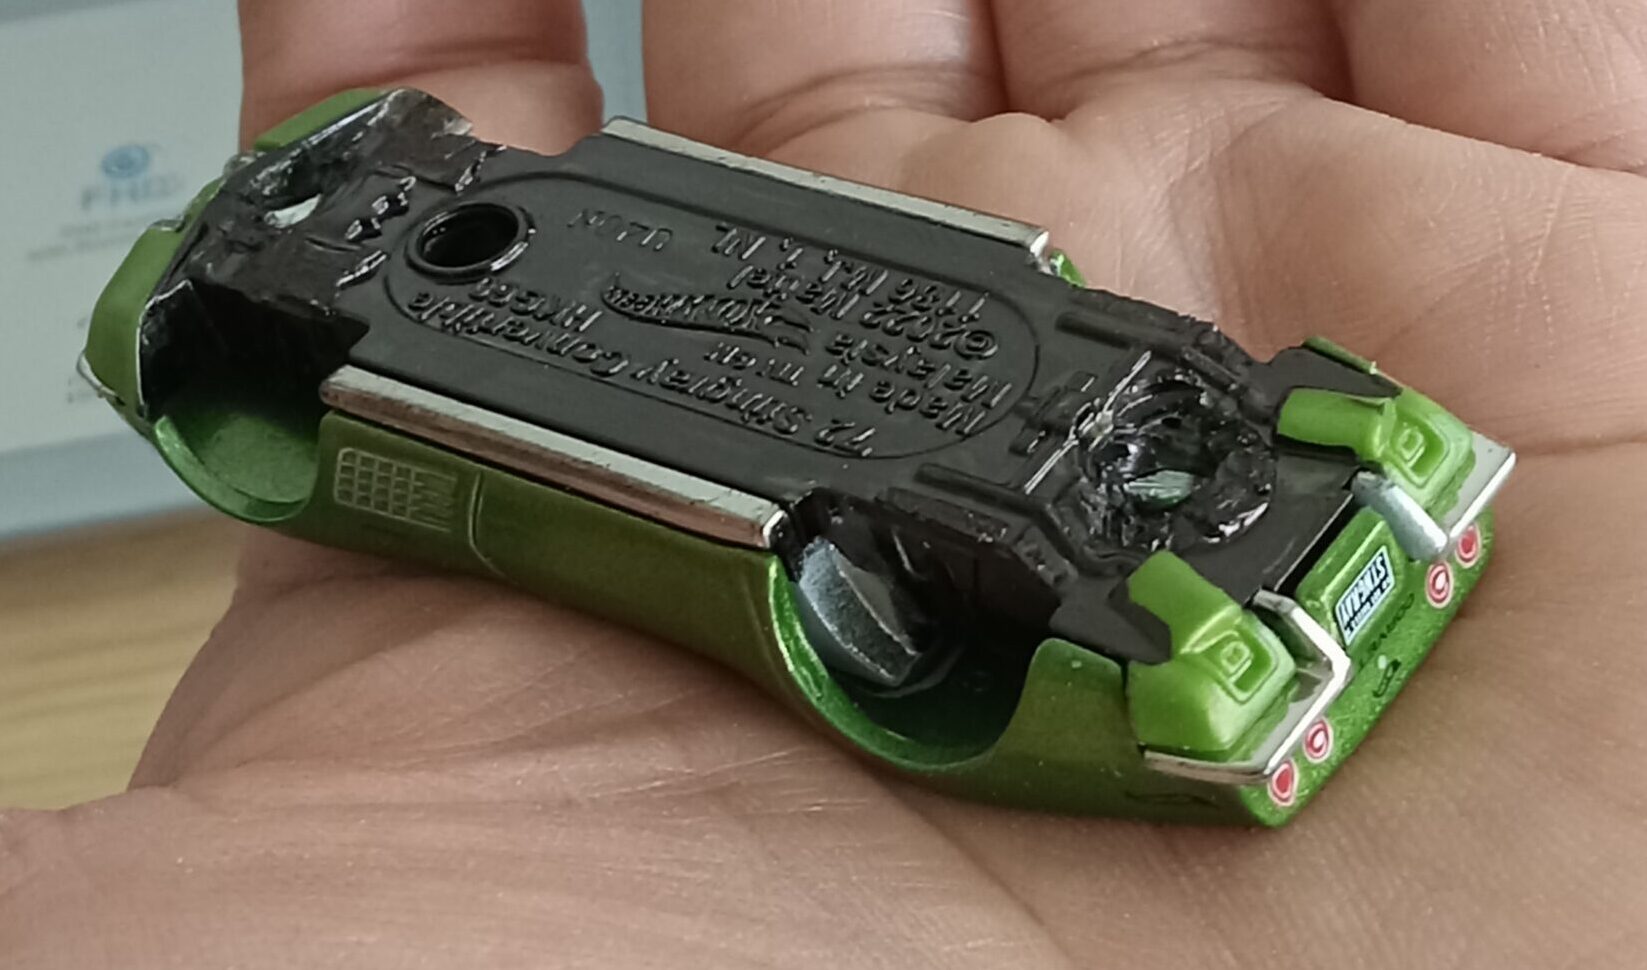
更に珍しいギミックとしては、
*シャーシの下側にある、丸い透明部分に光を当てると、
*ヘッドライトとウインドシールドが光るといった、非常に面白い、


仕掛けが組み込まれており、デザイナー&設計チームの、このミニカーにかける意気込みが感じられます。
*改造プロジェクト:ストック状態の再現?

#実車資料:1972年型、ロードスター


#当モデルの、良い点&欠点
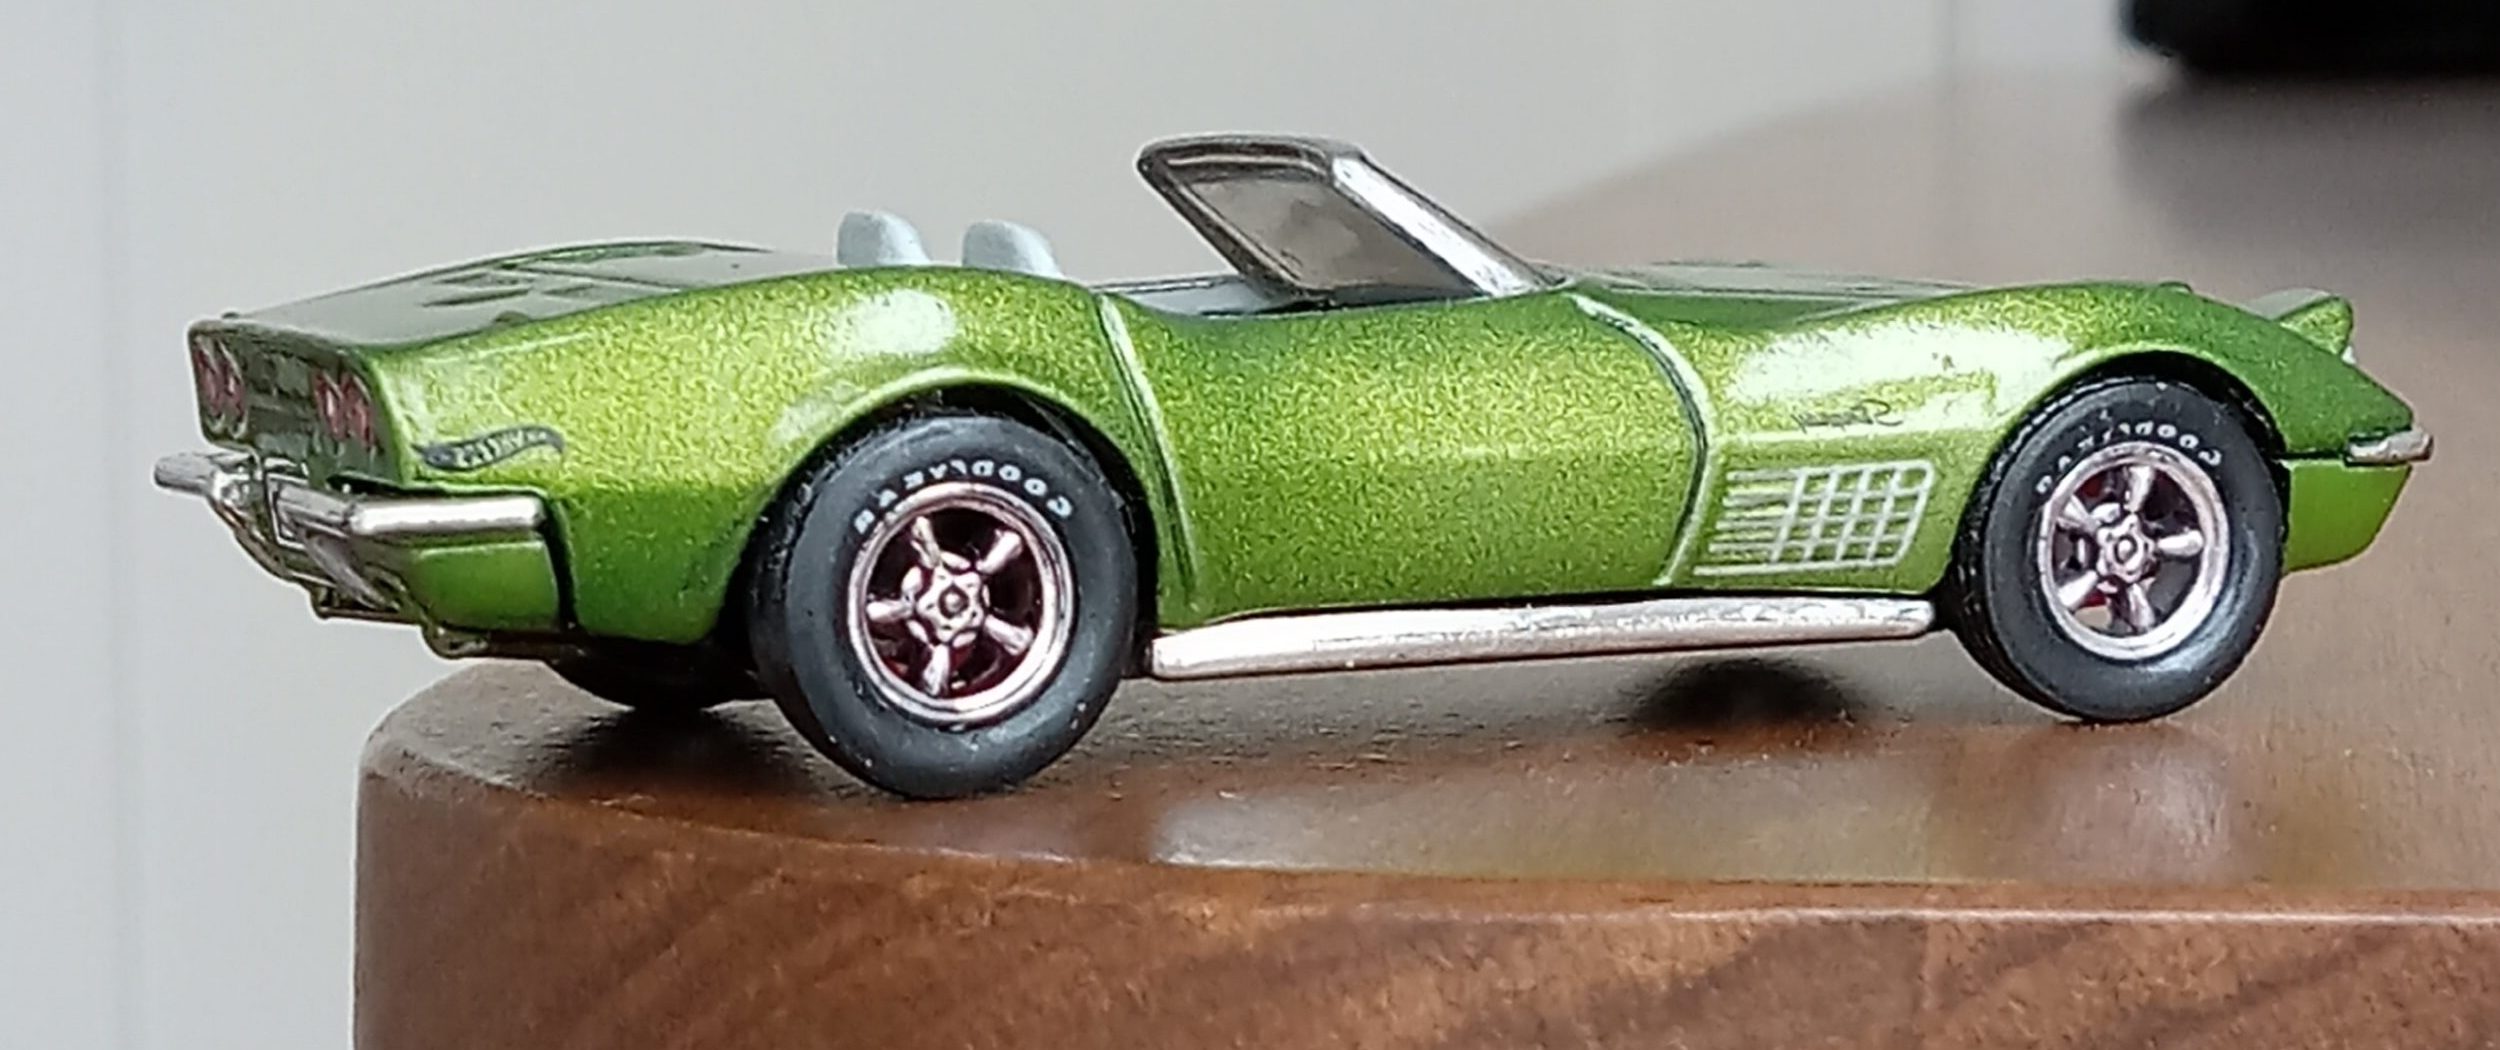
*美点:
#全体のプロポーションの正確さとスケール感
#スジボリの細さと深さ、ディテール再現がいい感じ
#少ないパーツで、バンパーや内装をシッカリ再現
*残念な点:
#内装部分のクローム・メタリック感が少し大げさ
#タイヤサイズとホイールが14インチで、扁平感が少し強すぎ
(60年代のバイアスタイヤの甲の高さを目指します。)
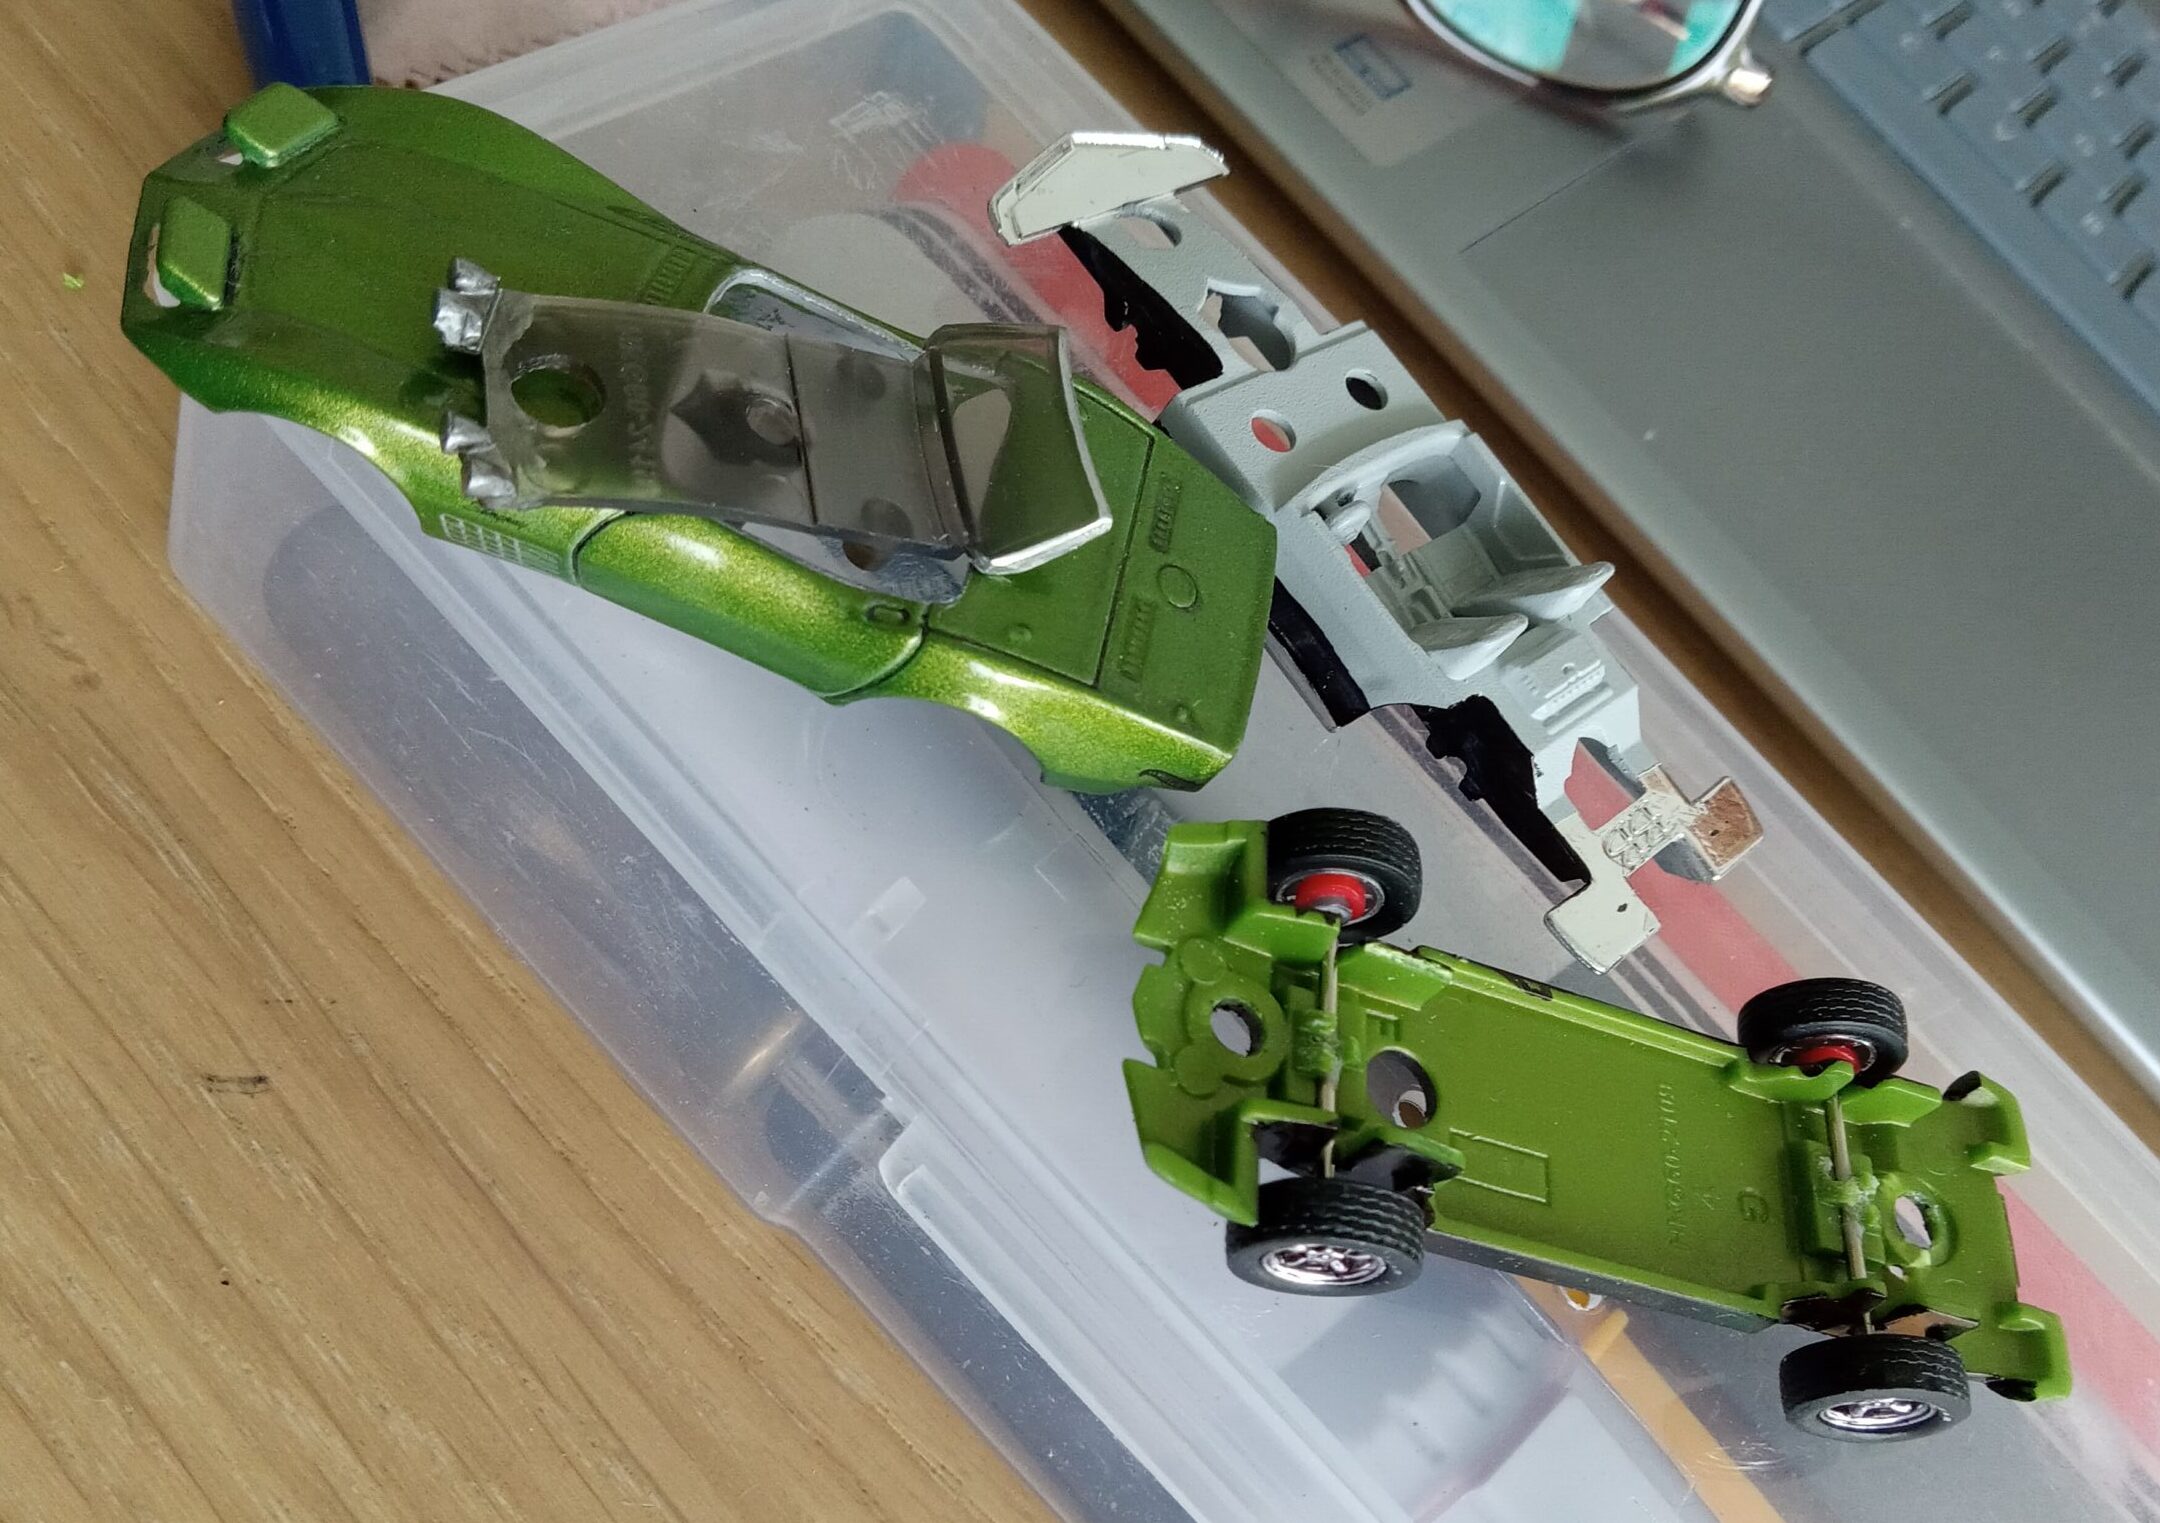
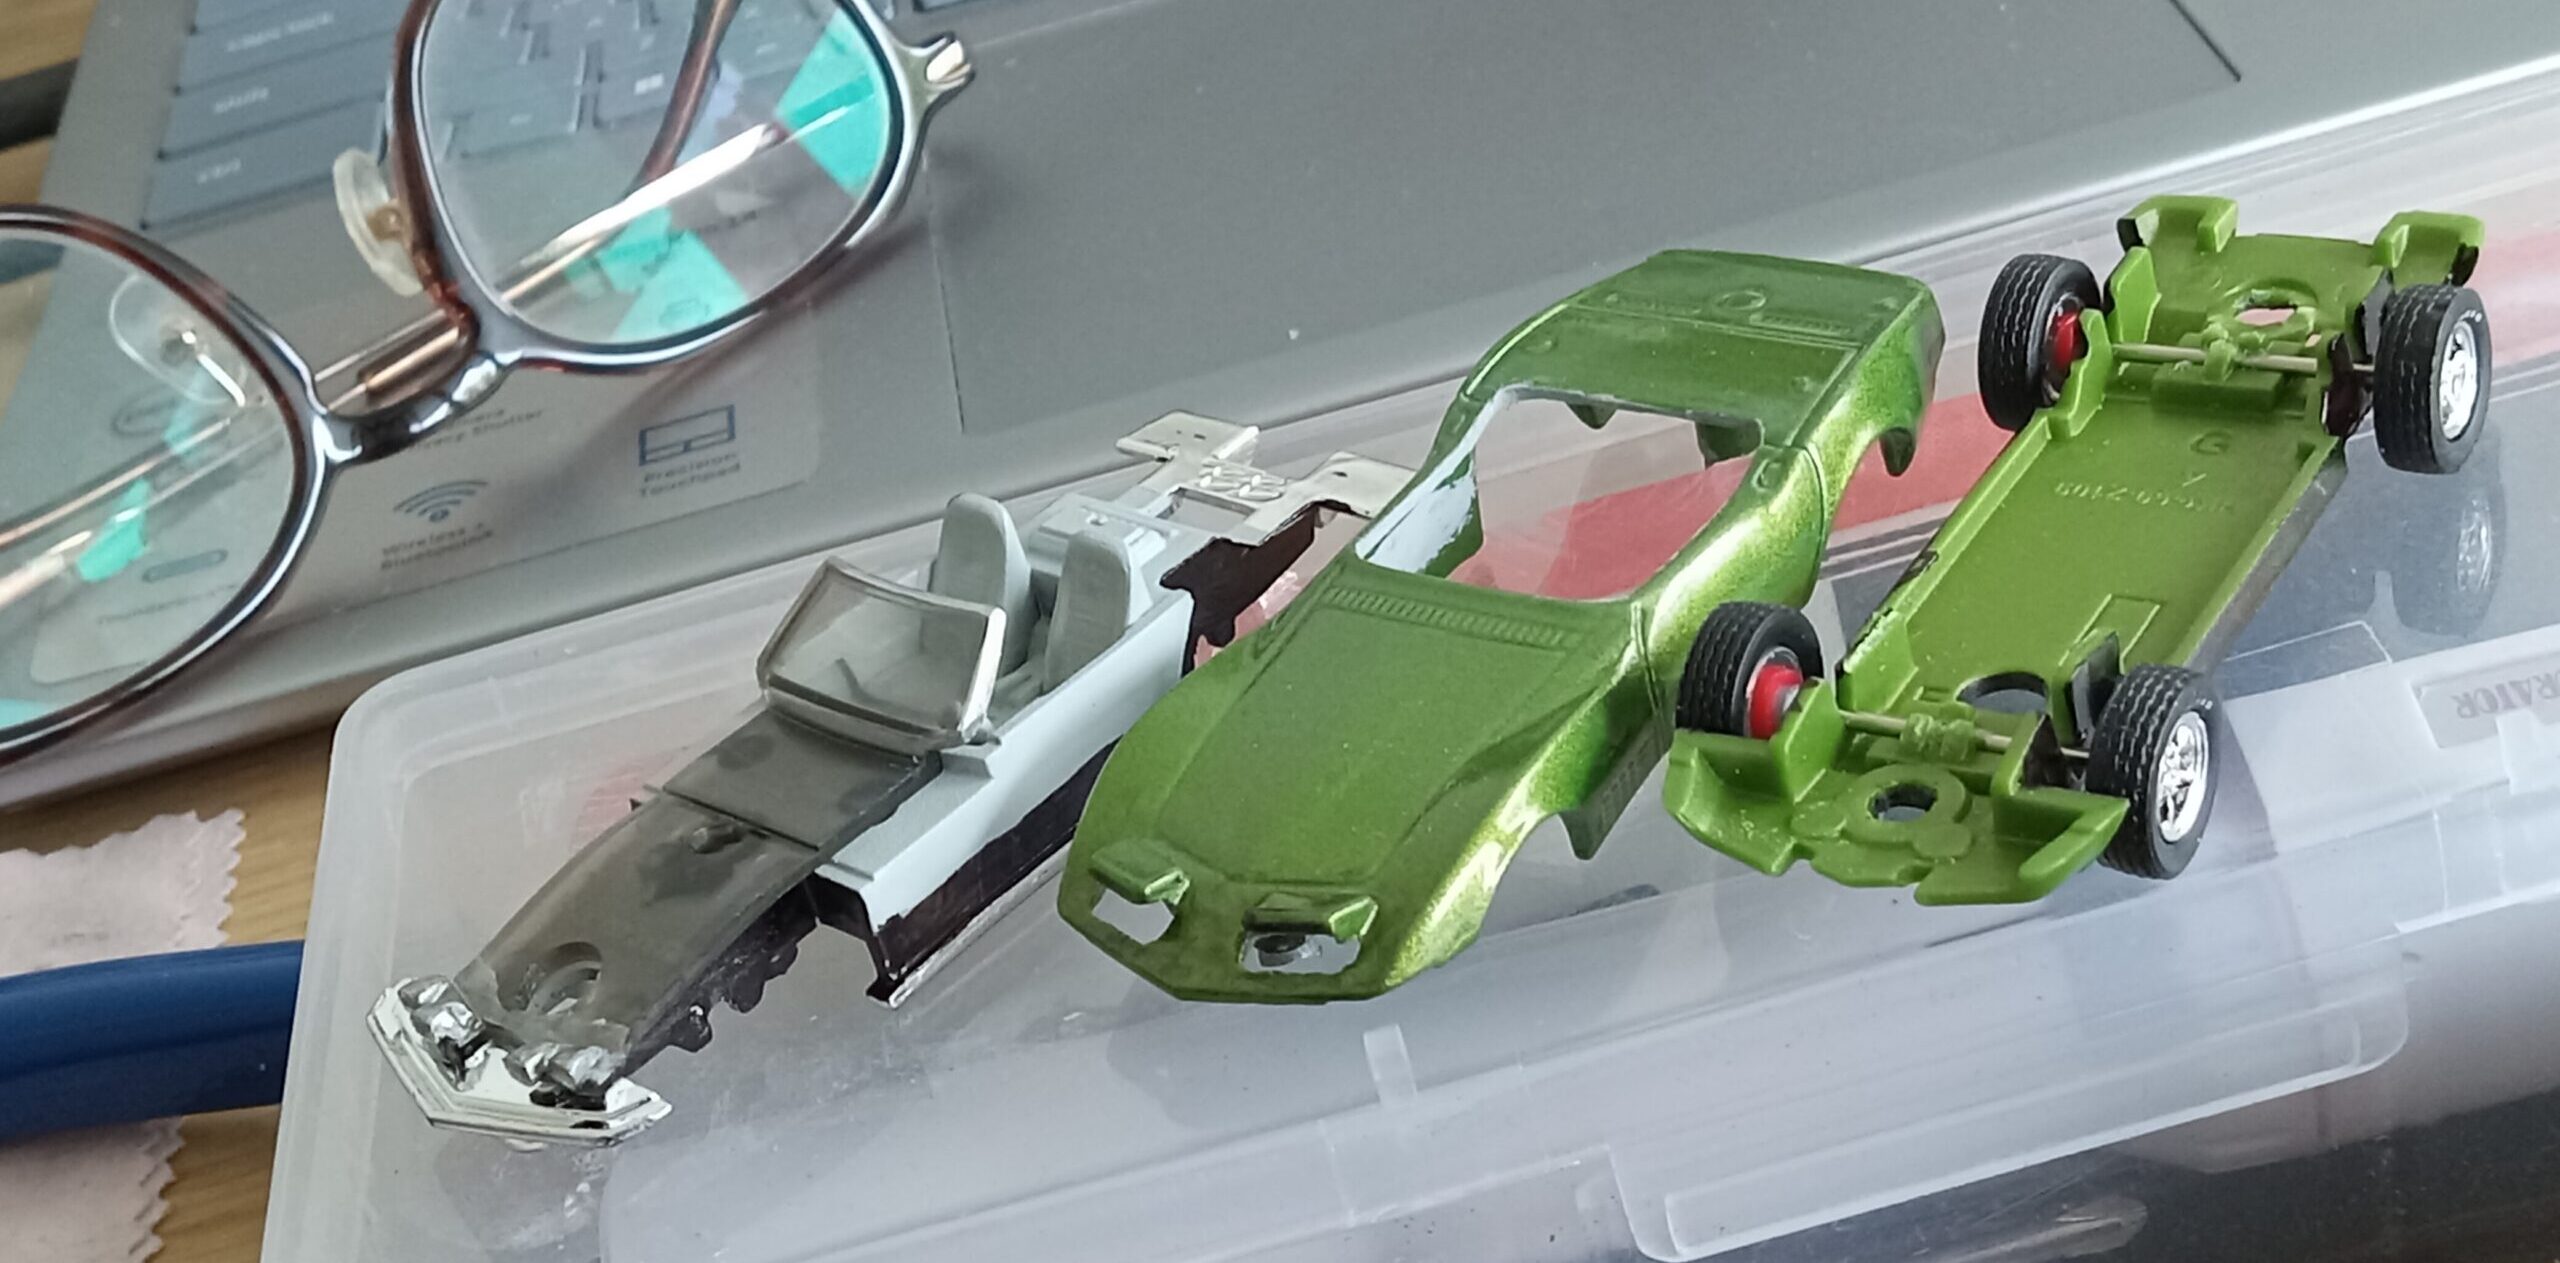
#改造開始:スムーズ且つ簡単です!!
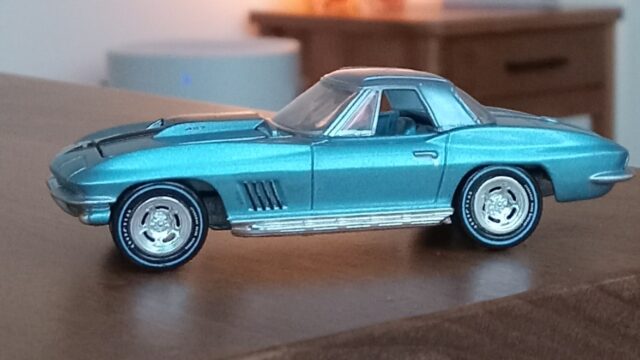
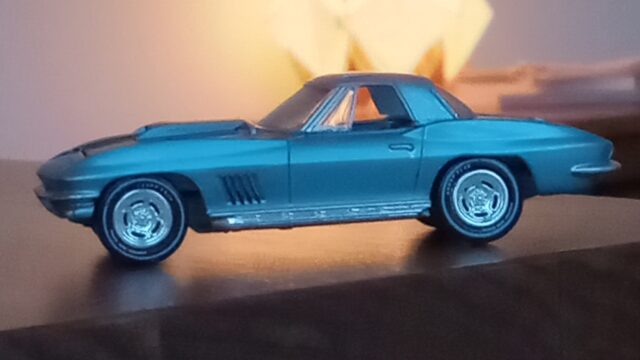
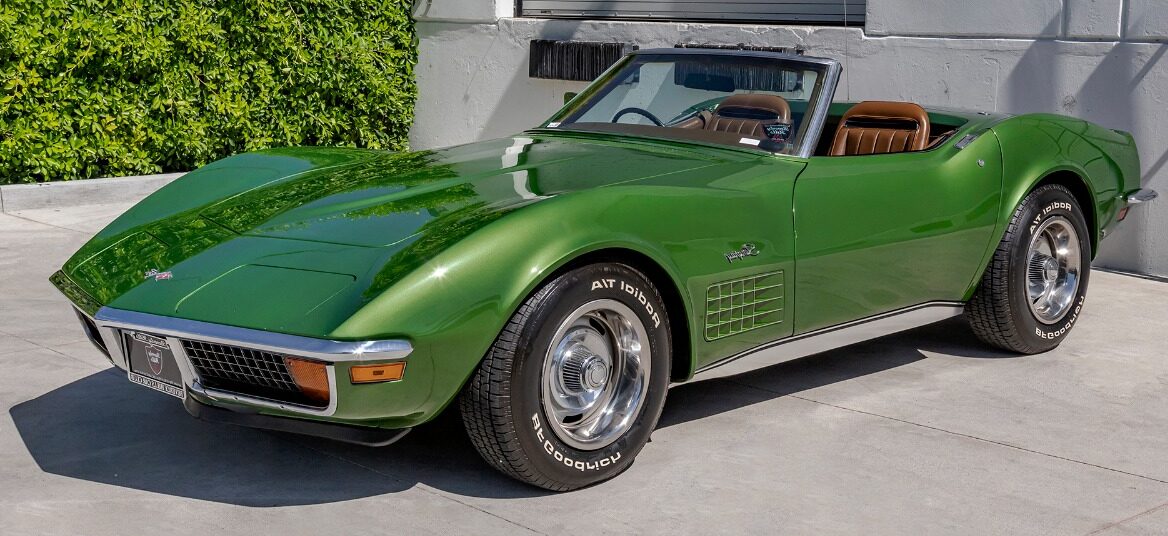
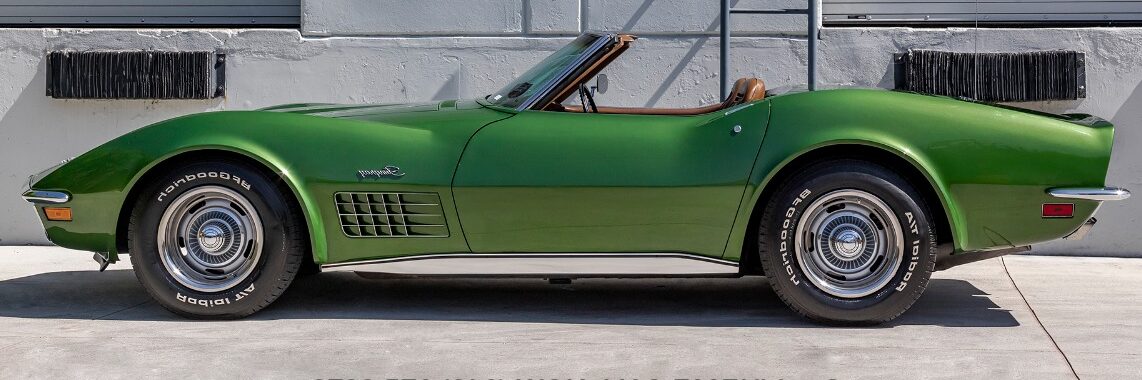
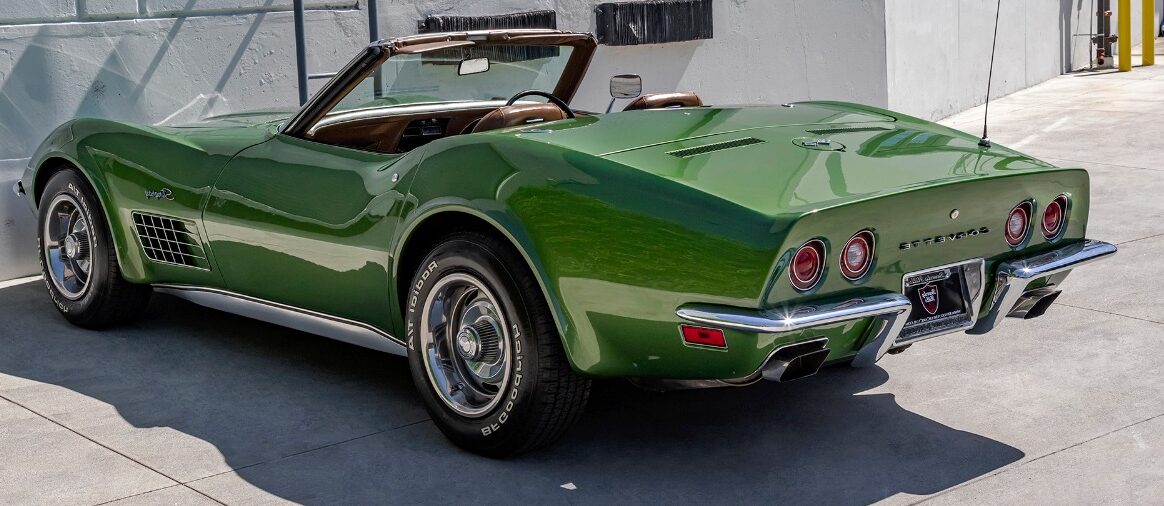
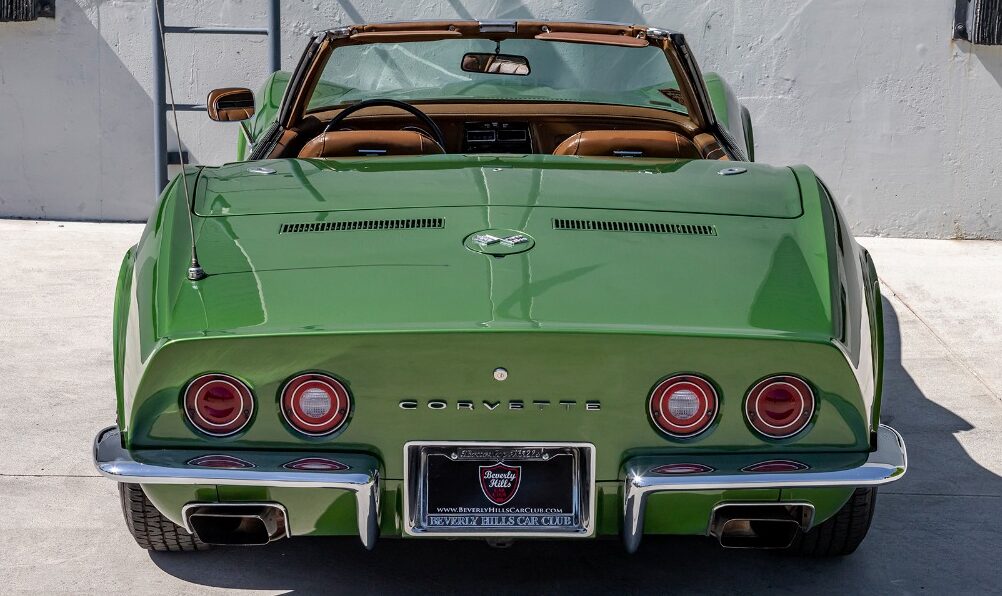
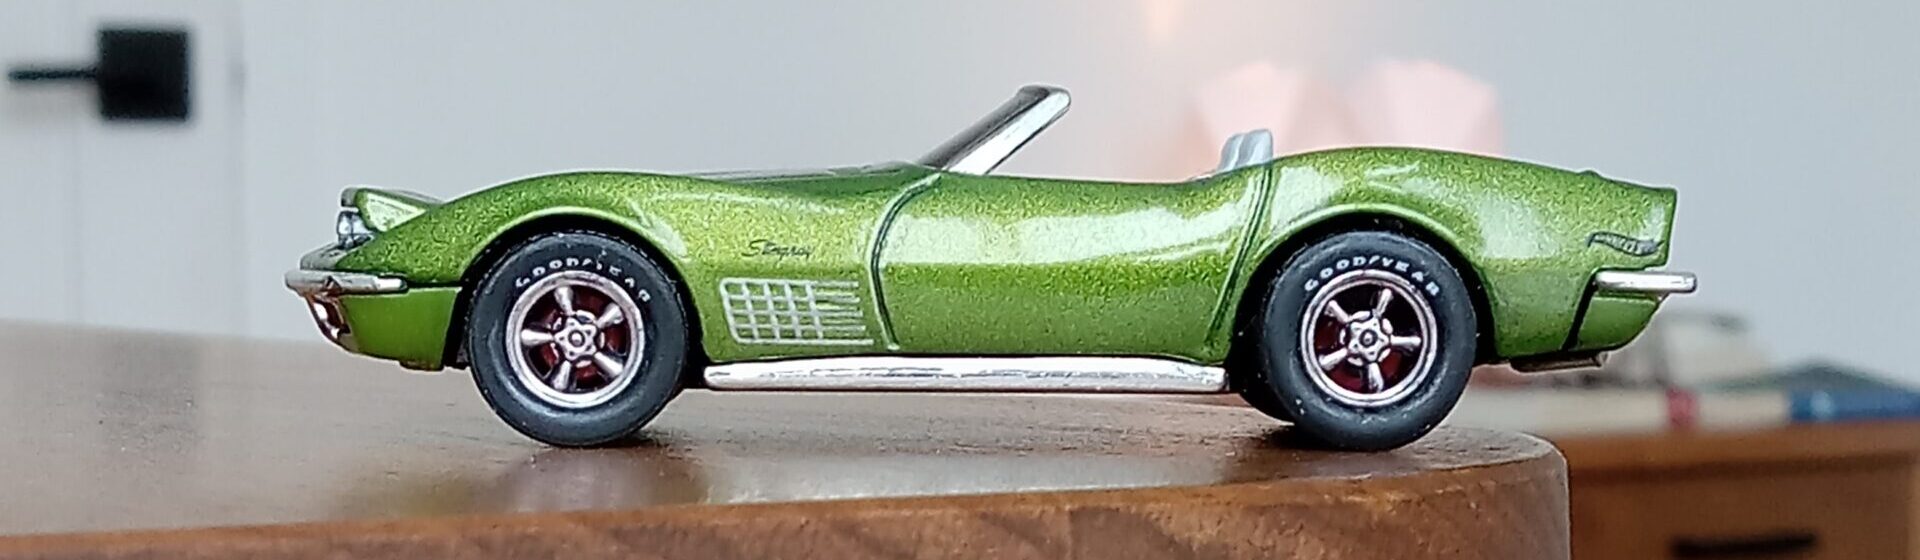
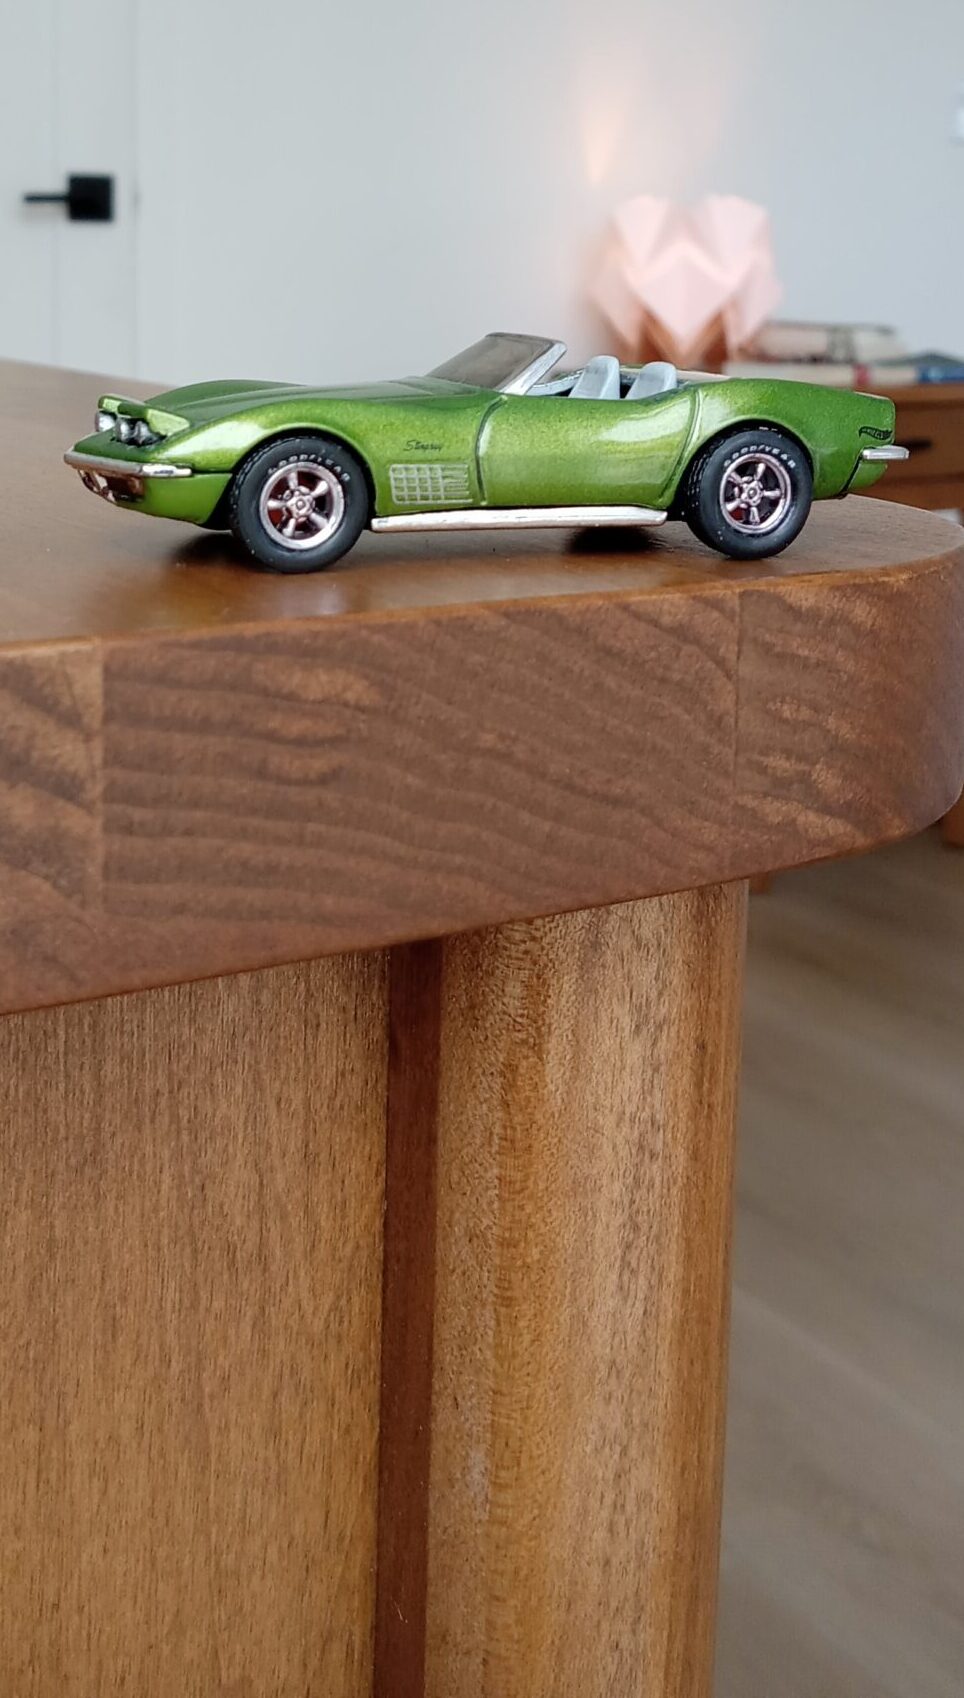
【完成写真】:
【改造過程】
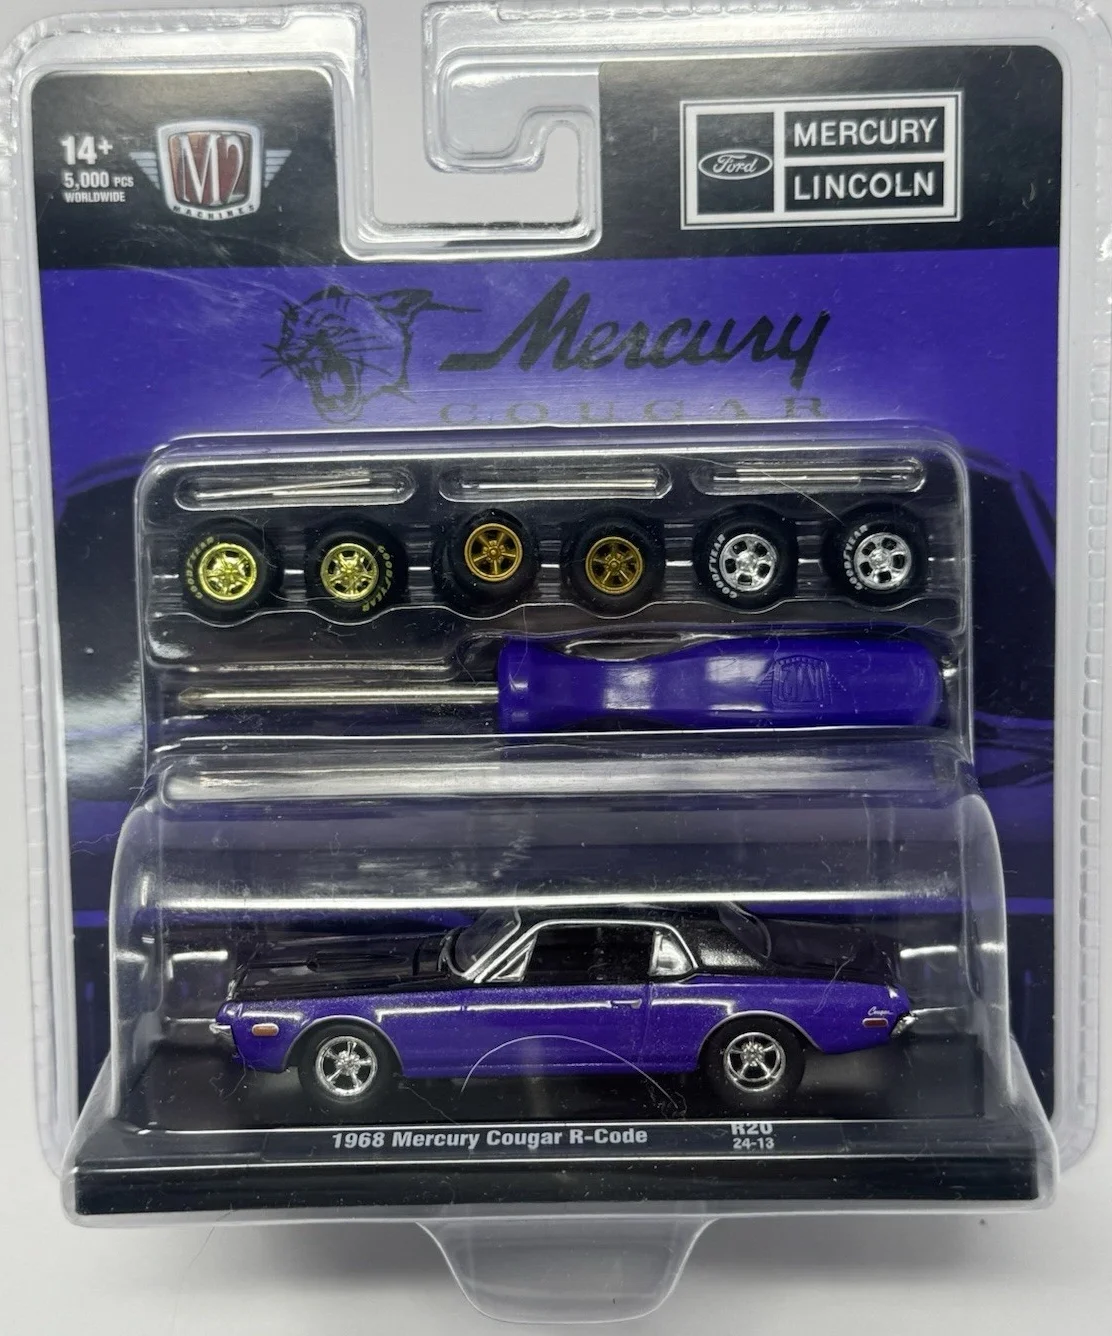
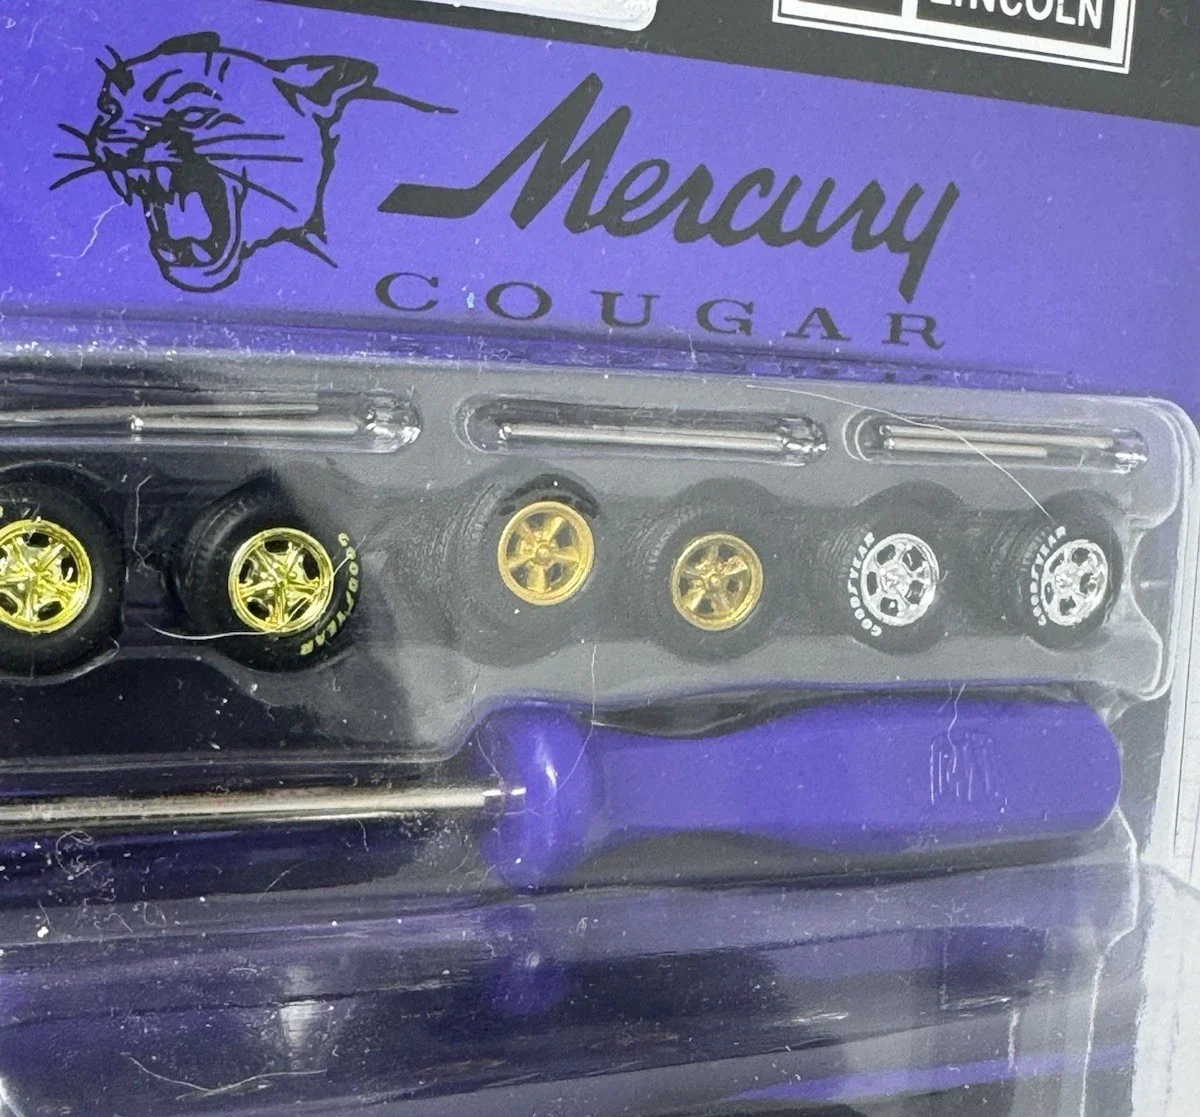 *タイヤ・ホイールの供給先です:
それでは、改造手順です。
前置き:
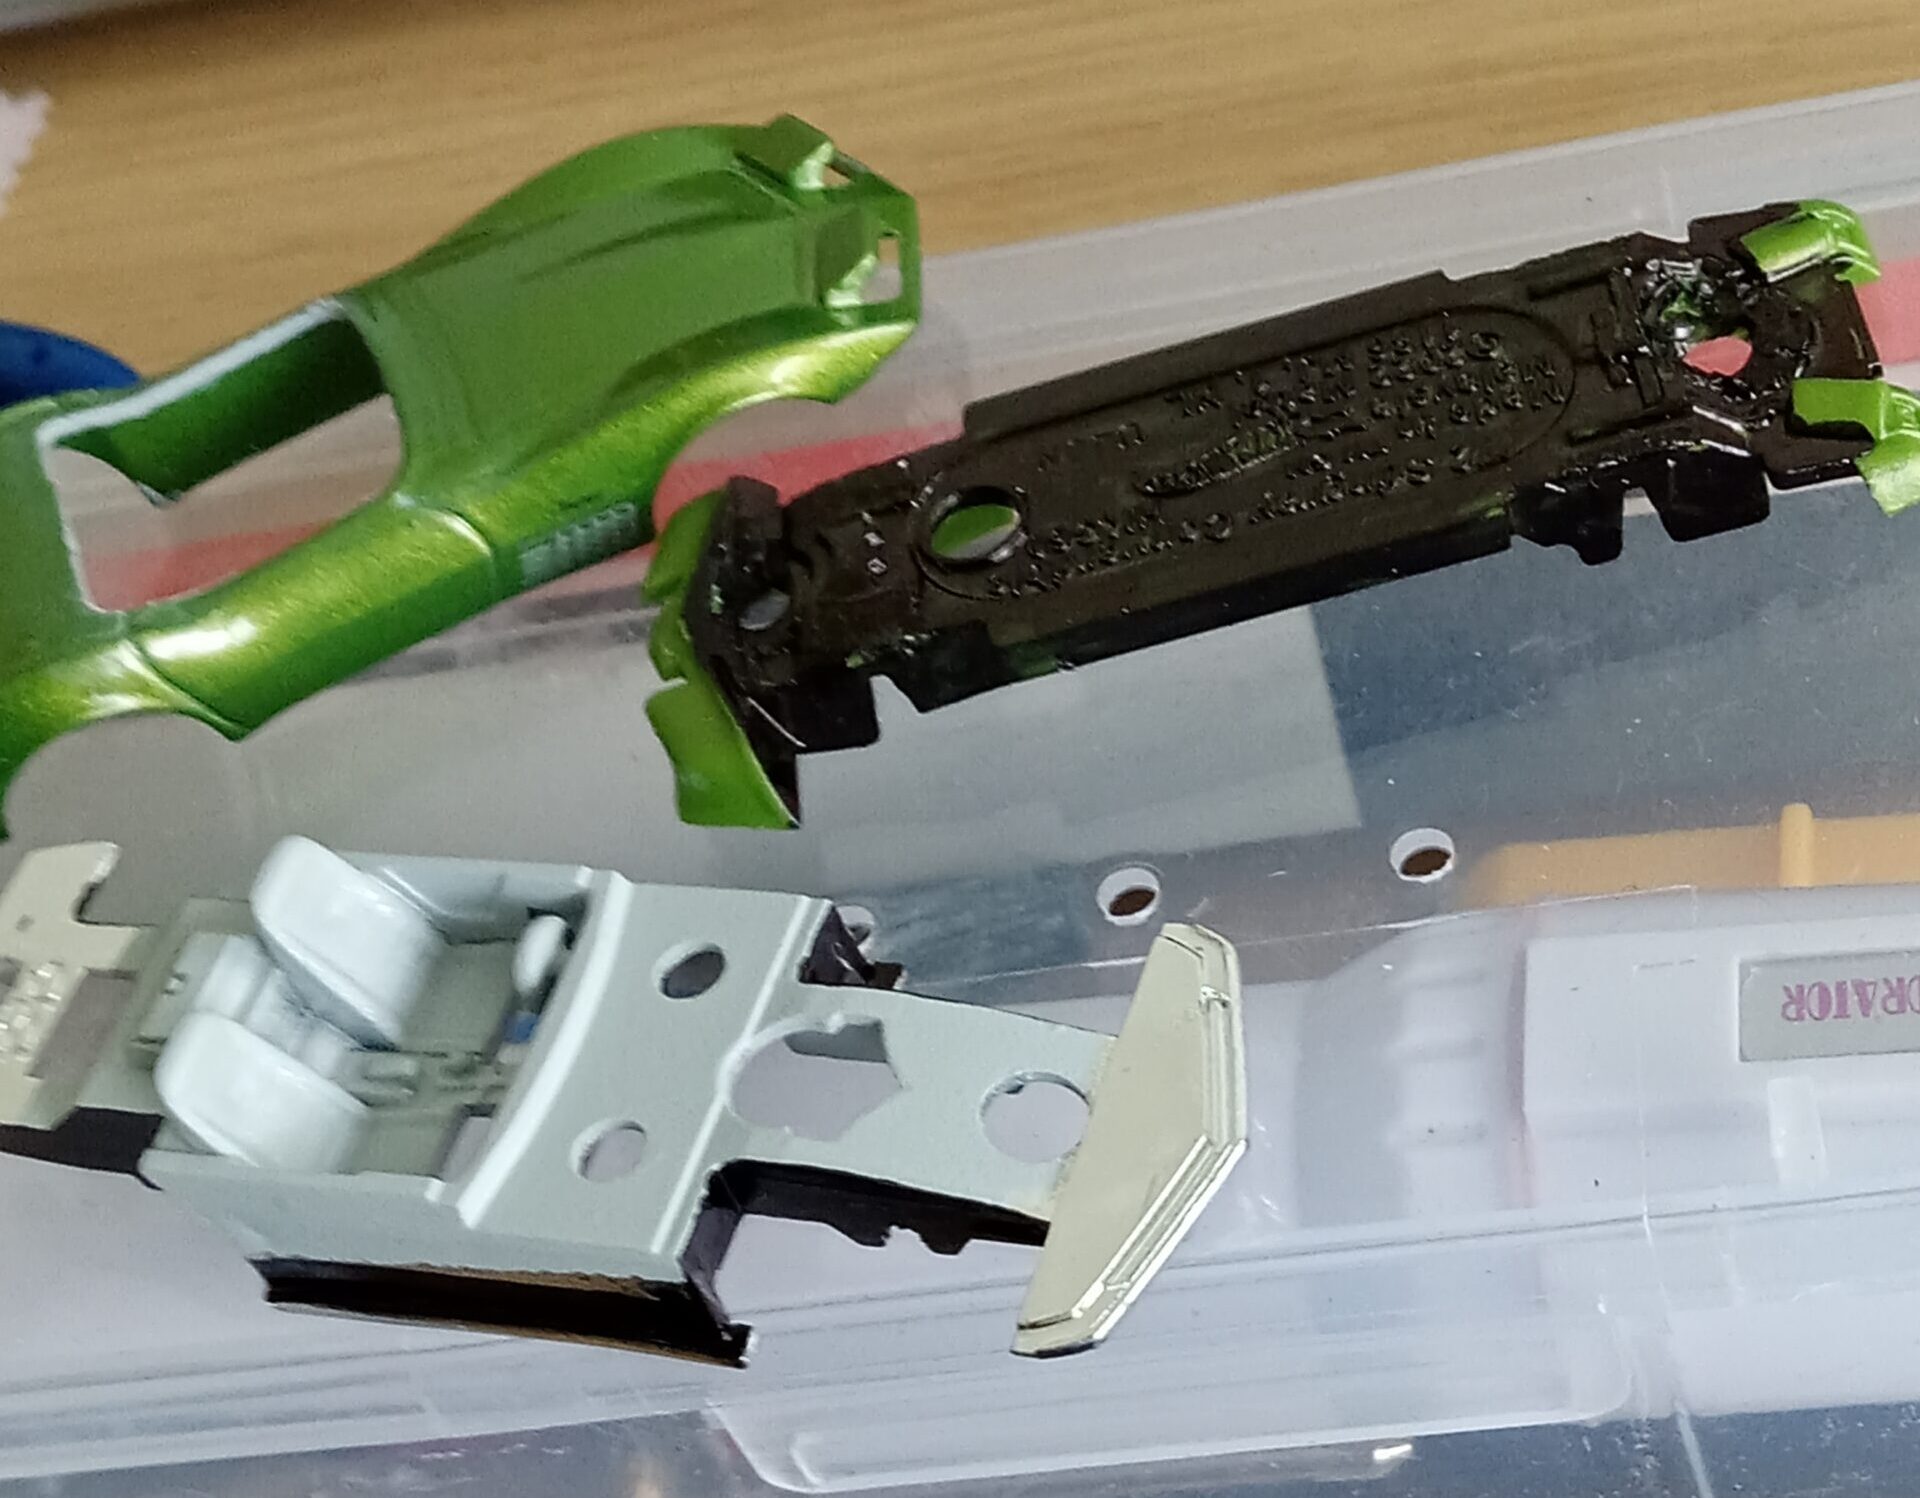
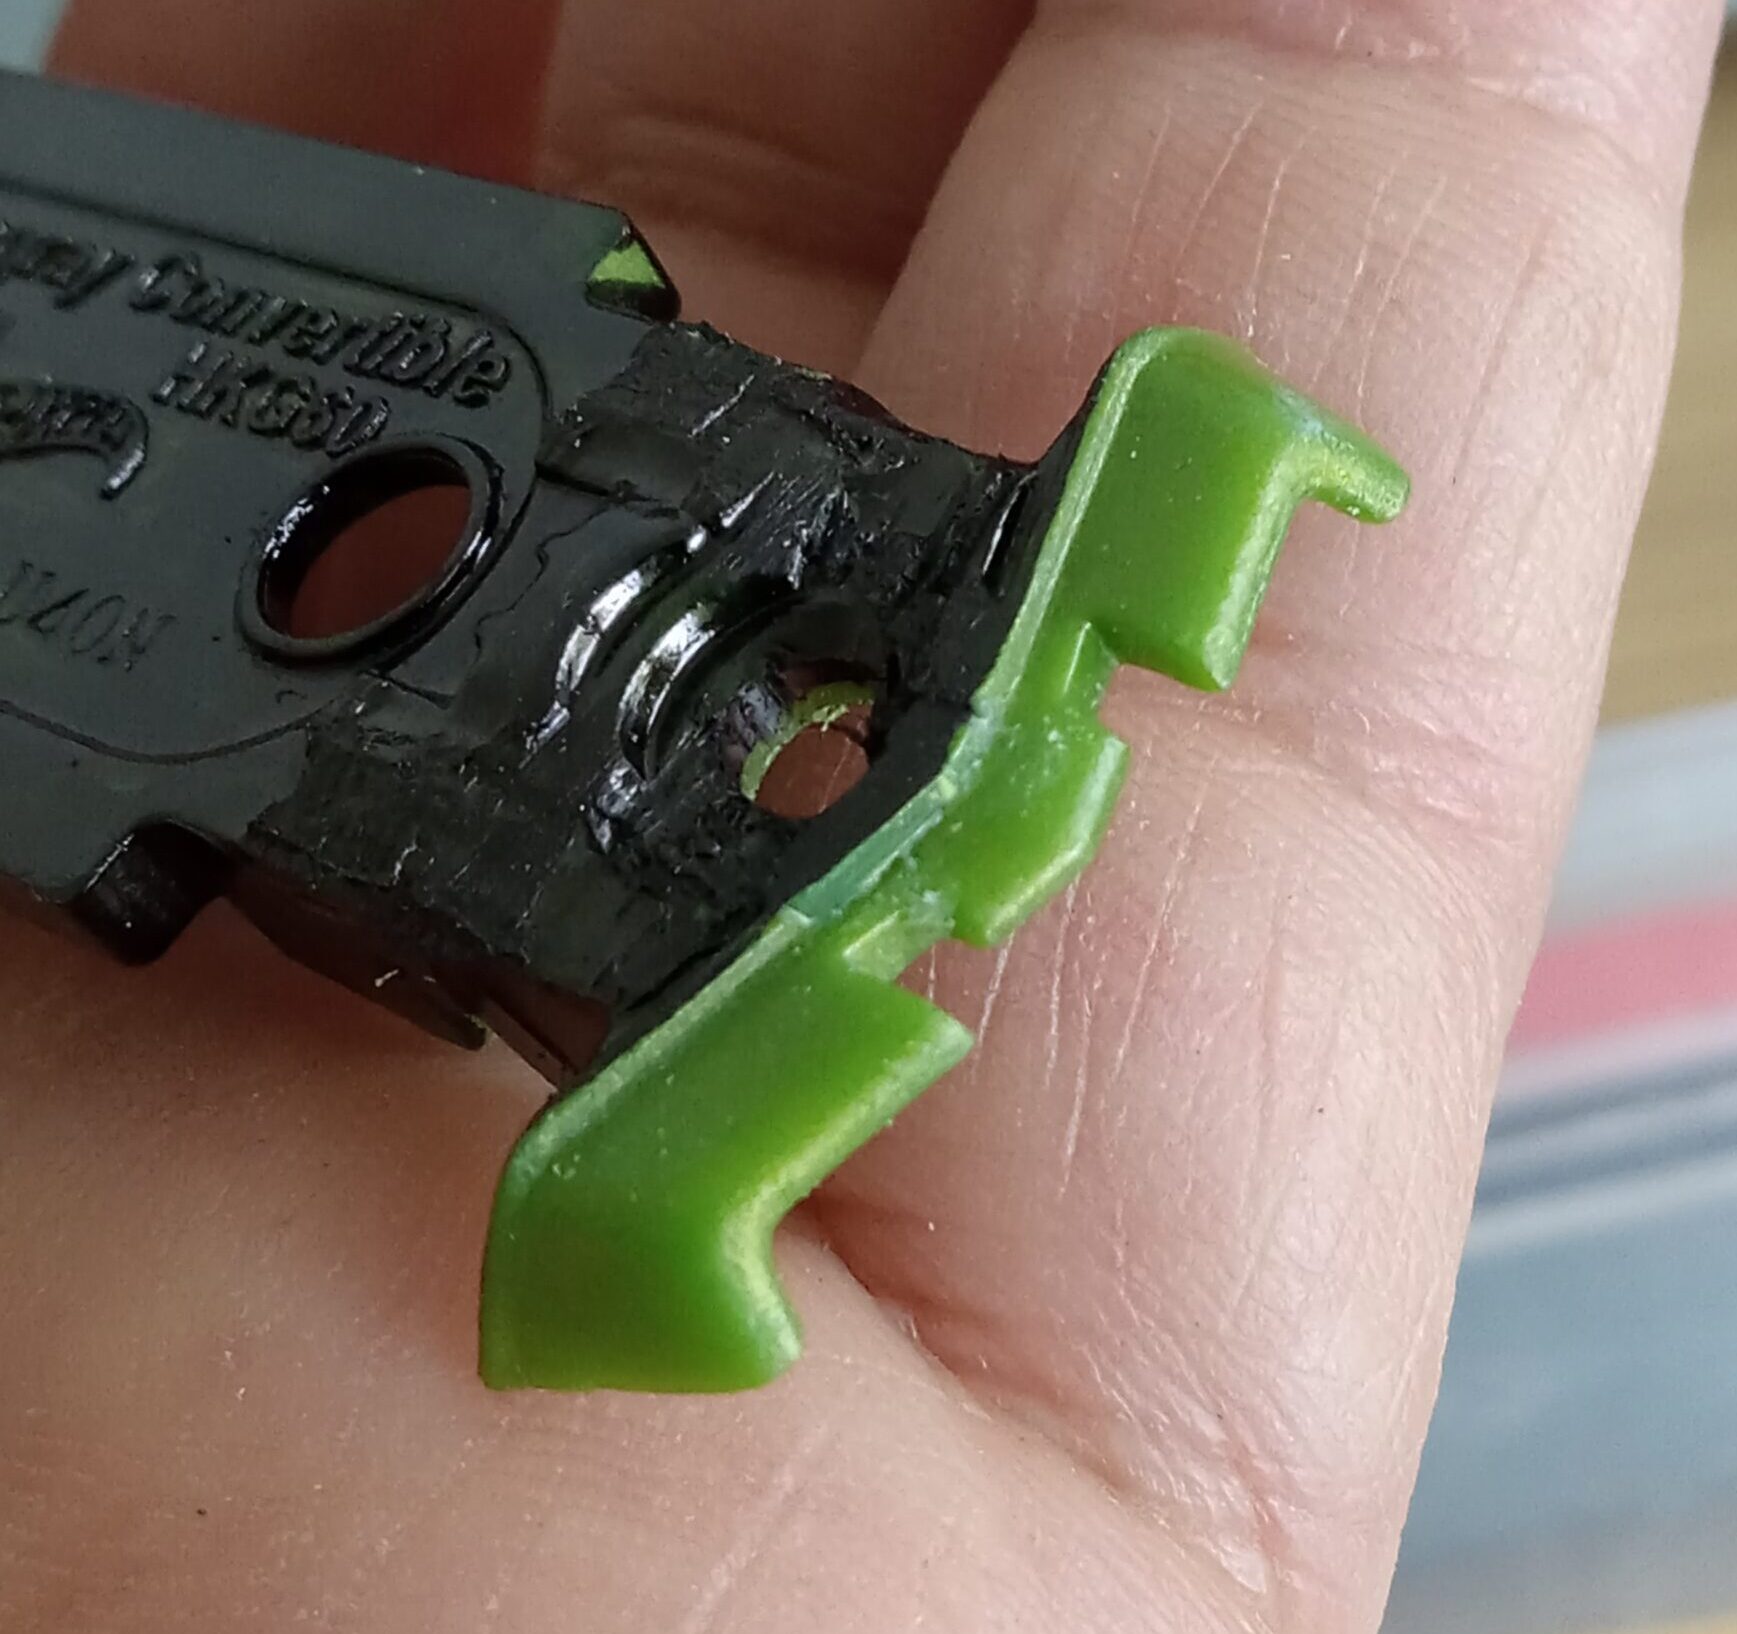
1:ドリルを使い、ボディー裏のカシメ止め部分を取り除き、シャシーを取り外す
2:内装部分をマスキング後、艶消しの灰色で塗装する
3:M2社製の’68クーガー付属のオプション、ラリー・ホイールを取り出す
4:内装パーツ、車軸の上側が当たる部分を半径3㎜程の半円状にナイフで削る
見せ場:
5:車軸の幅、位置や高さを微調整して、理想的なスタンスを作る
仕上げ:
6:ドアやボンネットなどのスジボリ、ホイール、ドアー周りの下側の面、フロントグリルなどの細部にアルコール系のマーカー(40%前後)で墨入れ、その後薄め液で吹井揚げ、塩梅を調整
7:シャーシ裏面、ホイールハウスの内側、ヘッドライトのガラス面と上面(ボディーカラー)以外の部分に黒のマーカーを塗りこみ、コントラストを強めて、シャープなイメージを演出
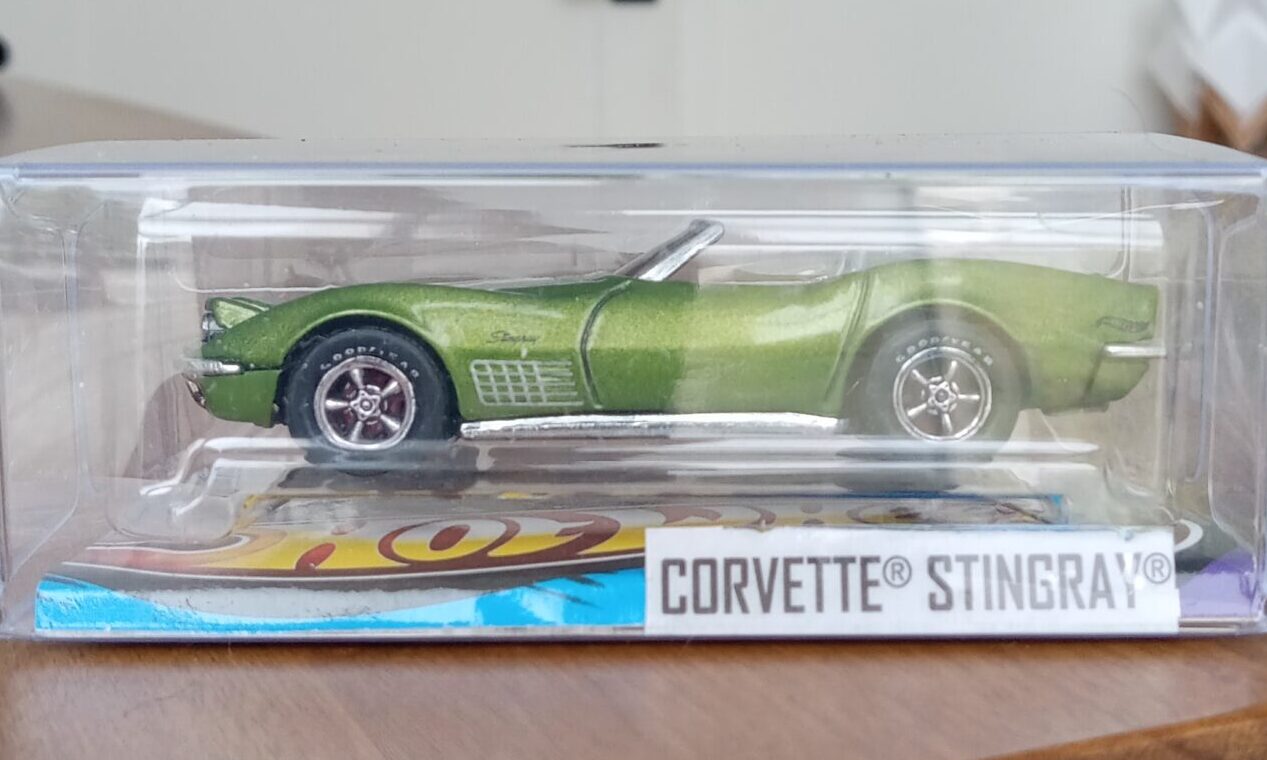
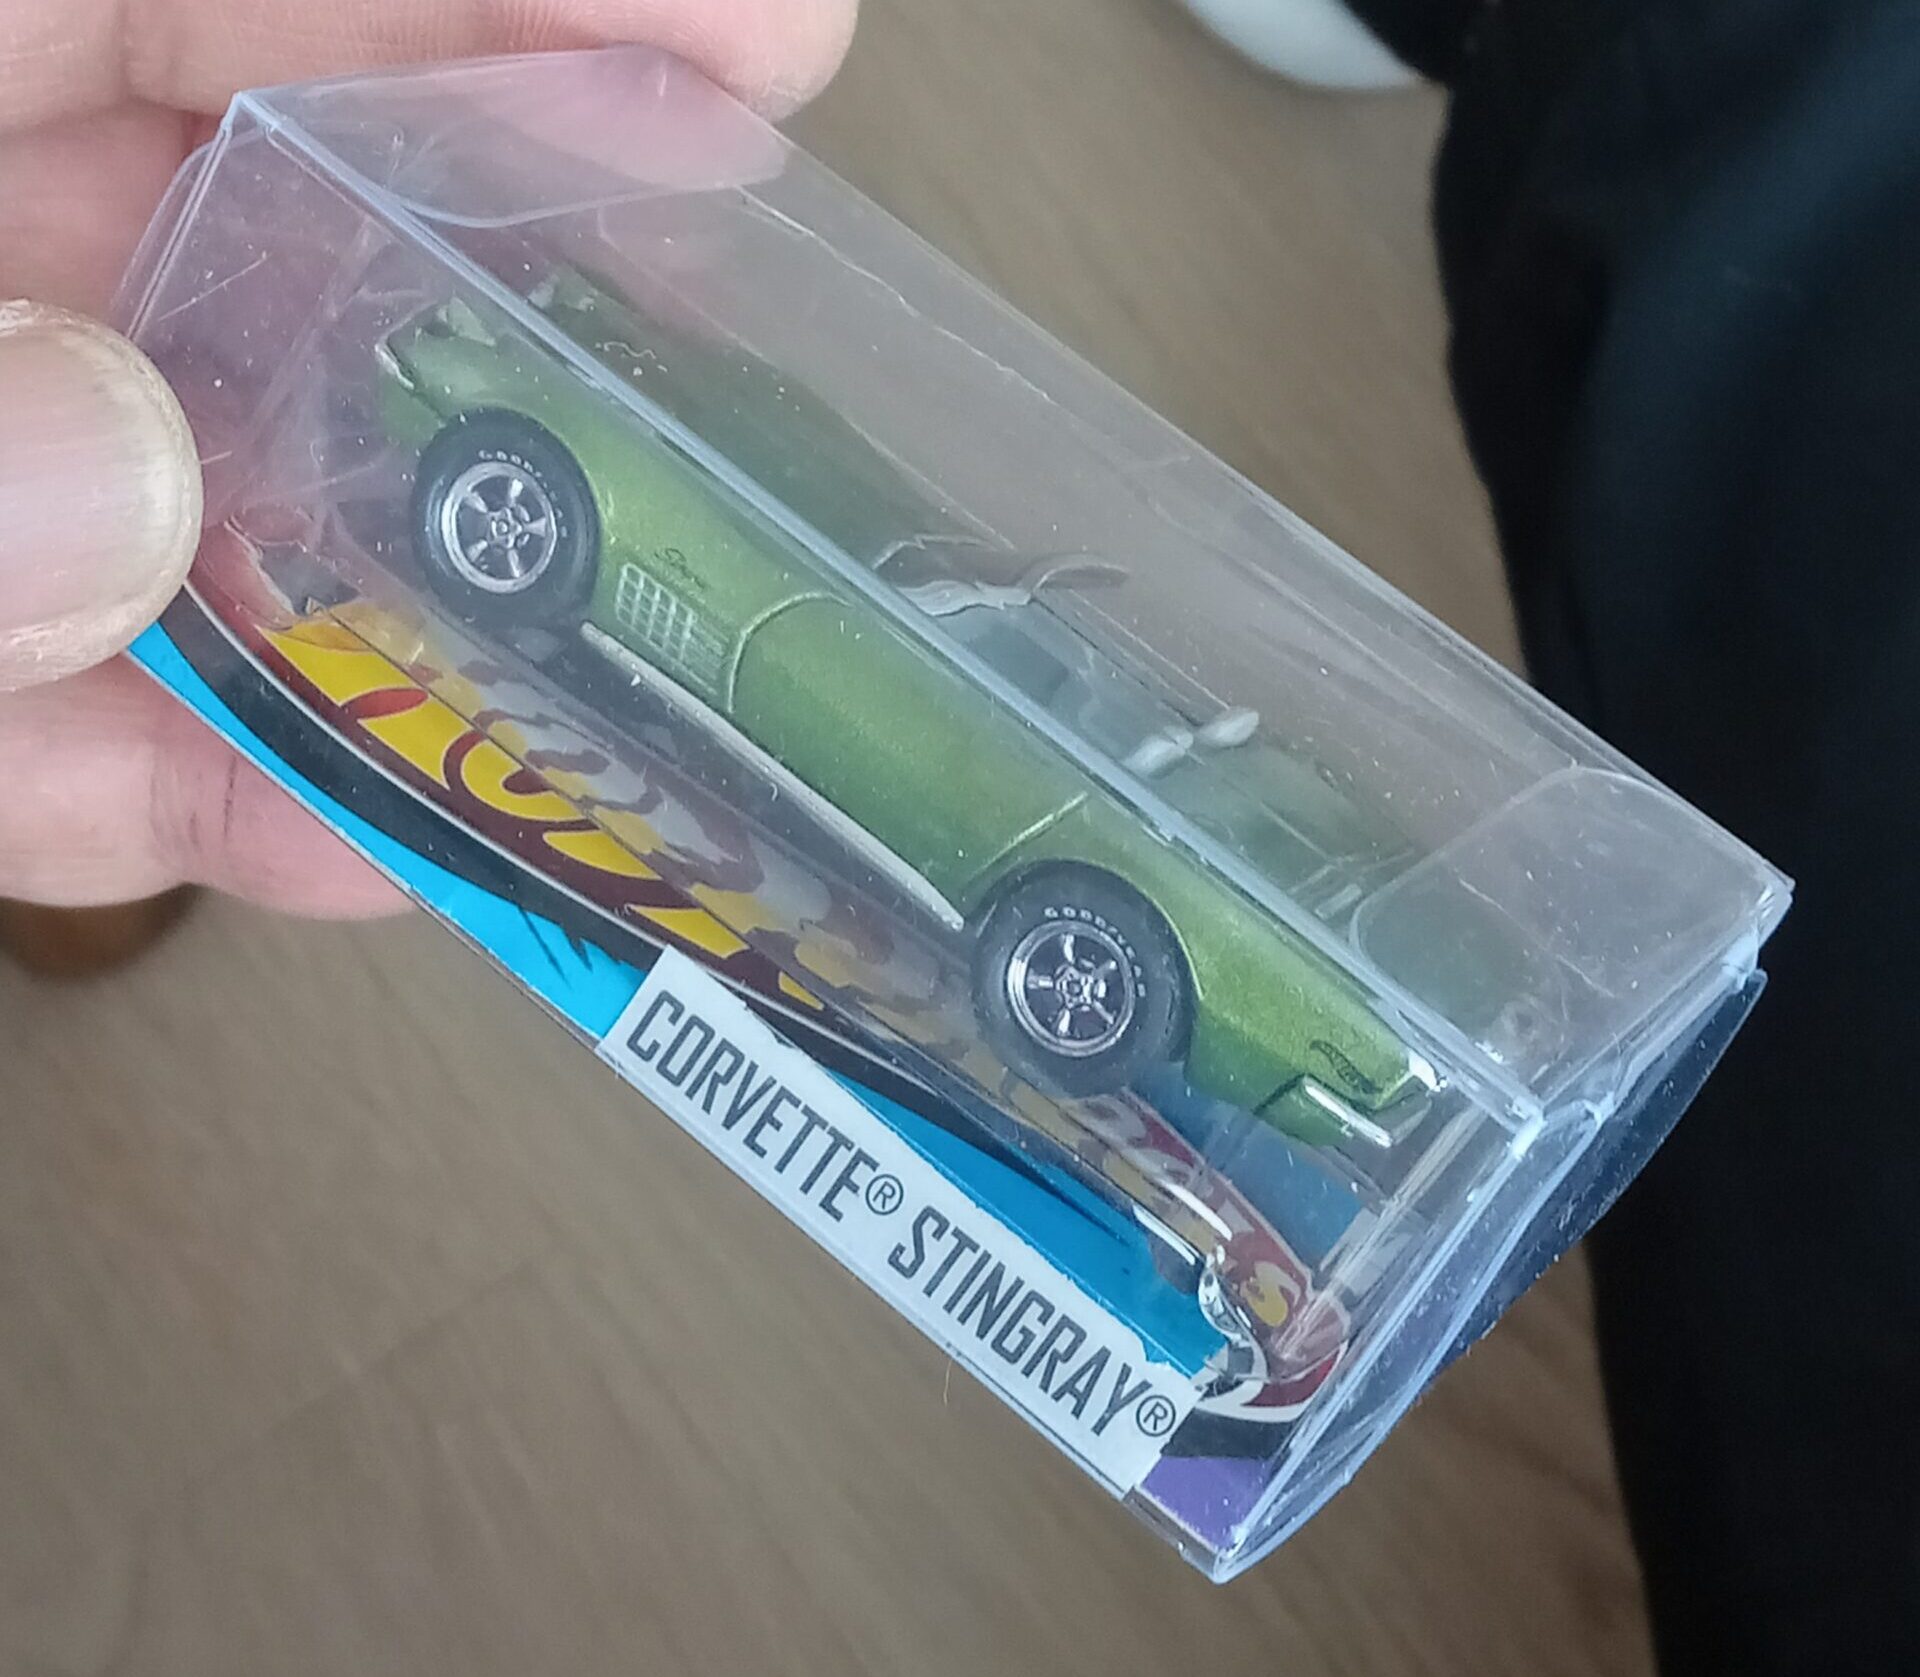
*総評:大切な友人へのプレゼントになりました。
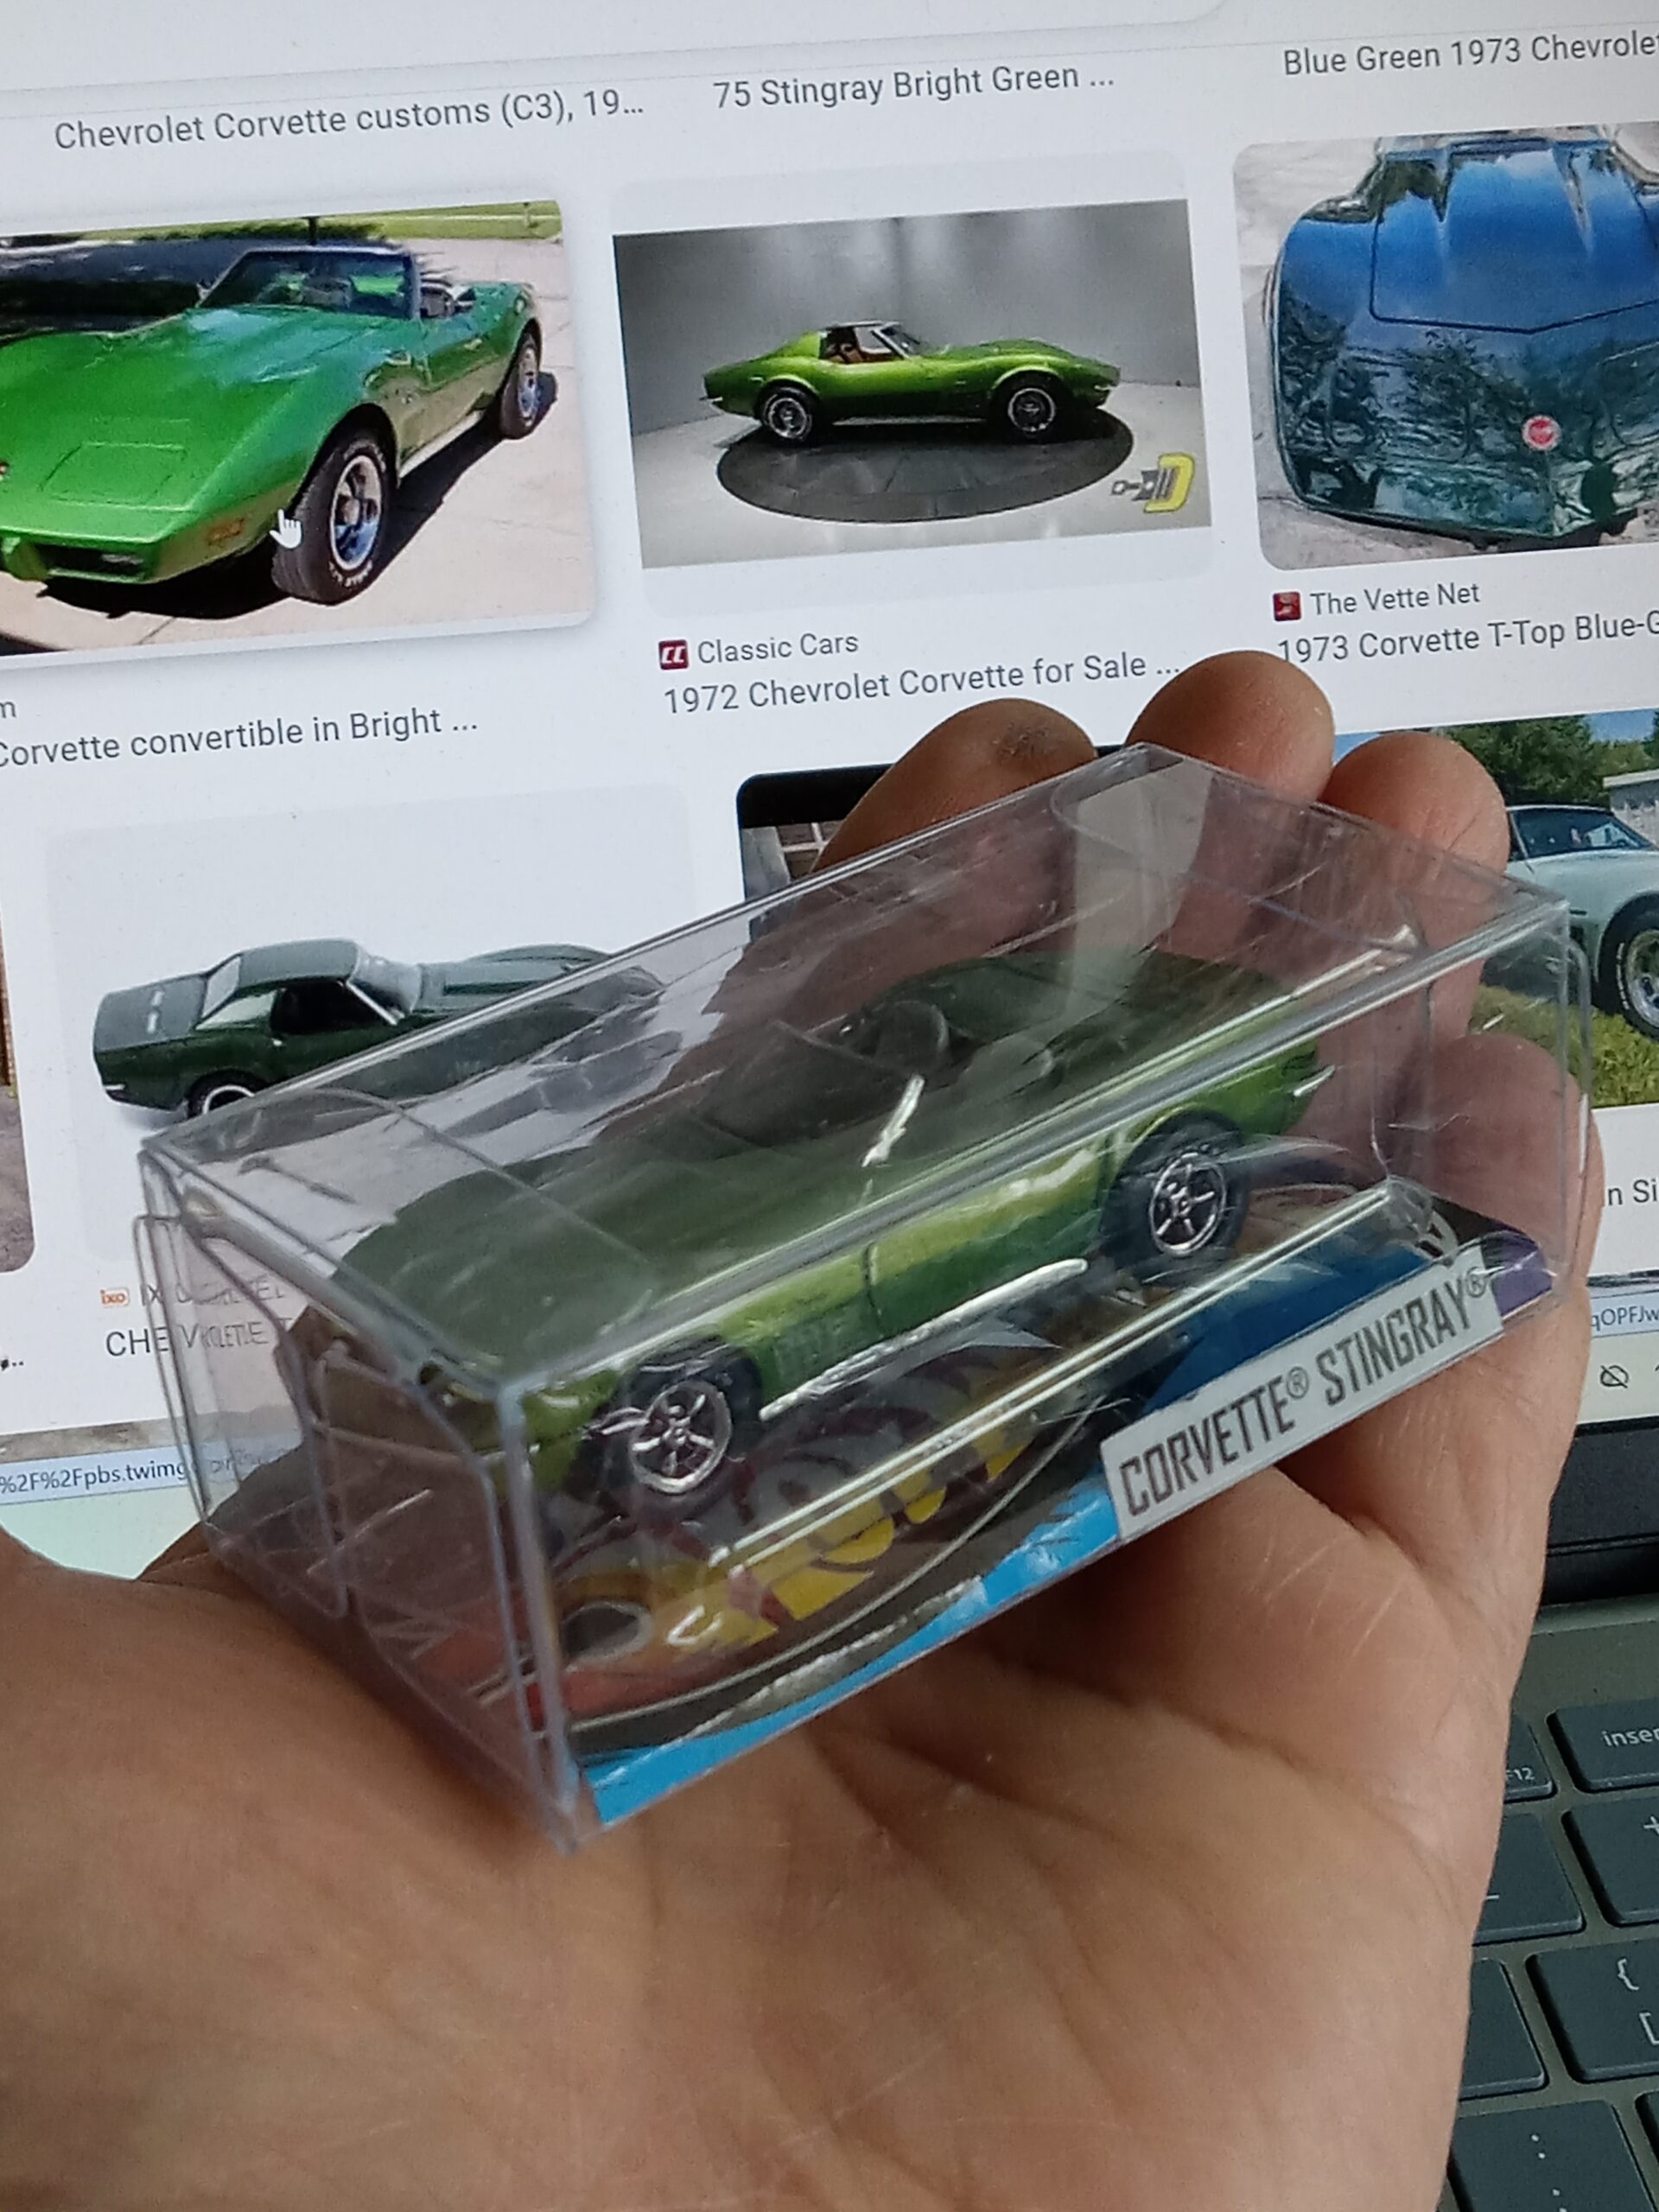
余ったパケージの裏紙を適当な大きさに切って、透明のミニカー用の箱に入れたら、いい感じになりました。
 今後もこんな感じで、
ホットホイールの通常モデルの出来がシャープなものが見つかった時には、
*ホイール・スワップや、
*細部の塗装による改造を加えて、
どんどん、
発表していきたいです。
本ブログと記事内容につきまして:
ブログ記事を書くにあたり私の目標は、立体造形(料理も含めて)とのかかわりを通じて、私個人の特徴的(ネジ曲がり方も含めて)な評価軸を解明することで、「美しさ・美味しさ」に対する好奇心や、探求心を、どのように満足・充足させてきたのかを明記しておくことです。
従いまして、記事の中に出てくる、数字や年号、微細なデータなどには細心の注意を払っておりますが、時に大きな間違いや勘違いを犯していることも考えられます。特に自動車記事における主要諸元や、年号などには紛らわしいものも多く、あくまで参考程度に考えていただければ幸いです。
私としては、記事の中で個人的な外観デザインや味覚の評価、そこから広がる後半部分につなげるための、『流れ』を作るための客観的材料として年号やデータを挿入している感じです。あくまで重視したいのは、私個人の頭の中で起こる、記憶の錯そう的混沌から生まれる新たな『見方』や『情報の予想外のつながり』です。その勢いを作り出す、『流れ』の一環として、諸データが副次的に必要となるわけです。
話がそれますが、大好きな落語の世界に「三題噺」という、その場て会場から募った3つのお題を使って1つのお話に仕立てるといったお遊びがございますが、私はそれに近いことを立体造形の特徴や(料理のお味)をお題にして行っている感じがします。その中で頭の中に去来する数々の着想が、全く予想外で楽しく、次回からの記事内容を大幅に変えたり、新展開につながっています。
当ブロブの仕組み:
『好奇心の点と線 x 気まぐれ脳内回路=予想外の新展開』
こんな自分勝手なブログですが、今後ともよろしくお願いいたします。
追記:上記の『流れ』を作る為に必要な写真はできる限り、個人所有のミニカー・自前の料理などを使い撮影しておりますが、その他の必要最小限の図版や写真を他のブログ主様の記事や諸会社ホームページなどからお借りしております。(記事内容に合うよう加工させていただき、使用時は最小の解像度で載せております。)問題がある場合、ご連絡いただければ直ちに降ろさせていただきます。
追記2:当ブログ記事に掲載のミニカー写真等(個人撮影)は許可なしで、どのようにお使いいただいても結構です。私個人の創造性はこの世のもの、と言う認識の上で記事を製作しています。
!!!!!!!!!!!!!!!!!!!!!!!!!!!!!!!!!!! Translated in English !!!!!!!!!!!!!!!!!!!!!!!!!!!!!!!!!!!
Part 2: Mattel 1/64 Corvette Stingray C3, 1972 [Tire & Wheel Replacement, Chrome Plating for Added Detail]
This time, I’m featuring
a standard edition Hot Wheels model from Mattel.
This green metallic version came as part of a three-pack set,
and I really liked its subdued color scheme,
so I purchased it via eBay’s “Buy It Now” option.
(This is the packaging for the three-pack set.)
In addition,
various colors are available,
including white, red, silver, and metallic blue.
(Unusually for a standard edition, there are no flashy logos or markings on the body, and I’m personally very happy that it reproduces the stock (unmodified) original condition as much as possible.)
The biggest talking point about this casting is that
it’s modeled after the designer’s actual car:
This die-cast model is a 1/64-scale replica of the real “1972 Cobalt Blue Chevrolet Corvette” that Bryan Benedict—a current senior designer at Hot Wheels—received as a birthday gift from his wife.
Check out the design process for this rare Hot Wheels model here: <https://driving.ca/car-culture/people/hot-wheels-designer-toy-diecast-car>
Now then,
let the 3D modification project begin!
Table of Contents
#Quality of the Die-Cast Model:
#Modification Project:
#Overall Review:
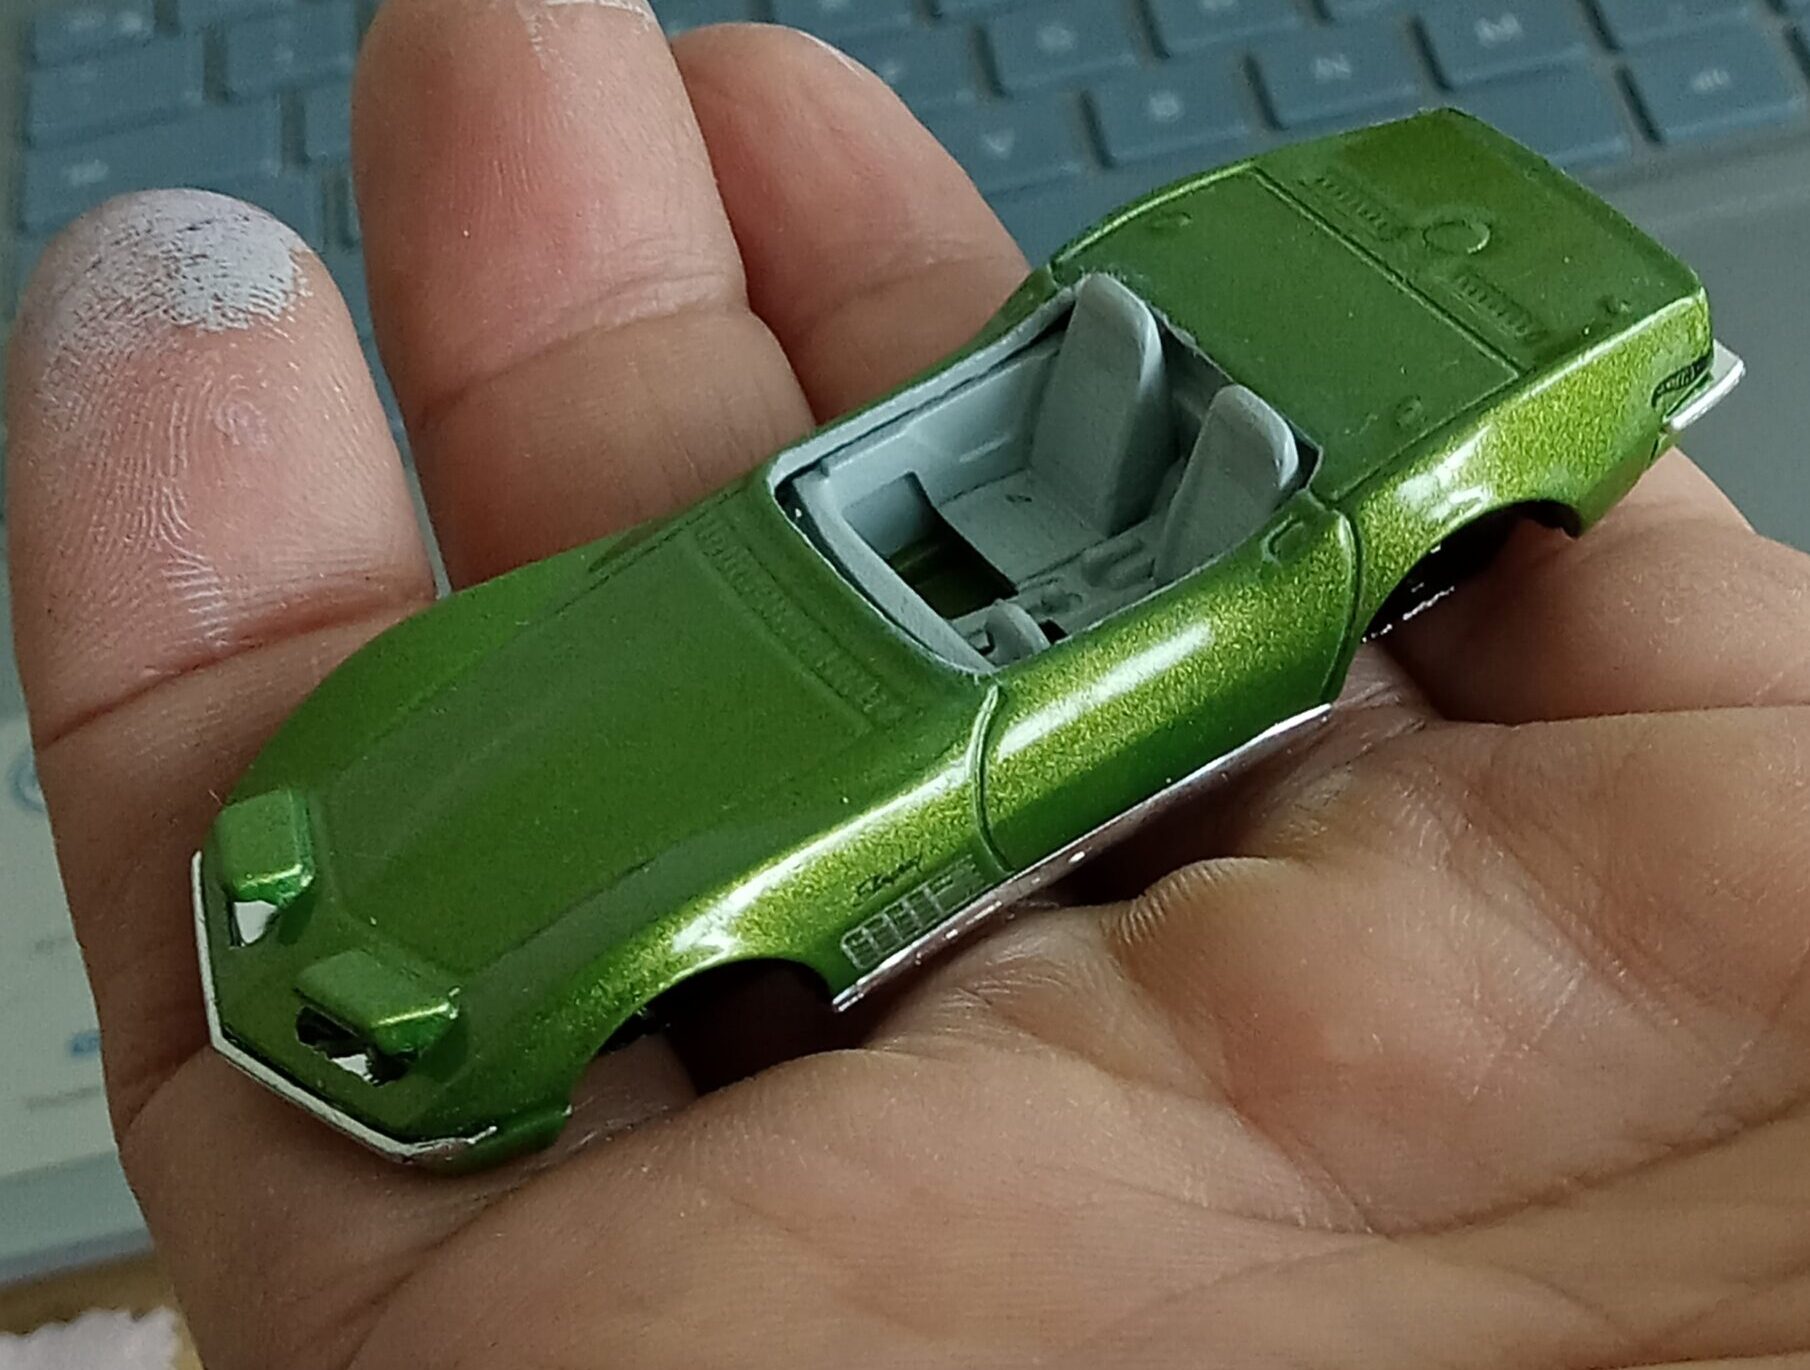
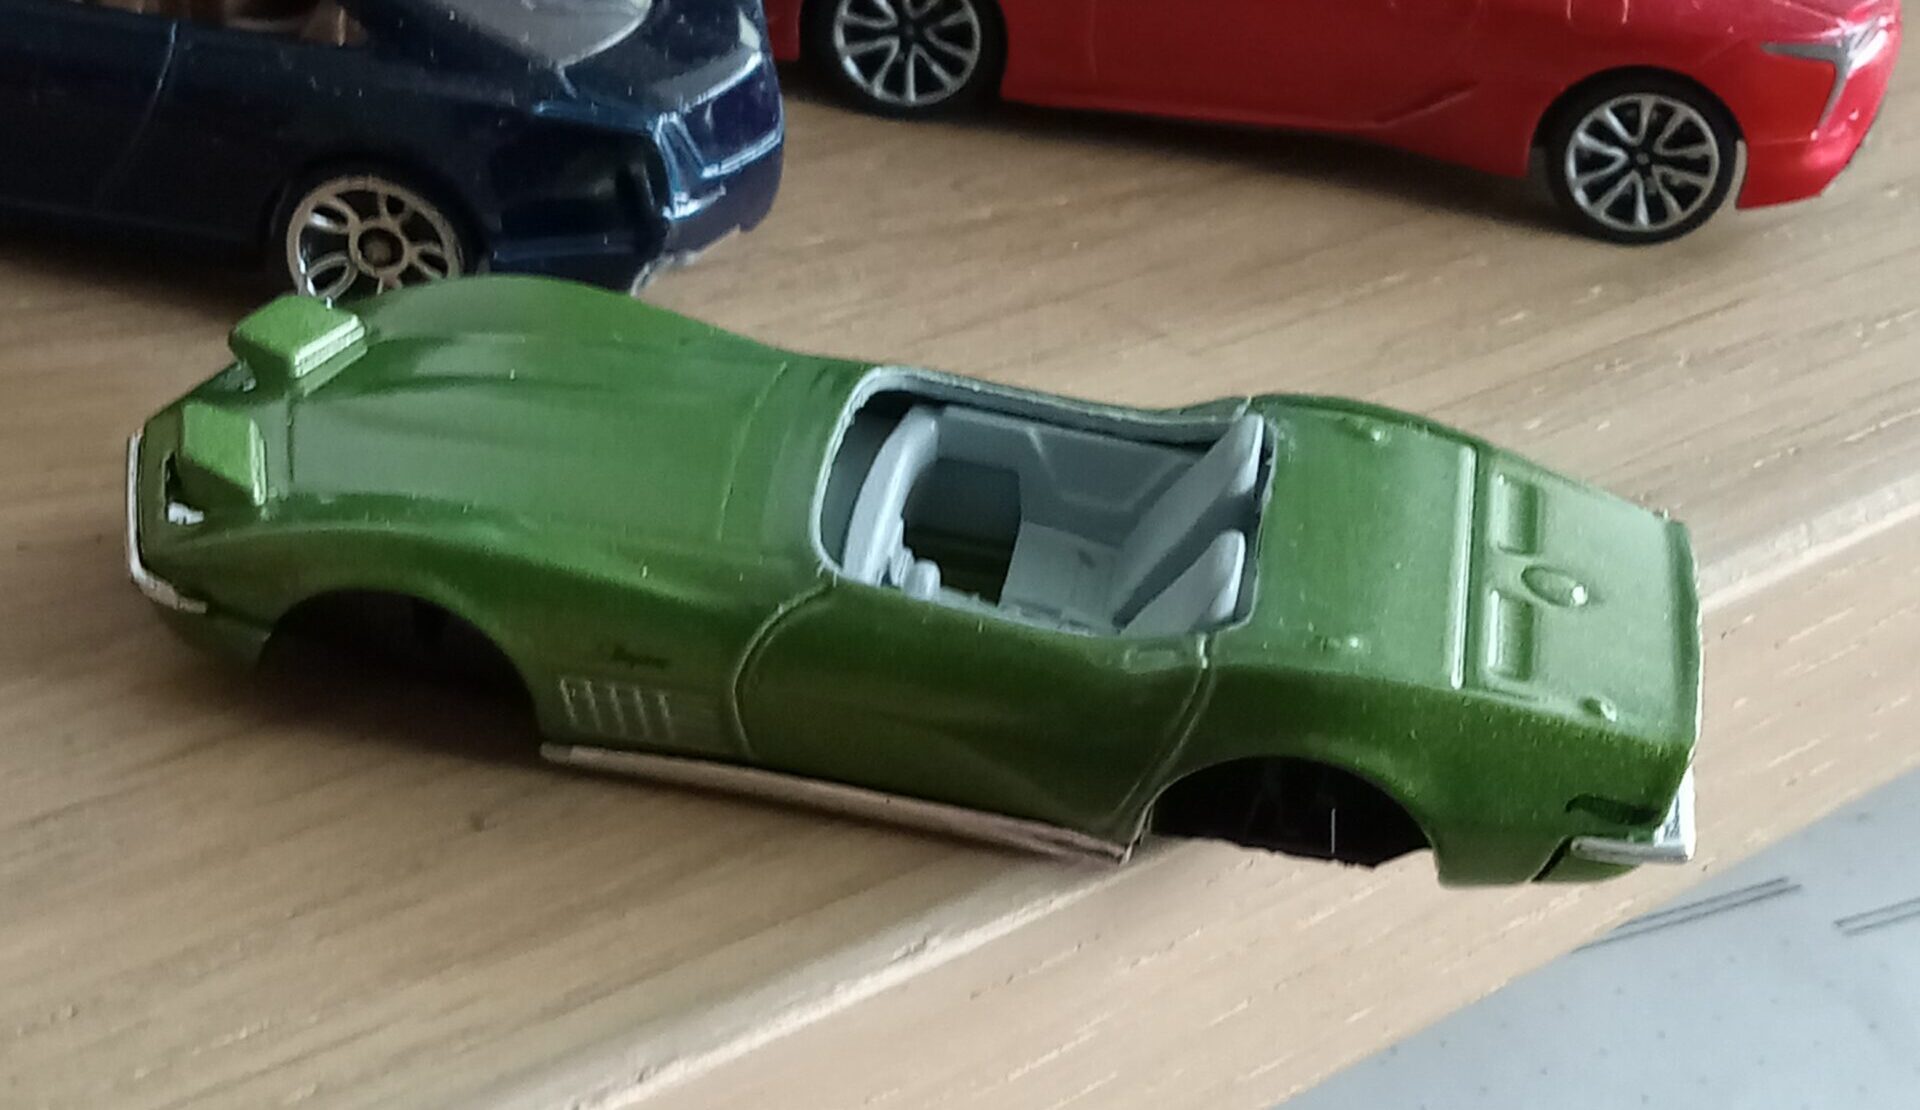
*Quality of the Die-Cast Model: A Perfect Reproduction of the Stock Condition
With standard Matchbox and Hot Wheels models,
this happens from time to time,
and this “1972 Corvette Roadster” is no exception.
* No exaggerated stylization,
* No flashy markings, logos, or character prints,
* Faithful to the real car, with proportions, lights, and grille accurately reproduced—
it’s a product aimed at adult collectors?
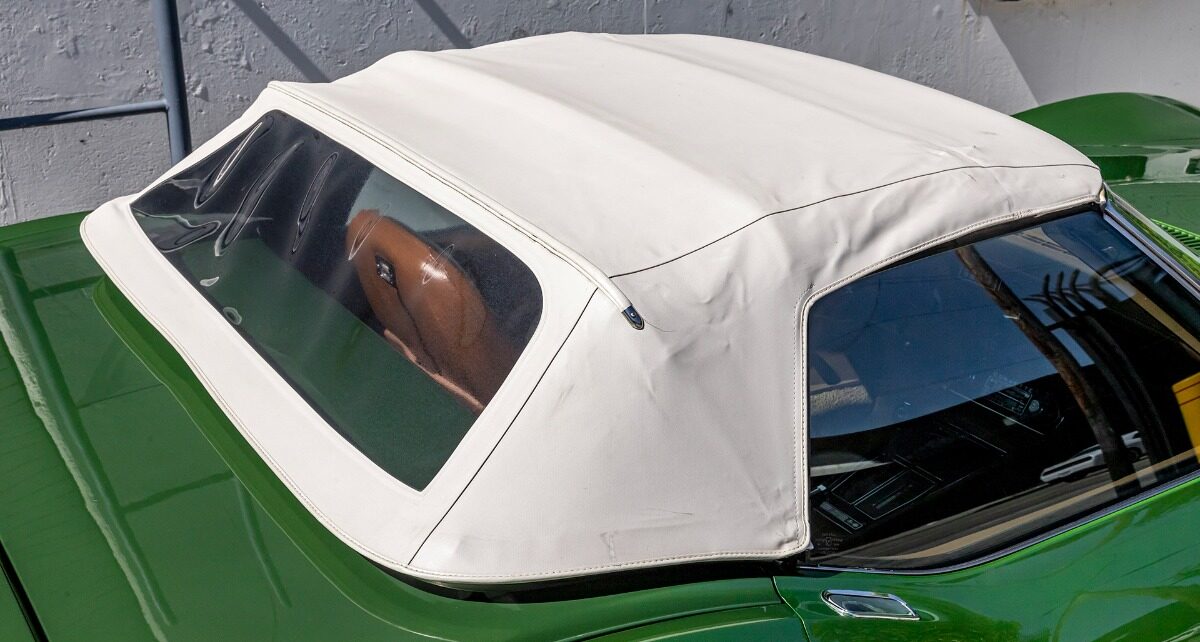
In particular, the Metallic Blue version
is modeled directly after Brian Benedict’s actual car,
and aside from the chrome interior trim,
it features excellent detailing,
including the scoop and taillight prints.
As for a particularly rare gimmick,
* When light is shone on the round transparent section on the underside of the chassis,
* the headlights and windshield light up—a very interesting
mechanism has been incorporated, and you can really feel the passion the designer and engineering team put into this die-cast model.
*Modification Project: Reproducing the stock condition?
#Reference Vehicle: 1972 Roadster
#Pros & Cons of This Model
* Pros:
# Accurate proportions and sense of scale
# The fine detail and depth of the panel lines are excellent
# The bumpers and interior are faithfully reproduced using just a few parts
* Cons:
# The metallic finish on the interior is a bit overdone
# The 14-inch tires and wheels make the car look a bit too low-profile
# Starting the Modification: Smooth and easy!!
[Completed Photos]
[Modification Process]
* Source for tires and wheels:
Now, here are the modification steps.
Preliminary Steps:
1: Use a drill to remove the rivets on the underside of the body and detach the chassis.
2: After masking the interior parts, paint them with matte gray.
3: Remove the Rally Wheels, an optional accessory included with the M2 ’68 Cougar.
4: Use a knife to cut a semicircular notch with a radius of about 3 mm on the interior parts where the top of the axle would make contact.
Highlights:
5: Fine-tune the width, position, and height of the axles to achieve the ideal stance.
Finishing Touches:
6: Apply ink to details such as the panel lines on the doors and hood, the wheels, the lower surfaces around the doors, and the front grille using an alcohol-based marker (approx. 40% concentration). Then, spray with thinner to lift the ink and adjust the intensity.
7: Apply black marker to the underside of the chassis, the inside of the wheel wells, and all areas other than the glass and top surfaces of the headlights (body color) to enhance contrast and create a sharp look
* Overall Impression: It became a gift for a dear friend.
I cut the leftover backing paper from the package into a suitable size and placed it inside a clear die-cast car box, which turned out great.
Moving forward, whenever I find a standard Hot Wheels model with sharp detailing,
* I plan to swap out the wheels,
* or customize it with detailed paintwork,
and continue to
share my creations.
About this blog and its content:
My goal in writing these blog posts is to document how I have satisfied and fulfilled my curiosity and desire to explore “beauty and deliciousness” by elucidating my personal, distinctive criteria for evaluation—including my somewhat unconventional perspective—through my involvement with three-dimensional creation (including cooking).
Consequently, while I pay the utmost attention to the numbers, dates, and minute details that appear in my articles, it is possible that I may occasionally make significant errors or misunderstandings. In particular, key specifications and dates in automotive articles can often be confusing, so I would appreciate it if you would consider them merely as a reference.
For my part, I feel that I insert dates and data into the articles as objective material to create a “flow” that connects my personal evaluations of exterior design and taste to the broader themes explored in the latter half. What I ultimately prioritize are the new “perspectives” and “unexpected connections between information” that emerge from the chaotic jumble of memories in my own mind. The various data points are needed secondarily as part of that “flow” to generate that momentum.
As a slight digression, in the world of rakugo—a form of storytelling I love—there is a playful tradition called “sandaibana,” where a performer weaves a single story using three topics solicited from the audience on the spot. I feel like I’m doing something similar here, using the characteristics of three-dimensional forms and (the taste of food) as my prompts. The countless ideas that flit through my mind during this process are completely unexpected and delightful, often leading me to drastically change the content of future articles or sparking new developments.
How this blog works:
“Spots and lines of curiosity x whimsical mental circuits = unexpected new developments”
This blog may be a bit self-indulgent, but I hope you’ll continue to follow along.
Note: To create the “flow” described above, I use my own miniature cars and home-cooked meals for photos whenever possible. However, I do borrow the absolute minimum necessary illustrations and photos from other bloggers’ articles and company websites. (I edit them to fit the article’s content and post them at the lowest possible resolution.) If there are any issues, please contact me and I will remove them immediately.
Update 2: You are free to use the photos of die-cast cars and other images (taken by me) featured in this blog’s posts in any way you like without permission. I create these posts with the understanding that my personal creativity belongs to me alone.
Translated with DeepL.com
これはCTAサンプルです。
内容を編集するか削除してください。